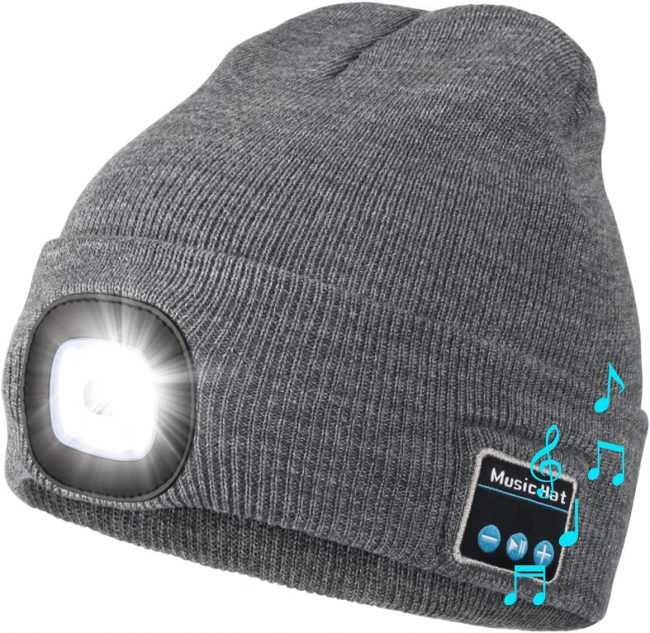
It’s kinda genius. Listen to music, take calls, and actually see what the heck you’re doing at the same time while not looking like a total dork wearing a headlamp in a non-camping situation? Winner. The Bluetooth Beanie Hat comes in 8 striking colors, ok some aren’t striking, maybe none of them are striking actually, but there’s 8 colors. It has both speakers and a microphone built in so you can actually have a full on conversation while you’re running, walking, or doing anything else. Or just listen to music. With volume controls right on the side of the hat. All while keep your head warm with a winter hat. Winter is coming as the kids say.
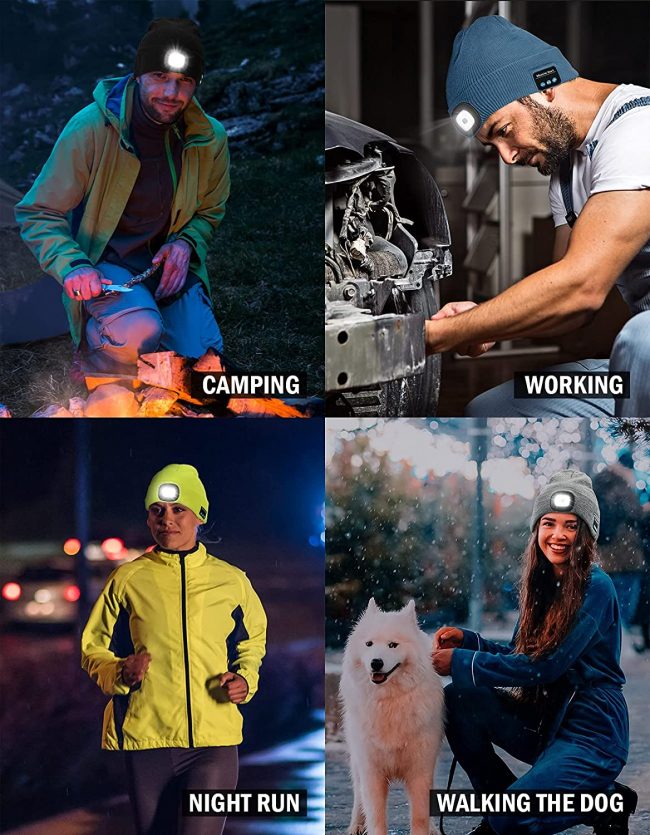
Now there’s other bluetooth beanies out there, but what sets this one apart is the LED headlamp. Sure, you look a little bit like a Minion, but not 100% like one unless you get the yellow one like the person above. And maybe that’s a good thing. The utility outweighs the style here. It’s not that bad in reality. The light is of course rechargeable, via USB. We recommend taking the hat off before charging, but you do you. No wrong way as long as you make it work people. The hat’s made of acrylic and is one size fits most. Not sure what constitutes “most”, 50% maybe? Anyone know? Anyone care? Makes a great gift, stocking stuffer, or fashion statement for dog walkers. Or all 3 at once. Hat.
![]()
Tag Archives: flashlights
The Five Best Tactical Flashlights

Long ago, in a time before smartphones, floundering humans lit their way through the untamed garages and linen cabinets of the world using flashlights. Today these arcane photon-emitting hand torches...
The Five Best Tactical Flashlights
Long ago, in a time before smartphones, floundering humans lit their way through the untamed garages and linen cabinets of the world using flashlights. Today these arcane photon-emitting hand torches...
Facebook blocks gun accessory ads to the under 18s
 Facebook has tightened the rules about what sort of firearms-related content is visible by the site's underage users. From June 21st, ads for weapon accessories, from optics, flashlights and holsters through to bulletproof vests and camouflage gear,...
How To Make A Flashlight – Step by Step Guidelines

Almost every day our friend at best tactical reviews compile various products (Survival tools, Health & Beauty, Kitchen, Home Improvement, knives, flashlight, etc.) review which are high quality and people love to buy regularly.
If you like hiking, hunting or even camping, then you truly understand the importance of having a flashlight handy. A flashlight is a very essential equipment that can save you from stumbling or going the wrong way at night or when you are searching for something under your bed. There are various kinds, sizes, and models of flashlights on the market today. Some are durably made while others are just basic. Also, there are those that are very costly and come with advanced features. No matter the case, a flashlight’s sole purpose will remain to provide light. If you don’t want to break the bank to acquire this lighting device, then you can decide to make one by yourself. But, no offense, you have to buy any ready-mate powerful tactical flashlight to observer their functionality. Then, it will be easy for you to develop one!
This shouldn’t sound tricky as all you need is to get the necessary parts and follow assembling instructions. Many people have managed to create small flashlights that they use in different scenarios. Although such a flashlight may not be as bright as the quality flashlights on the market, it will still be of great use when it comes to lighting needs. Check out our guide below on how to create a flashlight.
Things you require when creating a flashlight
- 3 volt flashlight bulb – acquire a bulb with the right volts you need. Most of the bulbs available range between 2 volts to 3 volts. Running 10 volts through a 3 volt bulb will just make it blow out even before the lights come out. Thus, stick to the rights volts.
- 2 D batteries – choose batteries that will light your flashlight for a long period of time. In most cases, people use 2 batteries in a series. Two 3 volt batteries will give you 6 volts. Take a strong bulb that can handle the total volts if you want to combine more than two batteries.
- Glue – ensure you get sturdy glue so that you can keep your assembled parts intact.
- 2 brass fasteners – these will help you link the negative and positive ends of the battery and act as an on/off switch.
- Electrical tape – this is a major item when creating a flashlight as it will hold together the batteries and other parts. Also, it may be used to hold the wire on both the negative and positive ends.
- Bathroom size paper cup – without this paper cup, the light emitted from the bulb will be blurred and won’t provide the much needed light.
- Paper clip – this will act as the switch for the flashlight after being assembled.
- Number 22 insulated copper bell wire.
- Small cardboard piece for holding bulb.
How to create a normal flashlight
- Begin by cutting the cardboard tube lengthwise and flatten. Then insert the two brass fasteners with the clip connected to one of the fasteners.
- Cut two wires and strip both ends. Connect one wire to each fastener and cover with electrical tape.
- Cut a small cardboard piece to fit over the top of the tube. Create a hole in the center of the cardboard piece and place the light bulb.
- Wrap one of the wires around the body of the light bulb.
- Connect the D size cells so that they are in series and use electrical tape to hold them together. Put the cells in the cardboard tube, wrap the tube around the cells, and apply tape to secure it.
- Use tape to secure the light bulb assembly to the top of the tub, make sure the bulb makes contact with the positive battery terminal.
- Secure the on the other side of the tube to the negative battery terminal using electrical tape.
- Cut a hole in the bottom of the paper cup and apply the tape to secure it over the bulb on the top of the flashlight.
- You now have a functioning flashlight. Closing the paperclip switch allows current to flow through the circuit and light up the bulb.
How to create a water powered flashlight
This type of flashlight is created in a similar way as other kinds of flashlights. The only difference is that water is added to this flashlight.
- Create the major source of energy
Take the power cell with two metal stripes which are copper and zinc that serve as anode and cathode respectively. Take the copper strip and wrap and wrap it with three sheets of toilet paper. Then coil well the zinc strip unitedly with the remaining two sheets of toilet paper. The moment this is done, take some copper wire and tie it around the power cell so as to secure the paper from getting torn when wet. Get a pulley, which should fit well on the PVC coupling, creates two holes in the metal strips to go through, place the strips in the holes and seal with glue.
- Build the circuit that powers the LED light
This circuit is a bit different from the usual one as it needs the transistor to be fitted below the LED’s board, while at the same time the toroidal core should go above it.
- Combine the two from above to make the water powered flashlight unction
What you have to perform is to solder the wires on the power cell and add glue around the coupling. Put the LED’s reflector onto the coupling and enable it to dry.
- Create the water storage cylinder
At this stage, you require a PVC pipe, place a cork or a small piece of acetate to close up the non-threaded side. This will enable you to fill it up with water during the succeeding step.
- Adding the water
Since the pipe is well closed on one side, bring it to the tap and fill it. You can apply other liquids as well, not simply the tap water, which could offer just half an hour of light. Instead, you can apply salt water, which is rich in electrolytes and allows you to apply the flashlight for up to 2 hours, but in case you choose something like Gatorade or vinegar, you may be in a position to have constant light for around 10 hours.
The above is what you need to create either a normal or water powered flashlight. Use it while out camping, hiking or for other purposes without worrying about the unforeseen circumstances like rain or other harsh environmental conditions that you might encounter.
Conclusion
There are differently priced flashlights on the market. Some are very costly while others are favorably priced. Depending on what you want to do with a flashlight, you may go for a simple one or the sophisticated type. If you prefer simple but best flashlight due to limited use, you can as well make one by yourself through following the simple steps above. Flashlights are very easy to make as long as you have the right parts to make one. All you need to do is to follow the procedure for assembling them and make your own. Such a flashlight is cheap and may offer the brightness that you actually need. Hope you have found this article to be of great help in your quest to making a flashlight of your own.
Tactical Self-Defense Flashlight Comes With Spikes
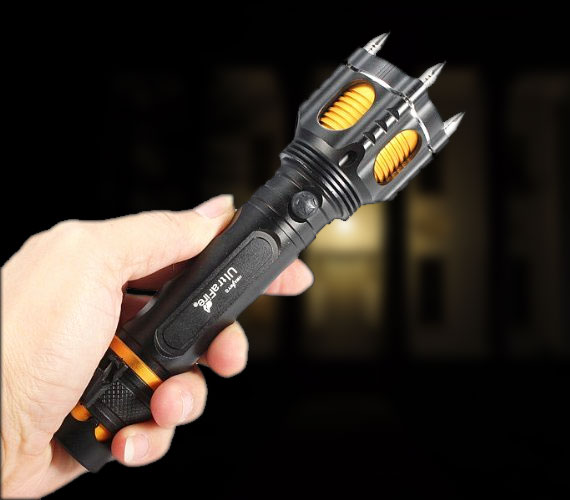
Flashlights are generally meant to help you find your way in the dark, but when they’re bright enough they can also help you ward off would-be attackers. You’re meant to shine the light straight in their eyes and use their temporary blindness to get away, however some determined miscreants might still rush at you even blinded. That’s when the spikes on the Tactical Flashlight Self Defense Torch would come in handy. It’s not the ultimate in self-protection but a few good spike hits to a soft spot somewhere might give you an edge if it ever comes down to it. It measures 6.8 inches in length and weighs 7 ounces. It’s $17.
[ Product Page ] VIA [ OddityMall ]
The post Tactical Self-Defense Flashlight Comes With Spikes appeared first on OhGizmo!.
Bazinga: Big Bang Theory Light Up Umbrella

If there’s one thing Sheldon and Leonard hate it’s getting wet. That and people who doubt their intellectual superiority. Or something. Stay dry the Big Bang Theory way with the Bazinga Light Up Umbrella. Not only does this umbrella shield you from the elements, it also lights up in not one but count them two ways. The handle lights up in red and at the bottom of the handle is a flashlight. Neither precipitation nor darkness shall stop this scientist from getting to his lab (however a social awkward interruption by someone of the female persuasion might do the trick). Bazinga!
![]()
Bazinga: Big Bang Theory Light Up Umbrella
Check out our Craziest Gadgets Shop for unique gifts!
Save Up To 50% off Tools Gifts for Dad

Father's Day 2014 is on June 15th. Now is the time to find great deals on hot Father's Day gifts. Amazon just launched a special Father's Day Tools Sale saving you up to 50%. Amazon offers deals on...
Tactical BBQ Fork with Laser and Flashlight

As long as we’re adding lasers to everything (remember the laser guided pizza cutter?, why not the BBQ fork? The TGX Tactical BBQ Fork adds both a laser and a flashlight to a 2 foot long stainless steel barbecue fork. I’m not sure why you’d need the laser other than to show off but the flashlight is certainly useful to see what you’re doing at night.

On second thought, showing off is half of barbecuing anyway, right? It’s really the missing link to bbq- you’ve got man, beer, fire, meat, and now lasers. Put that on the back of a large pickup truck at a sporting event and you’re now a real man’s man. Grunt.
![]()
Tactical BBQ Fork with Laser and Flashlight
Check out our Craziest Gadgets Shop for unique gifts!
Laser Guided Pizza Cutter: Pew Pew Pizza

Take your pizza cutting to the next level of accuracy and awesomeness with the Tactical Laser-Guided Pizza Cutter. This 100% necessary kitchen tool combines a standard pizza cutter with a class II laser pointer and a flashlight. The laser projects a perfectly straight line across your pizza for military style precision and straight edges to your slices.

You can also cut pizza in the dark with the flashlight mode. Helpful for those times when the enemy box top closes in on you and ends up blocking your light. The laser pointer/flashlight scope is detachable so you can wash the cutter part. Hit the target every time.
![]()
Laser Guided Pizza Cutter: Pew Pew Pizza