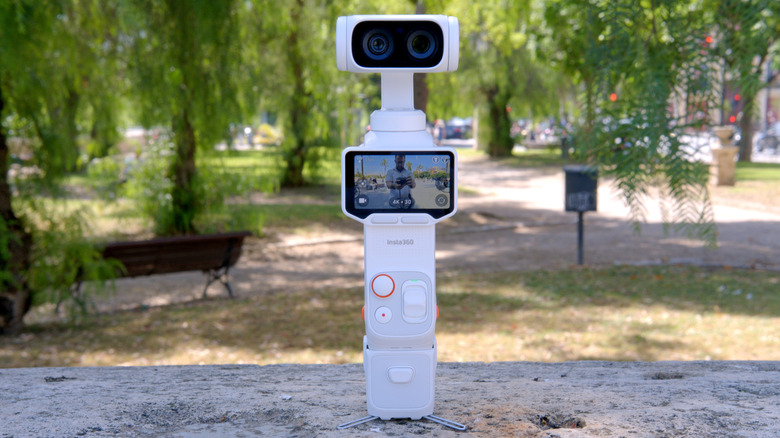
Insta360 Luna Ultra review: Let the gimbal camera wars begin
Insta360's first gimbal camera is a high-powered Osmo Pocket rival that you can actually buy.
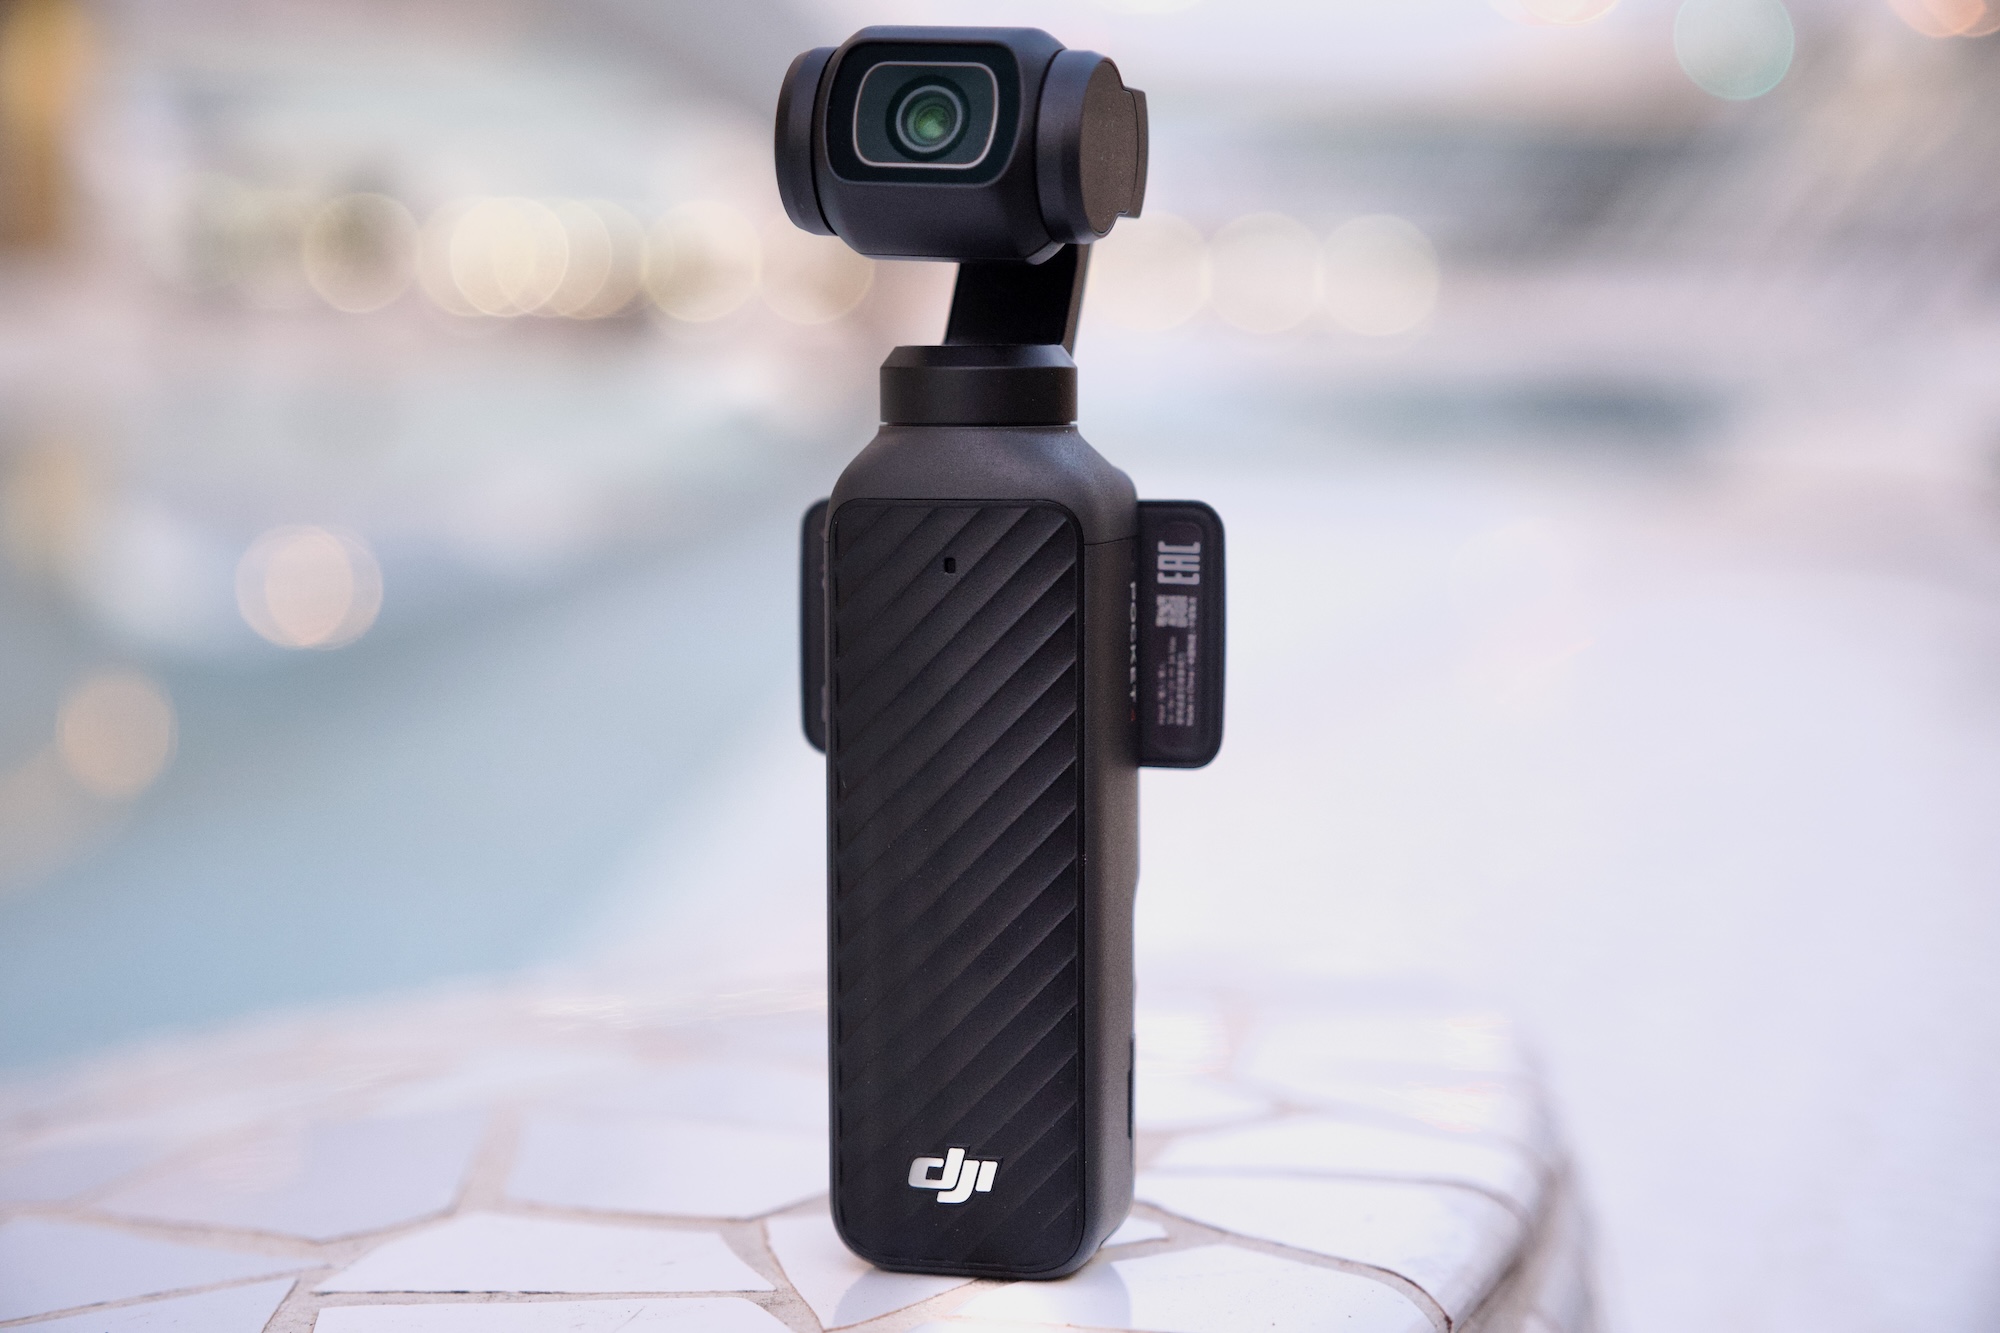
DJI’s Osmo Pocket 3 gimbal-camera was a category-defining camera. Two years since its launch, everyone from vloggers to pro film makers continue to upload how-to guides and gushing reviews to YouTube. When the Osmo Pocket 4 landed at the FCC at the end of 2025 (followed by a credible leak), creator forums and Reddit threads started to chatter with excitement. Over the following months the Pocket 4 leaked again and again, to the point where there’s very little that someone with a passing interest and an internet connection doesn’t already know about the camera. But DJI chose today to give us the official reveal, so we’re here with the full review which, remarkably, does contain some surprises.
For those who were waiting for official, confirmed specs and information, here’s a rundown of the headline new features of the Osmo Pocket 4. The camera is still 4K, but comes with an updated 1-inch CMOS sensor that DJI says is good for another two stops of low light performance (for a total of 14). The camera retains the 20mm equivalent, f/2.0 lens but squeezes in an improved max framerate of 240 fps (up from 120 fps) for up to 10x slow-mo. The Pocket 4 can also shoot in full, high dynamic range 10-Bit D-Log, upgraded from the more lightweight D-Log-M available on the Pocket 3. Shutter speeds are now expanded and go right down to 1/4 for extreme light effects.
Hardware changes are few, but do include two new buttons below the 2-inch display. One is a dedicated zoom button and the other you can assign a function from a selection of common tasks — rotating the gimbal, toggling recording presets and so on. You can assign up to three different controls to this button via single, double and triple clicks. There’s also 107GB of internal storage. You can still use SD cards, but you don’t need to if you don’t want to.
That zoom, DJI states, is good for 2x “lossless” zoom while shooting in 4K and 4x in 1080p. The Pocket 3’s 2x Mid-Tele zoom had to be activated first, but now you can use lossless zoom any time and/or while using ActiveTrack face-tracking. It’s available in Portrait mode, too, but if you’ll need to have the screen in the horizontal position to access the buttons, which means your viewfinder/preview will be teeny-tiny as it’s rescaled for 16:9.
DJI has added on-camera “Film Tones” which are similar, functionally, to film simulations seen on Fujifilm cameras. There are six to choose from at launch and include subtle and not-so-subtle stylized color tones that apply different “moods” to your videos without having to manually color grade or use a LUT after the fact. As for still images, there’s an on-screen button for “Live” photos similar to what you might find on an iPhone. Live photos were sorta-kinda possible on the Pocket 3, but they are a little bit easier this time around.
A lot of DJI drones include Gesture Control, which lets you start/stop recording and engage ActiveTrack from a distance, and that’s new on the Pocket 4 too.
On the audio side of things, the Pocket 4 now has “audio zoom,” so if you have two people in a scene and do a close up on one of them, the volume of their voices will be boosted. It’s a little crude, but it could be handy in certain situations. The Pocket 4 can also record spatial audio via the three onboard microphones, good for live music and other situations where sound placement might matter.
Lastly, the Pocket 4 has a modular component. At launch, there’s a magnetic fill light that clips onto the gimbal and can be configured via the camera menus. It’s included in the creator combo and opens the door for other modular accessories, though it’s limited to things that can sit on the gimbal without causing problems. A shotgun-style microphone, for example, could be possible.
Battery life also gets a slight boost over the Pocket 3 with a 1,545mAh cell — which is almost a 20 percent increase. That translates to an extra 30 minutes or so of recording time for an average of two and a half hours at 4K, more if you shoot in lower resolutions or are using the camera for photos.
What we don’t see here, an item that you might have been hoping for, is any type of optical zoom. What’s more, the max resolution in vertical mode remains capped at 3K. You still have to rotate the camera if you want full-sensor, 4K video in portrait.
The popularity of the Pocket series is thanks to its combination of high-quality video and a portable form factor. The Pocket 4 builds on this winning formula with exceptional quality for the camera’s size. The new 1-inch sensor is noticeably more detailed than the Pocket 3 and DJI’s claim of improved low light performance is backed up by stellar results. I took the Pocket 4 out at night and it bested its predecessor with far more dynamic range and better exposure in shadowed areas that come out dark or fuzzy on the Pocket 3.
Image performance in general is impressive and a definite strong point for a camera of this size. Colors now look more natural than ever without looking over-saturated. Similar shots on the Pocket 3 look a little flatter when viewed side by side. I like that the f2.0 aperture still provides some light bokeh, and when combined with the new D-Log mode, there’s plenty of scope for cinematic shots. These would be harder to achieve with a phone and don’t require the setup and planning of a mirrorless camera.
With the extended shutter speeds you can get some interesting effects — dramatic light trails in traffic for example — but it’s going to over expose any other light source in your shot. So, proceed with caution. The Pocket 3 bottomed-out at 1/25, but the Pocket 4 goes right down to a dramatic 1/4.
The 2x lossless zoom surprised me. At first, I was sceptical about DJI’s claims of it being lossless, but it does seem to maintain visual quality without noticeable loss of detail. Though if you want to use that 4x zoom in 4K, expect to see some digital artifacts. The Pocket 4’s 20mm lens is particularly suited to wider, vlog-style shots, so a usable zoom is a welcome addition. It’s worth noting that it’s better used for static and tripod shots as any gimbal movements and keeping a subject in frame can feel like steering a ship.
Until now, if you were aiming for a more cinematic style, you had to get comfortable shooting in D-Log-M and boning up on color-grading. DJI provided some filters in the Mimo app for a quick and dirty way to add a mood or vibe to your videos, but that still caused some friction in the workflow. The new film modes are on camera, so achieving something more stylized is now just a menu tap away. I’ll be honest, I’m not a huge fan of the selection available right now as they’re either too hot or too cold. Of the six, Warm and Movie seem the most usable for cozy-style landscapes or B-roll cityscapes.
DJI hasn’t shared much about whether these are just on-camera filters or true film simulations. Movie and Retro, at least, were already available as filters in the app. If the full effect is too strong, you can dial down the intensity, but that’s the extent of the control. Their addition here expands what you can get out of the camera without using the app or having to drag things over to your editing software. It’s unclear if we’ll see more options in the future, but they’re there if you need them.
One of my main complaints with the Pocket cameras was the zoom. More specifically, controlling it with the joystick. It always looks slow, inconsistent and a bit amateur when zooming in manually. The new button provides an instant punch-in that can be used for an intentional, attention-drawing effect. I can’t count the number of times I’ve ruined a shot because I thought I had the joystick set to zoom, but it was still assigned to panning (you had to toggle its use via an on-screen button). With the physical button, I can close in on a target instantly and never worry about accidental pans.
The second, customizable button is also a real usability upgrade. If, like me, you’re constantly recentering the gimbal, you’ll know that the usual double-click on the joystick is often unreliable. Now you can assign that action to the button plus two more controls from a selection of common actions. I have it set so double-click switches to one of my manual recording presets and triple-click locks the gimbal so I no longer have to jump into the main menu to switch gimbal modes. It even works while recording if I spontaneously decide I want to keep my horizon level.
Changing what this button does is simple: Long-press it and it’ll jump into the settings where you can choose its functionality. There’s still scope for some refinement, as although a double click can instantly start recording with my preferred settings, clicking again doesn’t stop it. You have to use the record button. This makes some sense, but I’m used to using the same button to stop/start recording, so intuitively I thought that might be the case here. Sadly not.
Something a little unexpected in the Pocket 4 is the addition of spatial audio. Using the three built-in microphones, the theory is you should be able to hear where sounds are coming from — though you’ll need headphones on for the effect to work. In practice, it does create a different audio ambience, one where sounds feel more relative to their location, but it comes at a price. If you speak to the camera, even if you’re nearby, your voice will sound distant and muddled so spatial audio is something you’ll want to use intentionally and certainly not as a default setting.
The same is true for that audio “zoom.” To be fair to DJI, I’ve never found an audio zoom I truly liked. You can’t capture better audio than what the microphone is receiving, so amplifying it in any way isn’t going to improve it beyond what you can do with editing software. In a pinch, this might help with interviews when you have multiple speakers, no external microphone and need to publish quickly, but I’m reluctant to recommend it for anything else.
The new “Vocal Boost” is a more useful option under the Pro settings menu. When activated, it enhances voices by lowering background noise and other sounds. Again, it’s not a fix for getting good source audio, but in noisy run-and-gun vlogging environments, it can improve your chances of capturing something useful with just the internal microphones.
Fortunately, DJI has a much better solution that was already a feature of Pocket cameras — native connectivity with its wireless microphones. The Creator Combo now includes a single DJI Mic 3 transmitter and charging cable, and it’s the absolute best way to get YouTube-ready audio from the camera. One nice tweak with the Pocket 4 is that you can now export videos with both the built-in and external mic audio as one 4-channel file. Open this in your video editor and you can mix and cut between mic and ambient audio without having to deal with separate files as before.
The fact that there’s no real direct competition for the Pocket series is surprising. For true, like-for-like gimbal cameras, expect to find alternatives from brands you’re less familiar with — such as Agfaphoto or Feiyu. Most of the nearest competition will be action cameras like the GoPro Mission 1 or Insta360 Ace Pro 2. Both of these are great portable cameras with solid stabilisation, but they unsurprisingly favor that wide, bright and sharp action-style footage. The Pocket 4’s nearest rival for stabilized vlog-friendly filming is still the Pocket 3.
This raises the question of whether the Pocket 4 (£445) is worth it over the more affordable Pocket 3 (£389) at launch. (DJI can’t directly sell the Pocket 4 in the US, so official prices are in British Pounds or Euros.) Both are great, all-purpose, vlogging cameras versatile enough for recording in a variety of situations — though less suited to rugged/action filming thanks to the delicate mechanical gimbal. It’s likely that the price difference between the two will expand after the launch window.
The Pocket 4 might not bring defining new features like optical zoom or higher resolution, but it’s a better camera in every way that matters. There are also several quality of life improvements that make it incredibly compelling. For the extra money, you’re getting better image quality that will pay you back over time. The new buttons make the camera even more convenient and that onboard storage alone effectively closes the price gap — not to mention the huge convenience that feature alone brings with it.
Hardcore fans might have been hoping for more “dazzle” with the Pocket 4. In reality, DJI delivered a camera that builds on an already winning formula in ways that actually matter: higher quality video, improved usability, modular capabilities and longer battery life. It’s hard to argue with that.
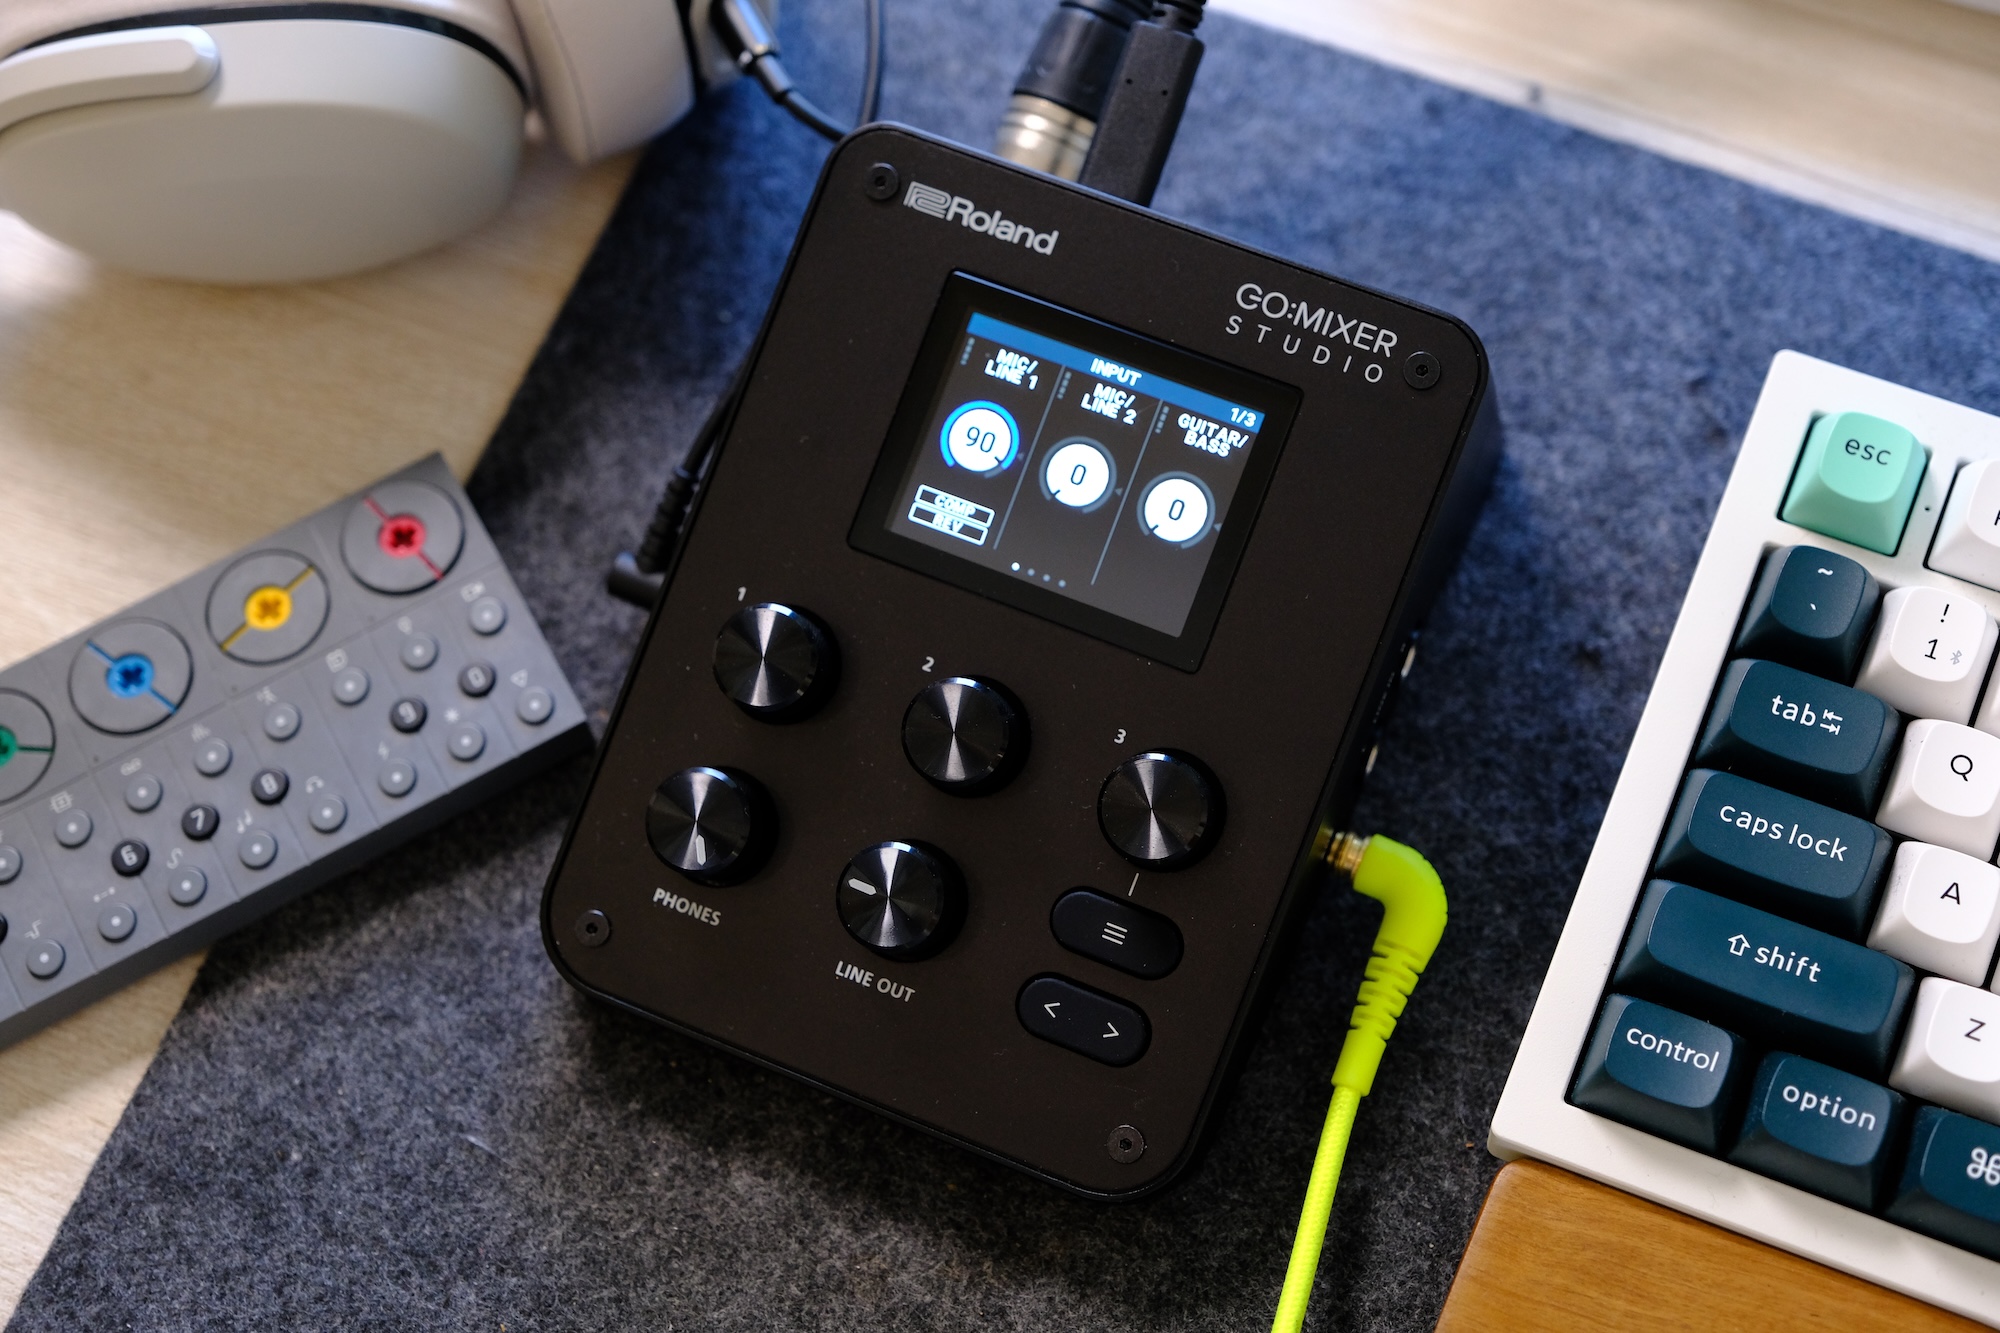
This article originally appeared on Engadget at https://www.engadget.com/cameras/dji-osmo-pocket-4-review-the-only-vlogging-camera-youll-ever-need-120000374.html?src=rssWay back in 2017, Roland carved out a little niche for itself with the introduction of the Go:Mixer line. The small, portable audio interfaces are a convenient way to connect a mic and multiple musical instruments (or audio sources) to your phone for more professional public performances or on-the-go recording. At this year’s NAMM show, the company unveiled the latest in the family — the Go:Mixer Studio — and it’s the most premium version to date.
The Studio adds a display, multitrack output and onboard effects along with a far more luxurious design. At $300, there’s also a far more luxurious price tag. The Go:Mixer Pro-X was already a capable option, and competing products from Mackie and Zoom are also vying for your hard-earned musical dollars. The big question, then, is can the Studio make a case for itself at this elevated price point?
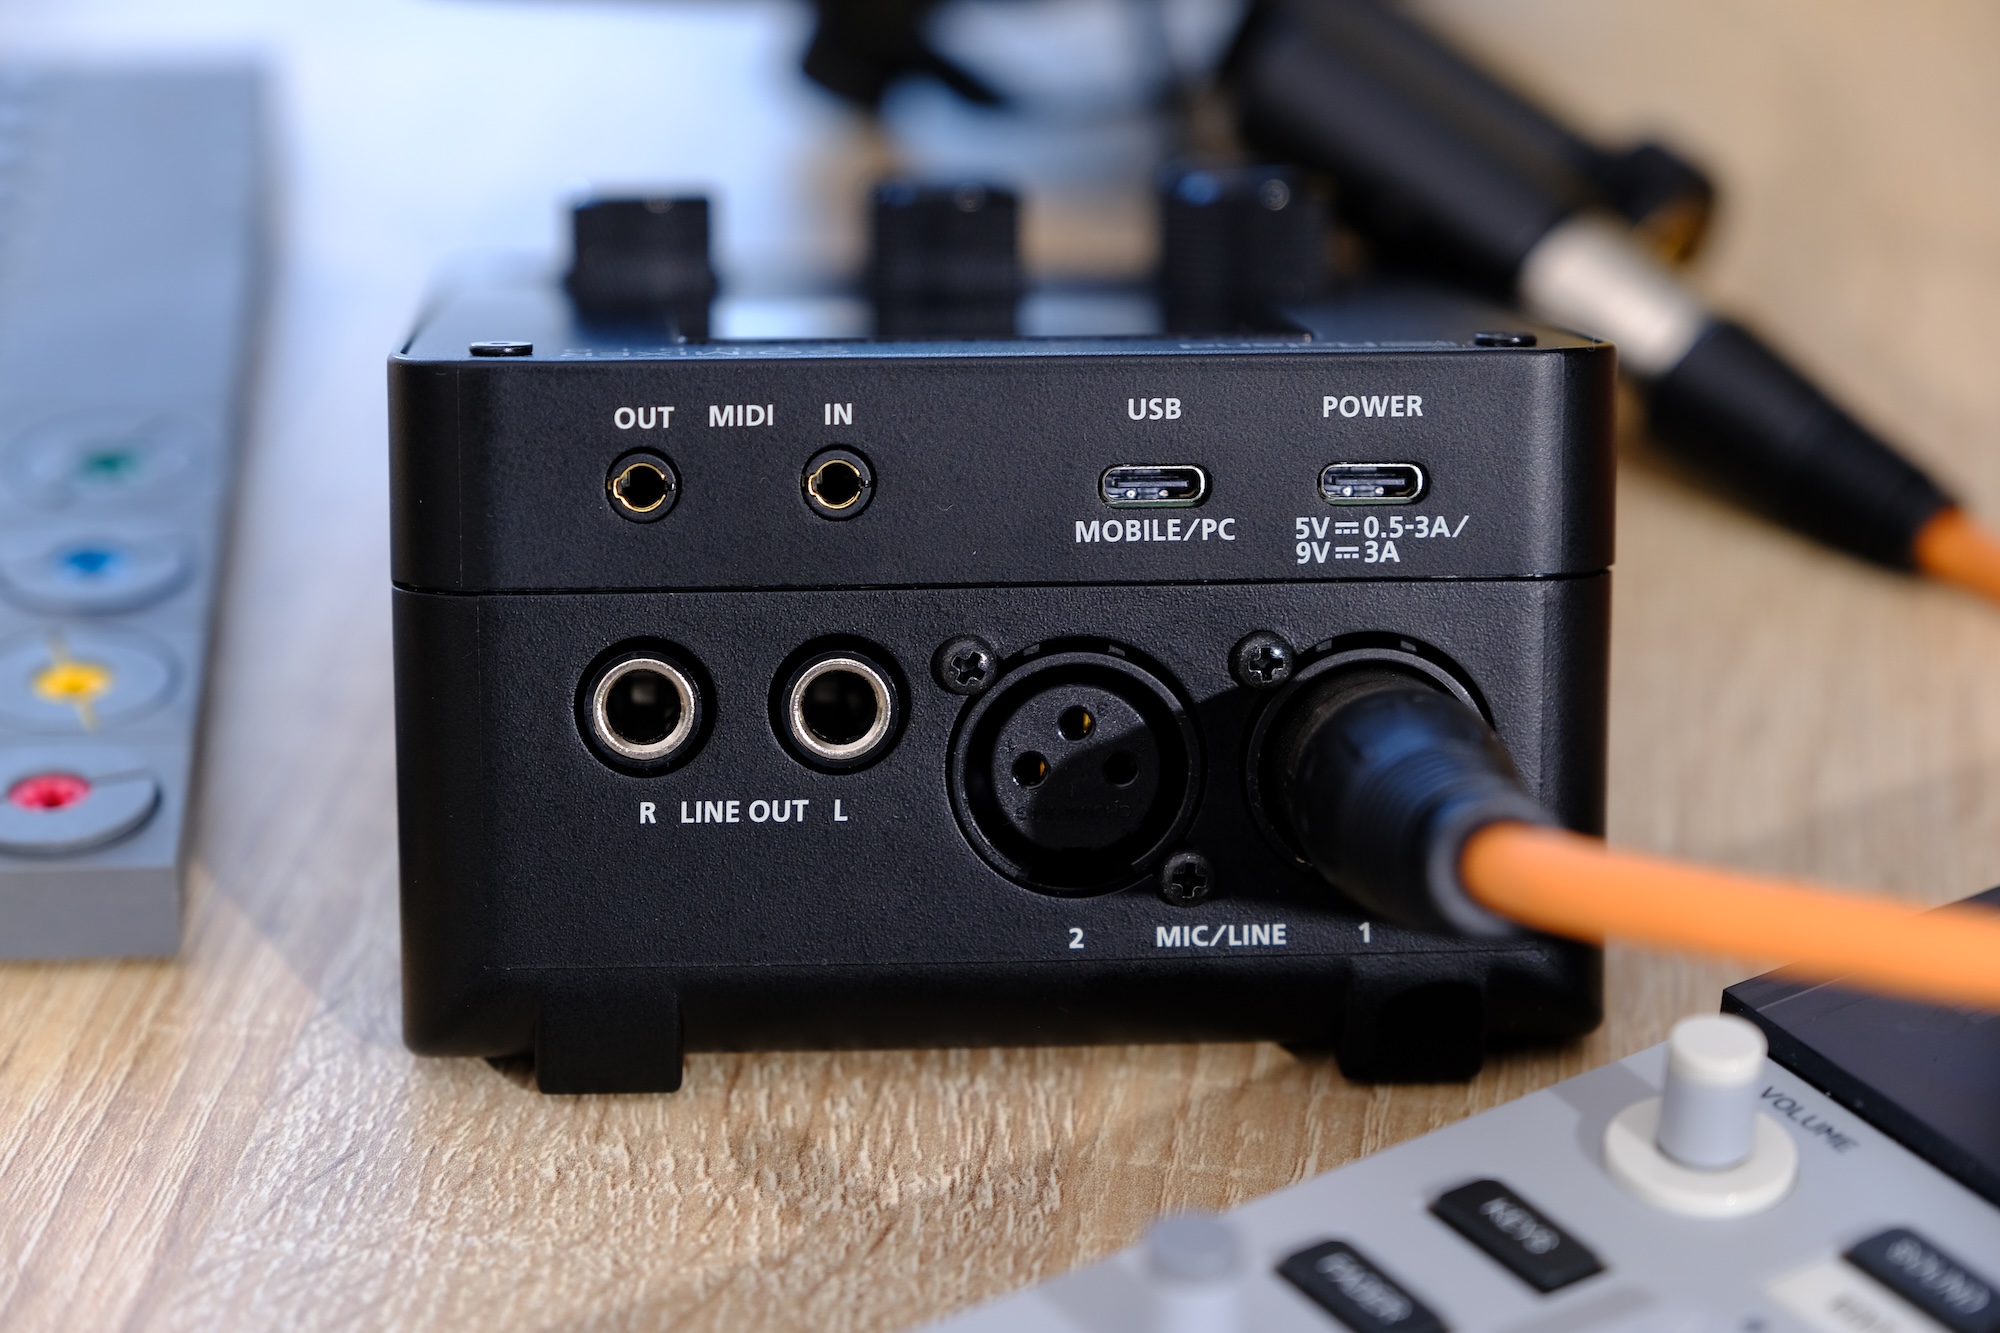
Right off the bat, in terms of usefulness, the Studio is a solid step up from the Pro-X thanks to the addition of a second XLR port. So if your band is a duo, or you simply need two microphones, each performer can now have their own. This also opens the Studio up for basic podcast situations, too. Technically, you could always connect more microphones through other inputs, but now you can do so without adapters or additional hardware like preamps. The rest of the connectivity remains similar with ¼-inch line-in and guitar ports, headset mic support, a 3.5mm aux input and USB-C for audio from your phone and connecting to the app.
Other headline upgrades include a much higher maximum sample rate of 24bit/192kHz (the Pro-X capped out at 16bit/48kHz) and there’s MIDI connectivity for the first time in the Go:Mixer series. The new effects consist of a compressor, EQ and reverb. EQ and compression are available at the channel level, allowing for a good amount of creative control over your mix, while reverb is global. There’s a decent selection of different types of reverb, too, with enough controls to configure them to your taste. I found some of them to be a bit robotic, or not very musical, but others sounded more traditional and appropriate for my vocals and synthesizers.
The Go:Mixer series was doing just fine without a display up until this point, but the benefits of having one are instantly clear. On the Pro-X, the only visual feedback for your levels was a solitary LED that indicated your audio was in the red. If you had multiple inputs, you might not even know which one was too loud. The first benefit of the Studio’s display, then, is visible VU meters. They’re not huge, and the display only shows information for three tracks at a time. This means you might have to page through a few screens to see the one you want, but it’s infinitely more useful than before.
The next obvious advantage of the screen is being able to control settings on the device via a menu. Navigation is intuitive, with the screen divided into three sections, corresponding to the three knobs just below it. The default screen, for example, shows the channels Mic 1, Mic 2 and Guitar/Bass. Turn the first knob clockwise to change the gain of Mic 1. The second knob for Mic 2 and so on. Click a knob and, where applicable, you’ll enter a sub-menu where those three dials control whatever is shown above them. This dynamic system works pretty well and took seconds before it felt natural.
The main limitation is that you can only see three of the mixer channels on screen at a time and there’s no way to manually reorder them. If you have a microphone connected and USB audio playing at the same time, you can’t see the levels or control both of those things from the same screen. You have to keep paging screens back and forth.
The good news is that Roland’s Go:Mixer Cam mobile app does offer a visual mixer that lets you see more or less every channel on screen at once and adjust levels quickly that way. It’s primarily designed for creating videos of your performance, but it doubles as a remote mixer if needed. There is one caveat with the app, though, which is that you won’t be able to use your phone as a USB audio source — say, for backing tracks — if you want to record video with the Go:Mixer Cam app. That’s something to be mindful of.
The app does have a cool feature, which could also be a lifesaver: You can change the “mix” after recording. If you record a performance, but find that your vocals are a bit low, or your synth is too high in the mix, you can adjust the levels and re-export it with better balance. You have options to export as video or audio only, so you can share one to YouTube and then a version for Soundcloud all from the same app. Small detail, but if you want to use the app and have the mixer sample rate set to something other than 48kHz, it’ll warn you that it needs to revert to 48kHz and restart the device before you can carry on.
If you prefer recording on the desktop, there’s also a GoMixer Editor app for Windows and Mac. It’s actually a much easier way to change settings and see what’s going on thanks to the extra visual real estate. The EQ section for each channel looks like a regular software EQ where you raise or lower points on a frequency chart. The compressor also has visual feedback to show when it’s active, which is lacking on the device itself. Obviously, the Studio has a mobile focus, but the desktop app has two big selling points.
First, if you prefer to set your mix levels, compression amount and so on at home, you can do that more easily with the desktop app and then save it in a memory slot. You can then quickly recall this “Scene” on the device while out at a gig. The second is that, for the first time in the series (according to me at least), the Studio is a viable mixer and audio interface for the desktop. The build quality is solid and weighty, not like the light plastic of previous models. It feels premium and this could just as well be used at home for streaming and podcasting as much as on the go. The desktop app makes it even more useful in this scenario.
In terms of what’s missing, this might be very use-case specific. I enjoy using this for electronic music production or pseudo DJ type performances. As such, I’d love to see at least one fader rather than just knobs, but this is true of every model to date. I’d also love for there to be a way to see all the channels at once on the device’s screen. I know it’d be a bit cramped and there’d be no easy way to adjust the mix at the same time, but as an overview you could drop into, it might be handy. And if we’re out here making wishes for any Studio Pro model, an SD card slot for native recording would really elevate the portability element so you wouldn’t need to connect a phone, just a power bank.
Roland has a few competitors in this space, most notably IK Multemida which makes a few portable interfaces. Perhaps the most similar is the iRig Pro Duo and Quattro. The Duo comes in a little cheaper than the Studio at around $235 but lacks a display and build quality. I also personally find IK Multimedia’s apps, while functional, less user friendly. Mackie has the M Caster Studio ($200) which adds Bluetooth connectivity but has fewer physical ports — that one too is a little older. Zoom’s interfaces often center on their ability to record directly onto the device, but have more of a vocal/spoken word focus. The H5 Studio ($299) has a display, built-in mic and onboard recording, but its mixer functionality and outputs for live performance are secondary features.
For musical performers, Roland continues to dominate this niche, and the Go:Mixer Studio is clearly the company’s most refined interface to date. The connectivity covers most use cases, even podcasting, and the layout of the dials makes it easy to use in live environments. The display is a welcome addition that goes a long way to making this feel both more useful and more premium. Perhaps the biggest selling point this time around is that the Studio no longer feels like an extra interface you bring with you for live gigs. It can easily be your main desktop audio interface too, making that $300 price tag suddenly feel a lot more palatable.
This article originally appeared on Engadget at https://www.engadget.com/audio/roland-gomixer-studio-review-portable-professional-and-plenty-of-polish-130000723.html?src=rssIf you want to hear Apple Music’s lossless catalog the way it was meant to sound, you will need a little extra hardware. iPhones and most wireless headphones still have limitations when it comes to high-resolution audio, which means a good DAC can make a real difference in clarity and detail. Whether you listen through wired earbuds, studio headphones or a home speaker setup, the right DAC can bring out far more texture in your music.
Lossless audio can be confusing at first, especially with different formats and file sizes to consider, but you do not need a complicated setup to enjoy it. Many DACs work across iOS, Android, Mac and Windows, and several are small enough to carry every day. In this guide, we picked the best DACs for Apple Music so you can upgrade your listening experience without wasting money on gear you do not need.
DAC stands for digital to analogue converter. A digital-to-analog converter takes the digital (D) music from your phone or computer and converts (C) it into analog (A) sound you can hear. All phones and PCs have them, but since handsets moved to USB-C, Lightning or Bluetooth for music, the task of converting that signal was generally outsourced to either your adapter or your wireless headphones.
DACs can be used with phones, laptops and desktops but tend to be much simpler than a regular external audio interface. One basic distinction is that DACs are usually for listening only whereas an audio interface might have ports to plug in microphones and instruments (but an external audio interface is also technically a DAC). Some high-end DACs even include XLR outputs for better connectivity with professional audio equipment.
The best DACs tend to be lightweight, making them more suitable for mobile use, although it still gets a little tricky with the iPhone as you still might need to add another dongle to make it play nice with Lightning. Also, not all DACs support all the higher audio resolutions like DSD. Most standalone DACs require external power or an onboard battery, though some can use the power from whatever you plug them into — in which case expect a hit to your battery life.
The short answer is, you don’t. You can play “hi-res” audio files on most phones and PCs, you just might not be getting the full experience. If your device’s audio interface tops out at 44.1 or 48kHz (which is fairly common and covers the vast majority of music online) then that’s the experience you’ll get. If you want to enjoy better sounding music at a higher sample rate and bit-depth (aka resolution), you’ll need an interface that supports it and wired headphones, potentially using a headphone amp for an enhanced experience.
It’s worth pointing out that “lossless” and “hi-res” are related terms, but not the same thing and will vary from service to service. Apple uses ALAC encoding which is compressed, but without “loss” to the quality (unlike the ubiquitous .aac or .mp3 file formats). CDs were generally mastered to at least 16-bit / 44.1kHz which is the benchmark that Apple is using for its definition of lossless. In audio circles, a general consensus is that hi-res is anything with a sample rate above 44.1kHz. Increasingly, though, the term is being used for anything 96kHz and above.
This, of course, isn’t only about Apple’s new streaming formats. External DACs and audio interfaces are a great way to get the best sound and upgrade your listening experience generally. Especially if you want to get into the world of more exotic (read: pricey) headphones, as they often even require a DAC to provide enough clean digital signal to drive them. For audiophile headphones, a phone or laptop’s internal sound chipset often doesn’t have the oomph needed to deliver a hi-fi experience, meaning a better DAC could make all the difference in sound quality.
No. Well, yes, but see above. A Lightning or USB-C to 3.5mm headphone adapter often is an audio interface and most of the ones you’re buying for $7 (or that come free in the box) do not support hi-res audio beyond 48kHz / 24-bit. Android is a little more complicated, as some adapters are “passive” and really just connect you to the phone’s internal DAC like old school headphones. Others (active ones) have a DAC built-in and good luck finding out what your specific phone and the in-box adapter delivers. (Hint: connect it to a PC and see if it comes up as an audio interface. You might find some details there if it does).
Chances are that over the last few years you’ve migrated from wired to wireless headphones (thanks, Apple). The world of Bluetooth headphones changes things a little when it comes to seeking better audio performance. What matters here is twofold, the headphones you’re using (as those will technically be the “DAC”) and the codec — the method used to send the musical data over to the headphones.
It’s also worth checking to see if your headphones support aptX and which version. Look out for aptX HD, aptX Adaptive and (for the highest quality) aptX Lossless which are all better than standard and becoming more common, albeit slowly. It’s worth noting that both your phone or media player and your headphones need to support the same aptX codec. Currently, no iPhone supports any type of aptX, though dongles exist that will offer that functionality.
Other higher-resolution Bluetooth codecs exist, like Sony’s LDAC, but Qualcomm’s AptX has wider support thanks to its prevalence in Android devices. Some high-end wireless headphones might even come with a headphone jack for wired connections when higher-quality audio is needed.
This article originally appeared on Engadget at https://www.engadget.com/audio/the-best-dac-for-lossless-high-resolution-music-iphone-android-160056147.html?src=rssThere’s nothing more frustrating than shooting the perfect reel only to realize that the audio sounds like garbage. For budding creators, it’s a frustration; for those looking to make more professional content, it’s a dealbreaker. Fortunately, the world of mobile-specific (or phone-friendly) microphones has exploded with great options in the last few years. Whether you’ve been tasked with recording candid moments at a relative’s wedding, shooting a friend’s dance moves or are a journalist out in the field traveling light — there’s an option out there that will be perfect for you.
We’ve tested a wide range of popular microphones with a mobile focus so that you don’t have to. Below is our hand-picked list of the very best options for a variety of use cases. Some microphones — the wireless lavalier kind, for example — will be more versatile and convenient, useful for a number of different applications. Others, such as our musician or field-recording picks, are where we explore more exotic form factors such as shotgun mics and mobile-friendly desktop options. As always, above everything else is sound quality and general performance. The good news for you is that we’ve done all the hard work for you. Happy recording!
“Creator” is a broad term, but for the purposes of this guide, it’s anyone that wants to make videos or recordings to share on the internet. This is possibly the most exciting category right now with excellent options from brands such as Rode and DJI, but also some compelling budget options too. Once the domain of TV and pro productions, wireless lavalier mics are now the go-to choice for anyone creating in front of (or even behind) the camera. They usually sound great, offer hands-free flexibility and premium models come with extra features that will streamline your creative process.
The world of mobile microphones has exploded in recent years thanks to affordable, high-quality wireless systems, the popularity of social media and content creation and, of course, Apple’s reluctant switch to USB-C on the iPhone which has removed connectivity complications for manufacturers.
When it comes to testing, my experience as a journalist, podcast producer, YouTuber and (failing) music producer has given me a lot of real-world experience with a wide variety of products all aimed at different jobs. When compiling this guide for Engadget, I filter that experience down to a few simple criteria that allows us to focus on what’s important to you, the reader and whatever it is you’re trying to record.
The main criteria for mobile microphones are simple: Does it sound great? Does it connect to a phone directly and reliably? And, is it good value for its intended purpose? A hobbyist and a professional have different budgets after all.
What every microphone endures is repeated recording in treated, non-treated and outdoor environments. I’ll also A/B test each one against its rivals and usually a suitable reference microphone — Shure’s SM7b for podcasting microphones or Rode’s NTG 5 for shotgun/video mics, for example.
Some sub-categories of microphone require a slightly different approach. For wireless systems, I test how far I can walk from the receiver before recordings degrade, along with a standard battery life test by setting them to record until they power off. For podcast and vocal-focused microphones, I record in different spaces to see how they cope with different environments and measure self noise (recording “silence”). Lastly, I test how they sound when recording at different distances from the microphone.
This article originally appeared on Engadget at https://www.engadget.com/computing/accessories/best-mobile-microphones-for-recording-with-a-phone-154536629.html?src=rssWe may deliberate for days when buying a laptop or computer or spend hours lining up the most comfortable and stylish keyboard before aimlessly adding a utilitarian mouse to our basket. The impact of a good, feature-rich and — perhaps most importantly — ergonomic mouse can be huge. Not just to your productivity, but to the quality and comfort of your worklife overall. A good mouse has long offered some level of configuration and customization, but more modern options go beyond that with the ability to automate repetitive tasks or convoluted keypresses at the click of a button. Unsurprisingly, even mice haven’t escaped the wave of AI hype, with many flagship models bringing services like ChatGPT or Copilot to your fingertips.
Beyond the fancy features, there’s still a lot to consider to find the best mouse for work, creativity or even play. Will the mouse fit your grip style or handedness? Do you prefer the convenience of Bluetooth or stability of a 2.4Ghz USB dongle? Can it connect to more than one device easily? Is the smoothness of the scroll wheel going to be a dealbreaker? Perhaps the companion software unlocks new functionality you never knew you needed? If you hadn’t considered all of those things, the good news is, we have (and more). Below are our picks for the best wireless productivity mice you can buy right now.
The mini PC is misunderstood. Easily dismissed as underpowered, over-priced or just plain ugly; we intuit that a computer with a tiny footprint has to mean a compromise. Ayaneo, best known for its Windows gaming handhelds, has branched out into tiny desktops with retro-inspired designs. Thankfully Ayaneo’s AM01 and AM02 mini PCs have more to offer, but their initial draw over rivals, I won’t lie, is nostalgic appeal.
Sadly, I’m old enough to remember using the original Macintosh that inspired the AM01 and if Nintendo ever reimagined a real NES, I hope it looks like the AM02. Both PCs come in various specifications, but to save typing out the numerous configurations the AM01 starts at $200 and comes in low-to-modest specifications, good for retro gaming and general office tasks. The AM02 is priced between $440 and $630, and all variants come with an AMD 7840HS APU, better suited for PC gaming and heavier tasks like video editing or even music production.
As someone that plays a lot of retro games and doesn’t mind playing PC games on low or medium settings, the AM02 is fast becoming my primary gaming system. Partly because the AM02 strikes a good balance between retro and contemporary design so it fits well in my adult living room. It’s also really well built. I’m not so sure about the four-inch touch screen (more on this later) but the overall design blends in nicely with a contemporary decor without calling too much attention to itself.
The AM02 I’ve been testing is fully loaded with 32GB or RAM and 1TB of storage, but there are enough ports here that even with a lower-spec model you can add more storage or even an eGPU (thanks to a USB 4.0 port) later down the line. There are also two RJ45 ports, one of which is 2.5Gbps, future-proofing the AM02 somewhat and making it well-suited to pulling media from networked storage. This model is also powered by USB-C which makes it more “portable” than its Mac-inspired sibling that uses a laptop-style power brick. Theoretically you could power a display from the AM02’s USB 4 port and have a PC that can easily be moved around. Yes, they invented laptops for exactly this but a perk of mini PCs is that they aren’t a pain to relocate.
I’ve suggested that the AM02 works great in a living room, and it does, but the placement of the built-in display suggests this was designed to live on a desk. When Ayaneo announced these mini PCs, marketing shots showed them in horizontal and vertical configurations. Sadly, neither model makes sense in a vertical orientation. Not least because both have ports on the side that would be facing the desk. Worse, the AM02 has a delightful NES-inspired front flap covering the USB and 3.5mm ports. Press the red button and it satisfyingly clicks open, but that would be the side facing down in a vertical set-up. Not to mention all the cables would then be coming out of the top.
It’s kind of a bummer as I was hoping the built-in display could be visible from across the room, but you can only see it if you’re near enough to peer over from above. What’s more, at least right now, the display is more of a novelty. By default it shows performance statistics such as FPS, CPU usage / temperature and fan speed which is useful for some folk. You can even change the TDP/power draw right from the display, but honestly, given that this thing is plugged in I’ve just been leaving it on the max 45W setting.
Swipe left on the screen, and the view changes to a date and time widget. Swipe one more time and there’s a virtual volume control along with the option to turn the display off. Fun fact, right now there’s no option to turn it back on again. I restarted the PC via Windows and it still didn’t come back to life. I tried once more via the physical power button and that worked, there’s a neater solution coming in the final software. Relatedly, Ayaneo is hoping users will create their own widgets for this display, so there’s definitely potential here. I’m sure it won’t be long before Doom is running entirely on the linux that runs that display.
If you do want to use this just for gaming, then you’ll have to decide whether you want to use the company’s own launcher or not. On Ayaneo’s handhelds it’s useful for changing power settings on the fly and other tasks that would otherwise be a pain for a handheld. On a PC like this, the launcher is adequate, but you might want to find your own or just ditch it for the most part. I set the AM02 up to load right into Launchbox/Big Box which handles all my retro/Steam/Epic games just fine and gives a much more console-like experience. But that’s the joy of Windows for gaming I guess, you can do what you want with it.
Despite their diminutive size, mini PCs aren’t always cheap. Like their full-size counterparts, prices range wildly depending on their performance, storage and components. Ayaneo’s handhelds almost universally fell into the “premium” pricing category with nearly all its Windows models costing more than the Steam Deck they try to rival. The two mini PCs break that trend with both models offering, at worst, fair market prices and, at best, beating the competition.
Most direct rivals to the AM02 don’t have a built-in screen (though some do) or have quite as good a selection of inputs and outputs. That’s to say, overall the AM01 and AM02 are reasonably priced for their spec and even more so if you can scoop them up during the early-bird window, which at time of publication is still active for the AM02.
There’s a small elephant in the room though. That is, if you’re looking for a true gaming PC, there are likely better ways to spend your money. The lowest spec AM02 costs more than a PS5. Or about the same as an LCD Steam Deck with a dock. Then there’s the Mac Mini which starts at $600 (with less memory and RAM but that M2 processor is no joke). So if gaming is your sole goal, then there’s a slim niche that the AM02 serves best — those looking for a mix of retro and PC titles that also want the flexibility of other media tasks (an easier way to watch Netflix with a VPN, for example) in a package that only draws the right kind of attention. Or maybe you just love it for its design and the capabilities work for you.
Mostly, it’s a promising new direction for a company that made a name for itself trying to take the Steam Deck head on. It might not have been truly successful in that specific mission, but it earned itself plenty of fans along the way for its high-spec handhelds that help re-establish portable gaming as an exciting category. As Ayaneo enters the more general PC market, it might well have found a space where it can excel against a very different type of competition.
This article originally appeared on Engadget at https://www.engadget.com/ayaneo-nes-inspired-am02-mini-pc-review-170029368.html?src=rssThe mini PC is misunderstood. Easily dismissed as underpowered, over-priced or just plain ugly; we intuit that a computer with a tiny footprint has to mean a compromise. Ayaneo, best known for its Windows gaming handhelds, has branched out into tiny desktops with retro-inspired designs. Thankfully Ayaneo’s AM01 and AM02 mini PCs have more to offer, but their initial draw over rivals, I won’t lie, is nostalgic appeal.
Sadly, I’m old enough to remember using the original Macintosh that inspired the AM01 and if Nintendo ever reimagined a real NES, I hope it looks like the AM02. Both PCs come in various specifications, but to save typing out the numerous configurations the AM01 starts at $200 and comes in low-to-modest specifications, good for retro gaming and general office tasks. The AM02 is priced between $440 and $630, and all variants come with an AMD 7840HS APU, better suited for PC gaming and heavier tasks like video editing or even music production.
As someone that plays a lot of retro games and doesn’t mind playing PC games on low or medium settings, the AM02 is fast becoming my primary gaming system. Partly because the AM02 strikes a good balance between retro and contemporary design so it fits well in my adult living room. It’s also really well built. I’m not so sure about the four-inch touch screen (more on this later) but the overall design blends in nicely with a contemporary decor without calling too much attention to itself.
The AM02 I’ve been testing is fully loaded with 32GB or RAM and 1TB of storage, but there are enough ports here that even with a lower-spec model you can add more storage or even an eGPU (thanks to a USB 4.0 port) later down the line. There are also two RJ45 ports, one of which is 2.5Gbps, future-proofing the AM02 somewhat and making it well-suited to pulling media from networked storage. This model is also powered by USB-C which makes it more “portable” than its Mac-inspired sibling that uses a laptop-style power brick. Theoretically you could power a display from the AM02’s USB 4 port and have a PC that can easily be moved around. Yes, they invented laptops for exactly this but a perk of mini PCs is that they aren’t a pain to relocate.
I’ve suggested that the AM02 works great in a living room, and it does, but the placement of the built-in display suggests this was designed to live on a desk. When Ayaneo announced these mini PCs, marketing shots showed them in horizontal and vertical configurations. Sadly, neither model makes sense in a vertical orientation. Not least because both have ports on the side that would be facing the desk. Worse, the AM02 has a delightful NES-inspired front flap covering the USB and 3.5mm ports. Press the red button and it satisfyingly clicks open, but that would be the side facing down in a vertical set-up. Not to mention all the cables would then be coming out of the top.
It’s kind of a bummer as I was hoping the built-in display could be visible from across the room, but you can only see it if you’re near enough to peer over from above. What’s more, at least right now, the display is more of a novelty. By default it shows performance statistics such as FPS, CPU usage / temperature and fan speed which is useful for some folk. You can even change the TDP/power draw right from the display, but honestly, given that this thing is plugged in I’ve just been leaving it on the max 45W setting.
Swipe left on the screen, and the view changes to a date and time widget. Swipe one more time and there’s a virtual volume control along with the option to turn the display off. Fun fact, right now there’s no option to turn it back on again. I restarted the PC via Windows and it still didn’t come back to life. I tried once more via the physical power button and that worked, there’s a neater solution coming in the final software. Relatedly, Ayaneo is hoping users will create their own widgets for this display, so there’s definitely potential here. I’m sure it won’t be long before Doom is running entirely on the linux that runs that display.
If you do want to use this just for gaming, then you’ll have to decide whether you want to use the company’s own launcher or not. On Ayaneo’s handhelds it’s useful for changing power settings on the fly and other tasks that would otherwise be a pain for a handheld. On a PC like this, the launcher is adequate, but you might want to find your own or just ditch it for the most part. I set the AM02 up to load right into Launchbox/Big Box which handles all my retro/Steam/Epic games just fine and gives a much more console-like experience. But that’s the joy of Windows for gaming I guess, you can do what you want with it.
Despite their diminutive size, mini PCs aren’t always cheap. Like their full-size counterparts, prices range wildly depending on their performance, storage and components. Ayaneo’s handhelds almost universally fell into the “premium” pricing category with nearly all its Windows models costing more than the Steam Deck they try to rival. The two mini PCs break that trend with both models offering, at worst, fair market prices and, at best, beating the competition.
Most direct rivals to the AM02 don’t have a built-in screen (though some do) or have quite as good a selection of inputs and outputs. That’s to say, overall the AM01 and AM02 are reasonably priced for their spec and even more so if you can scoop them up during the early-bird window, which at time of publication is still active for the AM02.
There’s a small elephant in the room though. That is, if you’re looking for a true gaming PC, there are likely better ways to spend your money. The lowest spec AM02 costs more than a PS5. Or about the same as an LCD Steam Deck with a dock. Then there’s the Mac Mini which starts at $600 (with less memory and RAM but that M2 processor is no joke). So if gaming is your sole goal, then there’s a slim niche that the AM02 serves best — those looking for a mix of retro and PC titles that also want the flexibility of other media tasks (an easier way to watch Netflix with a VPN, for example) in a package that only draws the right kind of attention. Or maybe you just love it for its design and the capabilities work for you.
Mostly, it’s a promising new direction for a company that made a name for itself trying to take the Steam Deck head on. It might not have been truly successful in that specific mission, but it earned itself plenty of fans along the way for its high-spec handhelds that help re-establish portable gaming as an exciting category. As Ayaneo enters the more general PC market, it might well have found a space where it can excel against a very different type of competition.
This article originally appeared on Engadget at https://www.engadget.com/ayaneo-nes-inspired-am02-mini-pc-review-170029368.html?src=rss