Meta's messaging app WhatsApp could soon be subject to deeper scrutiny (and punishment) under the European Commission's Digital Services Act, Reuters reports. Because the app's broadcasting feature WhatsApp Channels grew to around 51.7 million average monthly active users in the European Union in the first six months of 2025, the feature has crossed the 45-million-person barrier that lets DSA rules apply.
A platform is designated as a "very large online platform" or VLOP once it has 45 million monthly users or more, according to the European Commission. Once an app or service passes that amount, it's subject to the DSA and all its rules about how digital platforms should operate, particularly around removing illegal or harmful content. Companies can be fined up to six percent of their global annual revenue for not complying with the DSA.
WhatsApp traditionally functions as a private messaging app, but its Channels feature, which lets users make one-sided posts to anyone who follows their channel, does look a lot more like Meta's other social media platforms. "So here we would indeed designate potentially WhatsApp for WhatsApp Channels and I can confirm that the Commission is actively looking into it and I wouldn't exclude a future designation," a Commission spokesperson said in a daily news briefing Reuters viewed.
Engadget has asked Meta to comment on WhatsApp’s possible new designation. We’ll update this article if we hear back.
The possibility that WhatsApp could become a regulatory target in the EU was first reported in November 2025, but Meta has been dealing with DSA-related fines since well before then. Meta was charged with violating the EU law in October 2025 because of how it asks users to report illegal content on Facebook and Instagram. Earlier that month, a Dutch court also ordered the company to change how it presents the timelines on its platforms because people in the Netherlands were not "sufficiently able to make free and autonomous choices about the use of profiled recommendation systems" in the company's apps.
This article originally appeared on Engadget at https://www.engadget.com/social-media/whatsapp-might-soon-be-subject-to-stricter-scrutiny-under-the-eus-digital-services-act-191000354.html?src=rss
In a move that should surprise nobody, Google is stuffing more Gemini AI into Gmail. A host of new features, some of which are already familiar to Workspace users, are rolling out today for Gmail users in the US. Some are free, while others require a Google AI Pro or Ultra subscription.
The first premium feature is AI Overviews, the same name as a similar feature in Google Search. Gmail’s version lets you ask questions about your messages in the search bar, using natural language. Google uses the example of, "Who was the plumber that gave me a quote for the bathroom renovation last year?" It’s hard to imagine that saving much time over a basic search for "plumber quote" or “plumbing estimate,” but maybe it could help in some situations.
There's also a free portion of AI Overviews that summarizes mail threads for easy catch-ups. However, the ability to ask your inbox questions requires a subscription.
Meanwhile, Proofread is a subscription-only feature that's essentially Grammarly for Gmail. As you'd guess, it suggests improvements in grammar, word choice, conciseness, voice and sentence structure.
AI Inbox
Google
Finally, there's the AI Inbox, a feature that "filters out the clutter so you can focus on what's most important." Google says it's like a personal briefing that flags to-dos and catches you up on what it thinks is most important. (It identifies VIPs based on frequent contacts, your contact list, and inferred relationships.) The company claims, without adding further detail, that this all "happens securely with the privacy protections you expect from Google." AI Inbox is another subscription-only feature.
Now onto the free stuff. Help Me Write is a tool for all Gmail users that generates email copy from a prompt. This kind of thing should be well-familiar by now, as Big Tech increasingly encourages users to avoid drafting anything from scratch. And Suggested Replies can draft replies for you that mimic your tone and style. (Google describes it as a next-gen version of Smart Replies.) Help Me Write and Suggested Replies are rolling out to everyone (no subscription required) today.
The new Gemini-powered features begin rolling out to Gmail today. Although they're starting with English speakers in the US, Google says they'll arrive in more languages and regions "in the coming months."
This article originally appeared on Engadget at https://www.engadget.com/ai/gmail-is-getting-a-gemini-ai-overhaul-130000422.html?src=rss
Disney+ will add vertical videos to its service in the US sometime this year, in hopes that they can entice viewers to engage with its app every day. The company has made the announcement at its Tech + Data Showcase event at CES 2026. Disney first dabbled in vertical content with Verts, which launched for the ESPN app in August 2025, giving it the insight it needed on how its users respond to the video format.
Erin Teague, Disney Entertainment’s EVP of Product Management, told Deadline that the company will use the format for all kinds of content. The service isn’t just planning to use it as a vehicle for movie and series teasers, but also for original short-form programming. She didn’t say what kinds of original programming Disney+ will be adding as vertical videos to its app, but vertical micro-dramas have become incredibly popular over the past year.
“We’re obviously thinking about integrating vertical video in ways that are native to core user behaviors,” Teague said. “So, it won’t be a kind of a disjointed, random experience.” The company is targeting Gen Z and Gen Alpha users, in particular, since they’re not inclined to sit and watch long-form content on their phones for hours. Disney said in a statement that the experience will “evolve as it expands across news and entertainment” and will be personalized for users, with making the service “a must-visit daily destination” as its goal. After all, if a user is already in the app, they’re more likely to explore and watch the service’s programming.
This article originally appeared on Engadget at https://www.engadget.com/entertainment/streaming/disney-is-launching-vertical-videos-this-year-120000776.html?src=rss
It's only been a few months since Meta announced that it would open its smart glasses platform to third-party developers. But one startup at CES is already showing off how the glasses can help power an intriguing set of accessibility features.
Hapware has created Aleye, a haptic wristband that, when paired with Ray-Ban Meta smart glasses, can help people understand the facial expressions and other nonverbal cues of the people they are talking to. The company says the device could help people who are blind, low vision or neurodivergent unlock a type of communication that otherwise wouldn't be available.
Aleye is a somewhat chunky wristband that can vibrate in specific patterns on your wrist to correspond to the facial expressions and gestures of the person you're talking to. It uses the Meta Ray-Ban glasses's computer vision abilities to stream video of your conversation to the accompanying app, which uses an algorithm to detect facial expressions and gestures.
The bumps on the underside of the Aleye vibrate to form unique patterns.
Karissa Bell for Engadget
Users can customize which expressions and gestures they want to detect in the app, which also provides a way for people to learn to distinguish between the different patterns. Hapware CEO Jack Walters said in their early testing people have been able to learn a handful of patterns within a few minutes. The company has also tried to make them intuitive. "Jaw drop might feel like a jaw drop, a wave feels more like a side to side haptics," he explains.
The app is also able to use Meta AI to give vocal cues about people's expressions, though Hapware's CTO Dr. Bryan Duarte told me it can get a bit distracting to talk to people while the assistant is babbling in your ear. Duarte, who has been blind since a motorcycle accident at the age of 18, told me he prefers Aleye to Meta AI's other accessibility features like Live AI. "It will only tell me there's a person in front of me," he explains. "It won't tell me if you're smiling. You have to prompt it every time, it won't just tell you stuff."
Hapware has started taking pre-orders for the Aleye, which starts at $359 for the wristband or $637 for the wristband plus a year subscription to the app (a subscription is required and otherwise will cost $29 a month). A pair of Ray-Ban Meta glasses is also not included, though Meta has also been building a number of its own accessibility features for the device.
This article originally appeared on Engadget at https://www.engadget.com/wearables/this-haptic-wristband-pairs-with-meta-smart-glasses-to-decode-facial-expressions-214305431.html?src=rss
Installing a virtual private network (VPN) on an iPhone or iPad is easy. The days are gone when Apple users had to be content with the leavings from the Windows ecosystem — in 2026, all the best VPN services have secure, user-friendly iOS apps on par with every other platform. If you've decided to add a VPN to your iPhone to stay anonymous online and change your virtual location, you've got plenty of great choices.
Since you're here, chances are you're familiar with the benefits of using a VPN, including security on public Wi-Fi and the ability to explore streaming libraries in other countries. But you may still be daunted by the process of actually choosing, installing and configuring a VPN on your iPhone.
In this article, I'll walk you through the steps, including how to configure a VPN manually without going through a service. Check out my how to use a VPN piece for more general information.
How to choose an iPhone VPN
One of the trickiest parts of installing an iPhone VPN is picking the right service. That brings us to our first pro tip: Don’t just go to the App Store and search on “VPN.” That will simply front-load whichever vendor(s) are paying for top placement (note the little “Ad” icon) as well as a laundry list of free services that come with big caveats. There are dozens of mobile VPNs out there, and many of them don't put the user first (for example, I reported last year on popular VPNs that failed to disclose shared security flaws). Choosing hastily can leave you stuck with an iOS VPN that's either mediocre or actively harmful.
Before downloading an iPhone VPN, do some research into the provider's background. A dependable VPN should have a well-written customer support page, a clear timeline of its history and a way to tell at a glance who actually owns and operates it. Check the reviews on the app store — it should have at least several hundred, almost all 4s and 5s.
iPhone users have a particular advantage here: several VPNs let you download their iOS app and start using it without paying. You can use this free trial period to put the VPN through its paces. Start by testing its speed using Ookla speedtest or a similar app. You should also use an IP address checker to make sure it isn't leaking; to confirm this, just check your phone's IP address before and after connecting to the VPN and make sure it's different the second time.
To keep things simple, my top recommendation for all platforms is Proton VPN. Out of all VPNs, it strikes the best balance of solid security, fast performance, useful features and a commitment to user privacy. Other iPhone VPNs I love include ExpressVPN, Surfshark and NordVPN.
How to install a VPN on your iPhone
Installing an iPhone VPN is like installing any other app. Just go to the App Store, find the VPN you've chosen and download it onto your phone. When it finishes downloading, open the app to grant permissions and finish setup. However, since there are a couple of potential sticking points, I'll run through the steps in more detail.
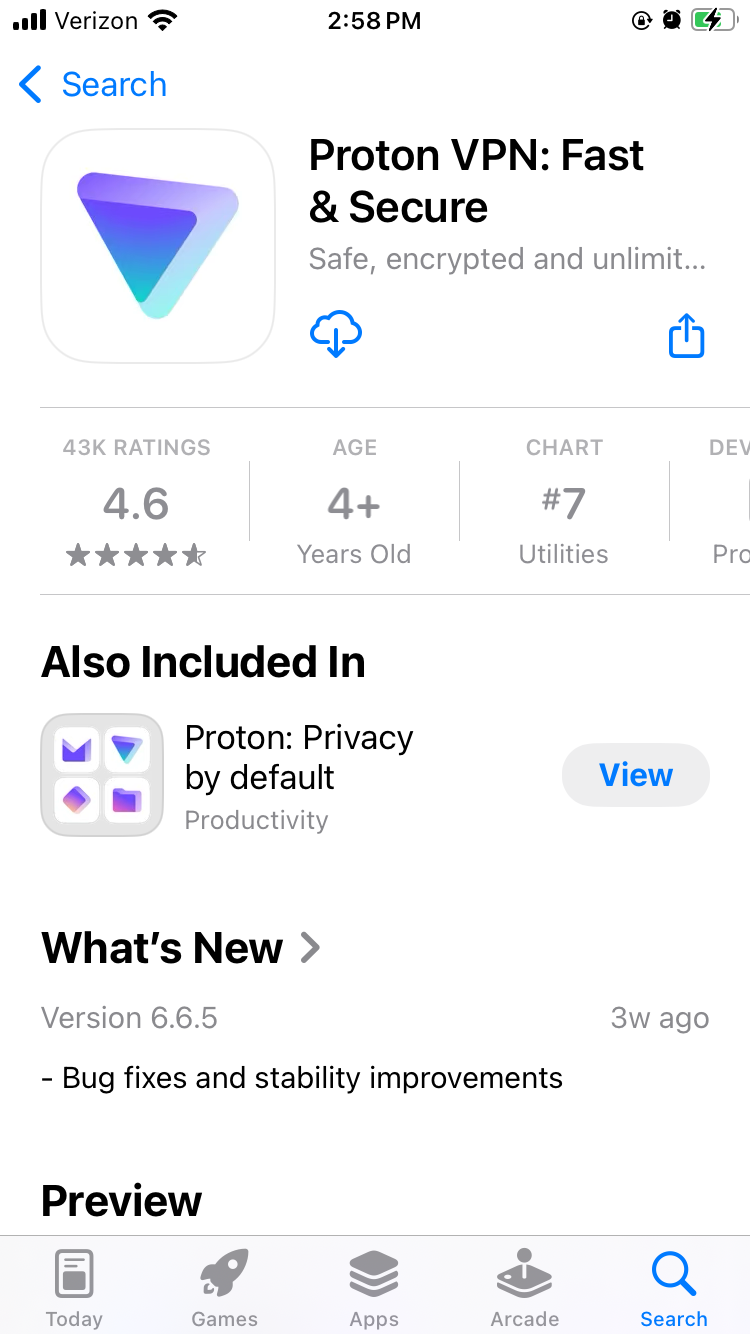
Proton VPN on the iOS app store.
Sam Chapman for Engadget
Open the App Store.
Tap the search bar and type in the name of your chosen VPN. Hit Search and look through the list of results. Be careful to pick the right one — there are some "mockbuster" VPNs that try to snare people looking for well-known names. As a rule, the one with the most reviews is the service worth using.
On the page for the VPN app, tap Get. Enter your Apple ID and password to begin the installation.
Once installation is complete, either tap Open in the App Store or find the new VPN icon on your home screen.
Create a VPN account with a username and password. Most services let you do this within the app, but you may have to shift temporarily to a browser, so make sure you've got internet access.
Choose a subscription. If there's a free trial, grab it and use it to test the VPN. If not, or if it's already expired, choose a plan that fits your budget and needs. Longer-term plans tend to save you money on average, but cost more at the start.
On the VPN app, log in with your new credentials. You're now ready to get started.
If you aren't interested in paying for software right now, you can still get an iOS VPN. Check out my list of the best free VPNs, which all have iPhone apps. We also constantly update a curated list of the best VPN deals for bargain hunters.
How to configure and use a VPN on your iPhone
An iOS VPN is generally usable with the default settings. Even so, it's a good idea to look through the options — you may not end up using all of them, but many of them are vital security checks or important quality-of-life boosters.
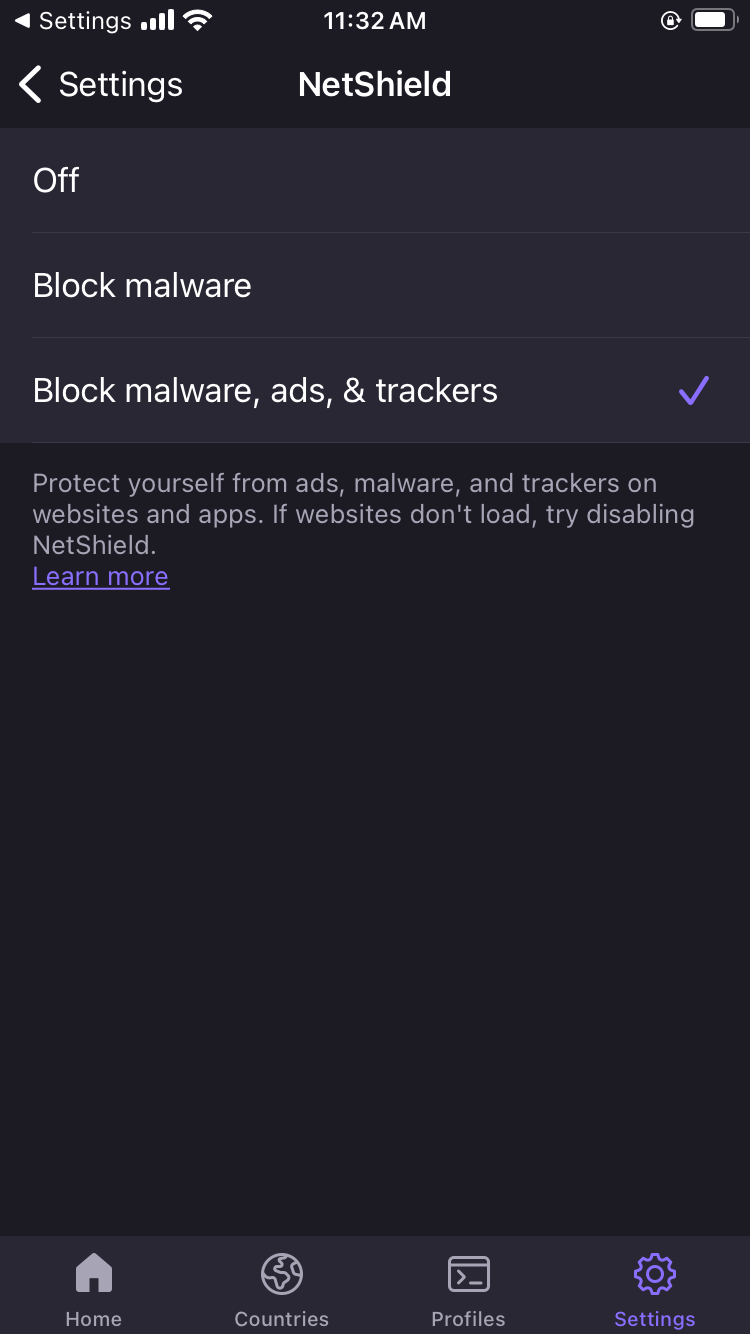
Proton VPN's NetShield content blocker on iOS.
Sam Chapman for Engadget
Here are some quick steps to make sure you're getting the best performance. These settings are in different places on each VPN, but most can be found by clicking a button with a gear icon, or any page labeled "settings" or "preferences."
Turn on the kill switch. This will protect you from broadcasting any data the VPN hasn't encrypted. In the event the VPN suddenly disconnects, the kill switch also cuts off your internet connection.
Set the VPN to always reconnect automatically if it disconnects. The method for doing this varies between services, so check the VPN's help page. Some (like Proton VPN) have an always-on VPN setting in the app itself, while others (like ExpressVPN) handle it through iOS settings.
Configure split tunneling. Not many iPhone VPNs have this option, but if yours does, you can use it to let certain apps or websites skip the VPN tunnel. Make sure to only bypass the VPN on sites and apps that share no sensitive information, or that refuse to work with a VPN active (some banks are like this).
If your VPN has a feature for blocking ads and malware domains, I recommend using it — the worst it can do is not work. Some also include parental controls, in case you're setting up the VPN on your child's phone.
Create shortcuts. Sometimes called Profiles, this relatively common feature lets you connect to the VPN and open a certain website with one tap.
Decide when and how you want the VPN to send you notifications.
Check available protocols. It's almost always best to let the VPN pick for you, but if you want to choose for yourself, IKEv2 is generally the fastest.
Look over the server list to see what choices are available.
When choosing a VPN server, think about what you need the VPN for. If you're just using it for privacy, pick the fastest server (or let the VPN app choose it for you). On the other hand, if you want to watch a movie or TV show that's only on streaming in another country, choose the fastest server in that country. If you're on a good VPN, it still shouldn't slow you down too much.
If you have the address of a VPN server and the necessary credentials, iOS lets you set up your own VPN and connect directly. This is less convenient than using a provider app, since you need to know the details about every server you connect to, but it's nice if you're worried about trusting your privacy to a third party. It can also be convenient for quickly accessing a work or school VPN from your phone. Here's how to do it.
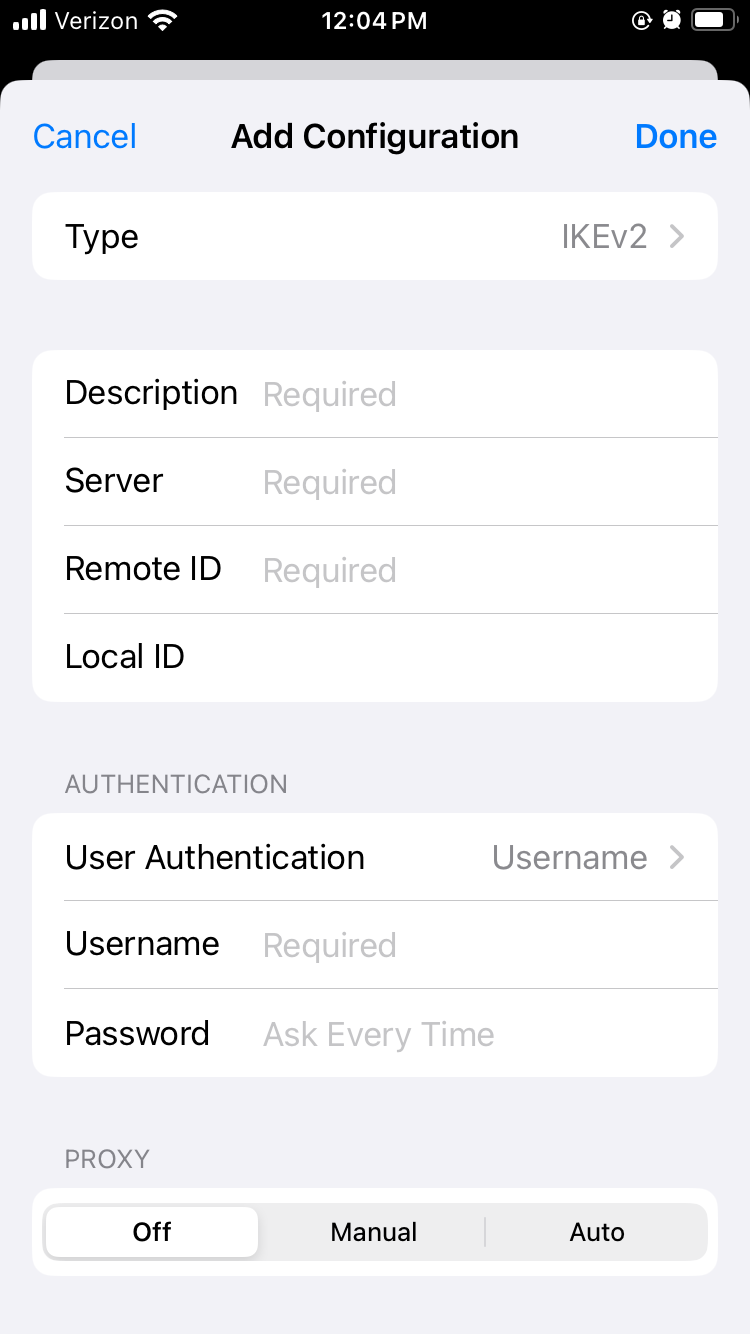
Manually setting up a VPN connection on iOS.
Sam Chapman for Engadget
Open the Settings app. Scroll down and tap General.
Scroll down again and tap VPN & Device Management. Tap the word VPN on the new page, then tap Add VPN Configuration. You should reach the screen shown above.
Make sure Type is set to IKEv2, then enter the Description, Server and Remote ID for the server you're connecting to (plus the Local ID if there is one).
Your source for the server information should also have told you if it authenticates access with a username/password or certificate. Pick the correct option, then enter the credentials required.
Tap the Done button or the blue checkmark at the top-right of the screen.
You'll arrive back on the previous menu with your new VPN option available. Toggle it on to connect. To turn it off, return to the same menu and deactivate the switch.
Do you need an iPhone VPN?
Whenever you get online, your internet service provider (ISP) assigns an IP address to your device — a unique fingerprint that follows you throughout the session. Your ISP may sell this knowledge to marketers to target ads at you, or in worse cases, collaborate with governments willing to violate their citizens' rights to privacy.
When you use a VPN, though, your real IP address is hidden behind that of the VPN server, so nothing you do on the internet connects back to you. That's why I always advise using a VPN on any device, including iPhones, that connects to the internet. It's even more important on the unprotected public networks you sometimes find in cafes and hotels. On the fun side, you can also use a VPN to change your virtual location to show you different content libraries on Netflix and other streaming platforms.
One more thing: I often hear iPhone users ask whether they need a VPN, since iCloud Private Relay comes standard on iOS devices. Just to clear this up, iCloud Private Relay is not a VPN. As you can see from this support page, your ISP can still see your real IP address when it’s active.
This article originally appeared on Engadget at https://www.engadget.com/cybersecurity/vpn/how-to-use-a-vpn-on-iphone-201743118.html?src=rss
Spotify is rolling out more social features to keep people on the platform. It's adding a new tool to its messaging platform that lets users see what their friends and family members are listening to in real time.
Once activated, a user's listening activity will be displayed at the top of the chat. The other person in the chat can tap the bar to play a particular track, save it or react with an emoji. People can also, of course, comment directly to either praise or rag on the song selection.
There's another little addition to Spotify's messaging system. Users will now be able to invite chat participants to start a Jam, which is the app's collaborative listening feature. Premium users will find a "Jam" button in the top right corner, which sends an invite. This lets two people add tracks to a shared queue and listen together. Free users can join one of these sessions, but cannot initiate.
It's worth noting that the messaging platform is currently just a one-on-one affair. There's no option for a group chat, so users won't be able to spy on multiple people simultaneously. These tools are rolling out gradually for iOS and Android right now, but won't be broadly available for a few weeks.
This article originally appeared on Engadget at https://www.engadget.com/entertainment/music/spotify-now-lets-you-share-what-youre-listening-to-in-real-time-via-chat-173749120.html?src=rss
The following article discusses themes of an adult nature.
Lovense has turned up to CES with a “companion doll,” a life-size sex doll that’s designed to be more than just a life size sex doll. The company has equipped it with its proprietary AI engine and promises “human-like cognition, emotional awareness and expressive behavior.” The doll, which in the marketing video is called Emily, is Lovense’s answer to the global loneliness crisis. It says, over time, a user’s relationship with the system will grow deeper as it learns to adapt to their needs. And that the doll is the natural evolution of the virtual companions that have, until now, “existed only on phones and screens.”
From a hardware standpoint, the doll uses a standard user posable skeleton for everywhere but inside the skull. Up top, there are various servos and mechanisms to give the doll the ability to slightly move their mouth while speaking, as well as some basic facial expressions. (You haven’t lived until you’ve seen Emily attempt a smize or a wink in a matter few would describe as flirtatious.) The company hasn’t spoken about the less delicate parts of her anatomy, but did say her built in Bluetooth can “integrate effortlessly with the full Lovense ecosystem” and can run for eight hours on a single charge.
The major focus, however, is on the AI part of the equation, explaining it will remember details of previous conversations to enable users to build a deeper bond with its user. In addition, you can even engage with the AI when you’re out and about, messaging it via the Lovense app. Oh, and you can even get “AI-generated selfies that mirror her real-world appearance” should you want. The company, in its materials, say that the doll will hopefully lead people out of their comfort zone and better equip them to engage with real people.
Of course, it’s worth noting that Lovense’s track record with people’s most intimate data isn’t the best. In 2017, a Reddit user discovered the Lovense app was recording a private moment between them and their partner. In July 2025, another security flaw enabled hackers to hijack accounts without a password. The company addressed both issues at the time, but it’s one to consider if you’re thinking about forming a long-term relationship with one of its bots.
There’s no word on pricing or availability just yet —the company will be launching a pre-sale in the near future — but you can probably expect it to be fairly expensive.
This article originally appeared on Engadget at https://www.engadget.com/lovense-launches-an-ai-companion-doll-at-ces-170000490.html?src=rss
Ring turned up to CES with a whole host of announcements, including a revamped range of home sensors. Ring Sensors (for that is their name) is a new lineup of tools, built on Amazon’s Sidewalk low-power networking protocol. That includes updated versions of its door, window and break glass sensors, as well as a new OBD-II car alarm, motion detectors and panic buttons. You’ll be able to pre-order the new car alarm today, while the rest of the new sensors will be available at some point in March. And, in tandem with that news, Amazon is announcing that Sidewalk is expanding outside of the US, starting in Canada and Mexico.
At the same time, the company is launching a number of enhancements to its app platform, including the Ring Appstore. This will let users purchase and integrate with third-party apps which have been built to cater to “specific use cases, from small business operations to everyday needs around the home.” The company added that, in the coming weeks, users will be able to browse a growing number of apps designed to help “you get more value from your Ring cameras.”
The company is also throwing more AI into its system to better coordinate its alerts, including Unusual Event Alerts. These will learn from the patterns around your home and, when it spots something out of the ordinary, send you a ping. Active Warnings, meanwhile, will use computer vision to identify potential threats and offer “specific warnings based on details like location and actions.”
Finally, Ring has teamed up with Watch Duty, a non-profit alert platform designed to share useful information about local wildfires. The pair have added a Fire Watch feature to the Neighbors app to enable communities keep each other in the loop about local fire and smoke events. Ring users are encouraged to share details from their own Ring cameras to “support first responders on the ground.”
This article originally appeared on Engadget at https://www.engadget.com/home/smart-home/ring-relaunches-its-suite-of-smart-home-sensors-140000667.html?src=rss
Garmin’s big announcement for CES 2026 wasn’t another fitness watch. Instead, it revealed it is adding food (and calorie) tracking to its Connect app. It combines AI image recognition with a rich food database, so you can monitor your calorie and nutrient intake without leaving the app — and even log some food through its watches.
The food tracking works similarly to existing apps like MyFitnessPal, Noom, LifeSum and many others. Still, Garmin hopes to make its companion app the best place for tracking nutrition without having to leave its app – and tying it into your other fitness goals.
This makes sense in a few ways. If you already use Garmin to track your exercise, the app can provide a more accurate estimate of your calorie expenditure. It’ll personalize it based on height, weight and gender, which you’ve likely already entered on your Garmin profile. It can even offer calorie and macronutrient recommendations tailored to your fitness goals.
However, it unveiled the news at CES 2026, a tech conference held in Las Vegas, which seemed like a troll. Las Vegas, where you’re never far from a three-foot margarita, a BLT Bloody Mary or fried chicken and waffles. In fact, Garmin selected one of my favorite restaurants, Yardbird, to showcase its new nutrition-tracking feature. Yardbird does incredible chicken and waffles. It’s possibly the worst possible place to start monitoring my calorie intake, regardless of the 15,000-odd steps I take each day here.
In addition to the food database, you can use the camera to log food. With AI-powered image recognition, the Connect app makes a generally good guess at what you’re eating. During the media briefing lunch, the app swiftly recognized grilled salmon, corn and several other vegetables. The quantities were not remotely accurate, however: Five kernels of corn do not equate to one cup. You can manually adjust the serving size, but unfortunately, it can’t make a more informed estimate at this point. A Garmin spokesperson noted that the company is looking into how to improve accuracy here. (It’s a common issue for any app or service attempting to use AI image detection to analyse meals.) It was, however, quick and easy.
Mat Smith for Engadget
You can also create customized meal entries (with the correct ingredient quantities), making it easier to track your regular breakfast habits or midday coffee order. Better still, you can monitor nutrition and calorie intake on compatible Garmin watches. You can even log your favorite (and recently logged foods from your wrist without needing to use your phone. Voice commands also work on compatible Garmin wearables.
The feature is now available to Garmin Connect+ subscribers, who pay $6.99 per month. This also includes Active Intelligence, which already offers AI-powered insights into your workouts. It can now factor in your nutrition.
Subscribers will also be able to get daily, weekly, monthly and even annual reports on calorie targets (and what you ended up consuming). But let’s start monitoring that once I’ve left Vegas, please.
This article originally appeared on Engadget at https://www.engadget.com/wearables/garmin-food-tracking-feature-connect-plus-ces-2026-043231948.html?src=rss
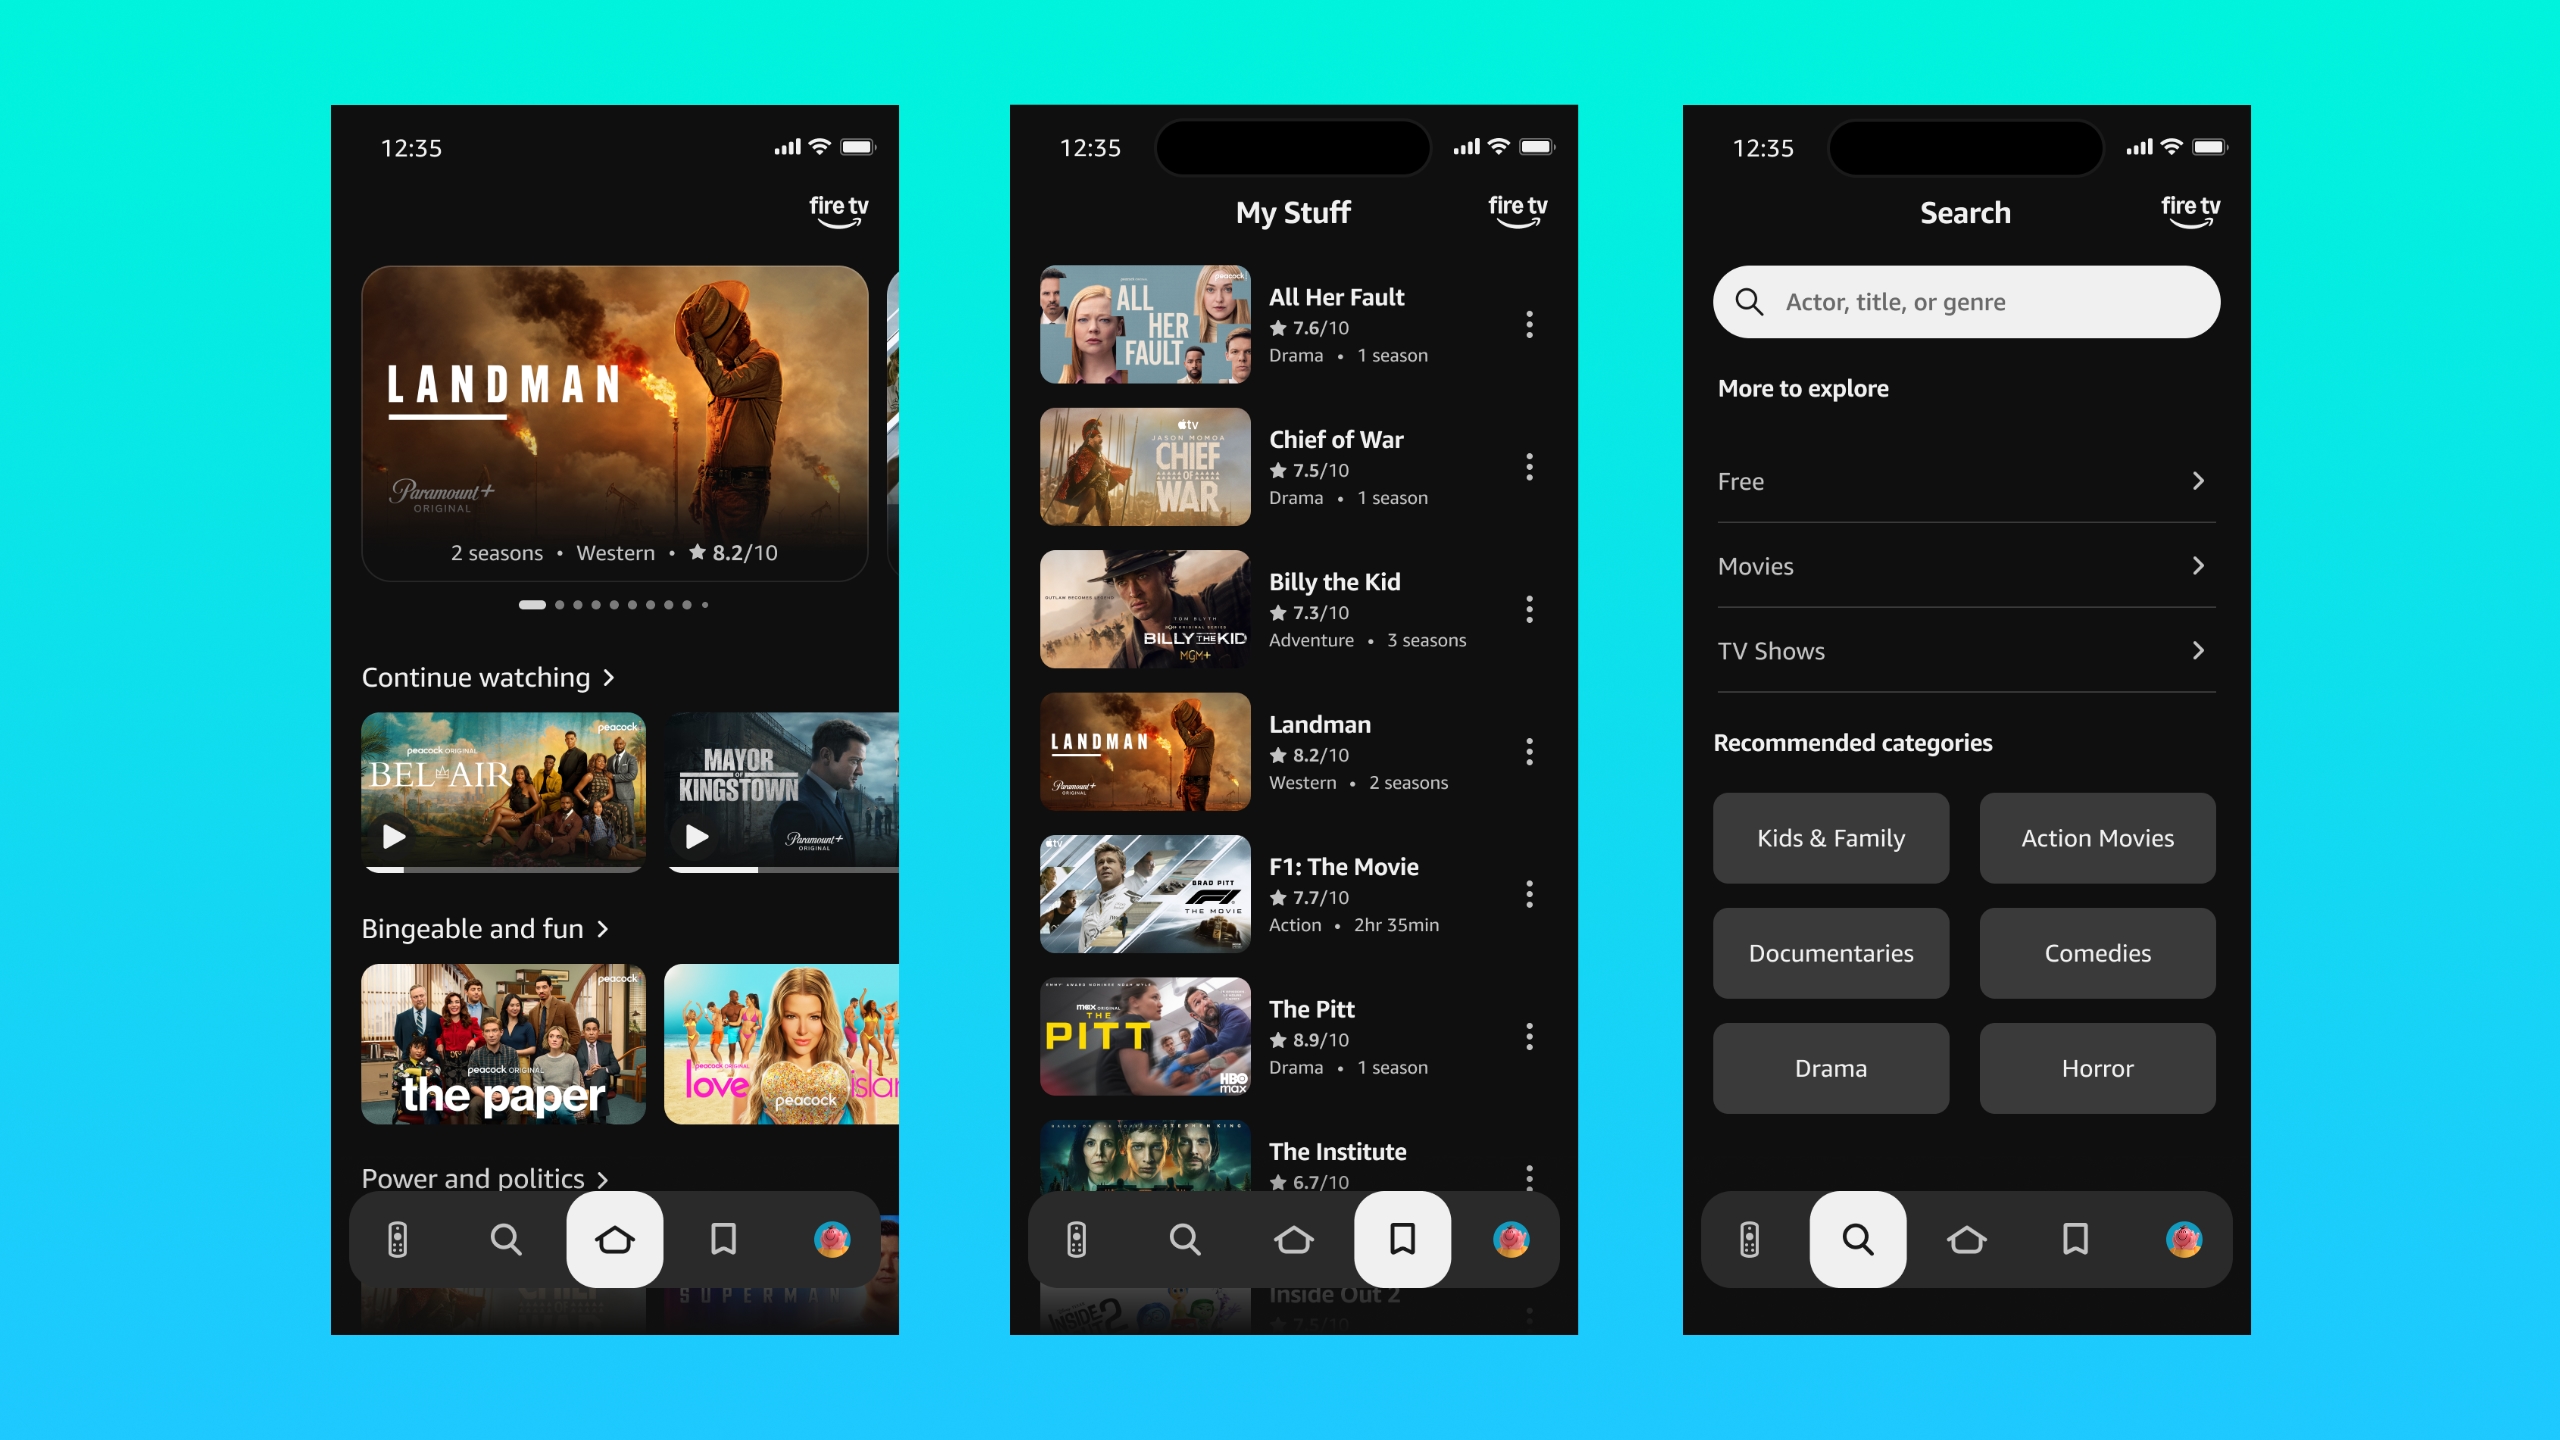
Amazon is kicking off the new year by announcing a redesign of its Fire TV UI at CES 2026. The new UI is designed to make finding things to watch on the platform faster, while making it easier to access more of Fire TV's features straight from the home screen.
On first blush, the biggest difference in the new Fire TV UI is that everything is rounder. Shows, movies and apps have rounded corners, and Amazon's changed the spacing in the interface to give everything more room to breathe. Tweaks to typography and color gradients also give the UI a more modern feel, and Amazon says it's rebuilt the code of the Fire TV software to make everything faster, too, in some cases demonstrating "up to 20-30 percent gains in speed."
The fundamentals haven't changed all that much, however. There's a menu bar of different tabs at the top of the interface that separates the Home page from things like Movies, TV Shows and Sports. Each page shows content in carousels, and Amazon still lets you pin streaming apps like Netflix or Apple TV underneath recommended content, with the biggest difference being you can now pin more apps at once (20 rather than six). Amazon is also changing up how the Fire TV Remote works. Pressing the Menu button now lets you quickly access Fire TV's Art & Photos, Games and Ambient Experience features, and a long press of the Home button pulls up a shortcut panel with access to things like settings and connected Ring cameras. Alexa+, Amazon's rebuilt AI assistant, is also available directly inside of the Fire TV interface for adding things to your watchlist, recommending content and controlling your smart home.
The new Fire TV mobile app can act as a remote and a way to search Amazon's library of content.
Amazon
Amazon offers the Fire TV mobile app as a way to control its streaming devices and TVs with a smartphone, but alongside this redesign, the company is also expanding what the app can do. The new Fire TV app lets you browse content, edit your watchlist and start playing things on your TV, in much the same way Roku and Google's streaming apps do.
Both the new Fire TV mobile app and redesigned Fire TV UI will be available for free for all users, Amazon says. The new Fire TV UI will launch in February on the Fire TV Stick 4K Plus, the second-generation Fire TV Stick 4K Max and Fire TV Omni Mini-LED series. Later in the spring, Amazon says it will bring the redesign to more countries and devices, including the latest Fire TV 4K streaming devices, TVs like the Fire TV 2-series, 4-series and Fire TV Omni QLED series and TVs from third-party partners like Hisense, Insignia, Panasonic and TCL.
This article originally appeared on Engadget at https://www.engadget.com/home/home-theater/amazon-is-redesigning-its-fire-tv-ui-for-streaming-sticks-and-tvs-150000622.html?src=rss