Small outdoor spaces have a way of revealing exactly how much thought went into the objects inside them. When every square foot counts, the things you choose to bring outside need to earn their place — not just functionally, but visually. The best tiny backyard accessories fold away when you’re done, grow upward instead of outward, and look like they were designed rather than assembled. These seven picks do exactly that.
The difference between a cramped yard and a considered one rarely comes down to square footage. It comes down to objects that understand their role — a fire pit that manages its own smoke, a dining set that lives inside a cylinder, a herb garden that climbs the wall instead of spreading across the ground. Each of these seven accessories solves a real outdoor living problem without creating a new one, which is the baseline requirement for anything going into a space this deliberate.
1. All-in-One Grill
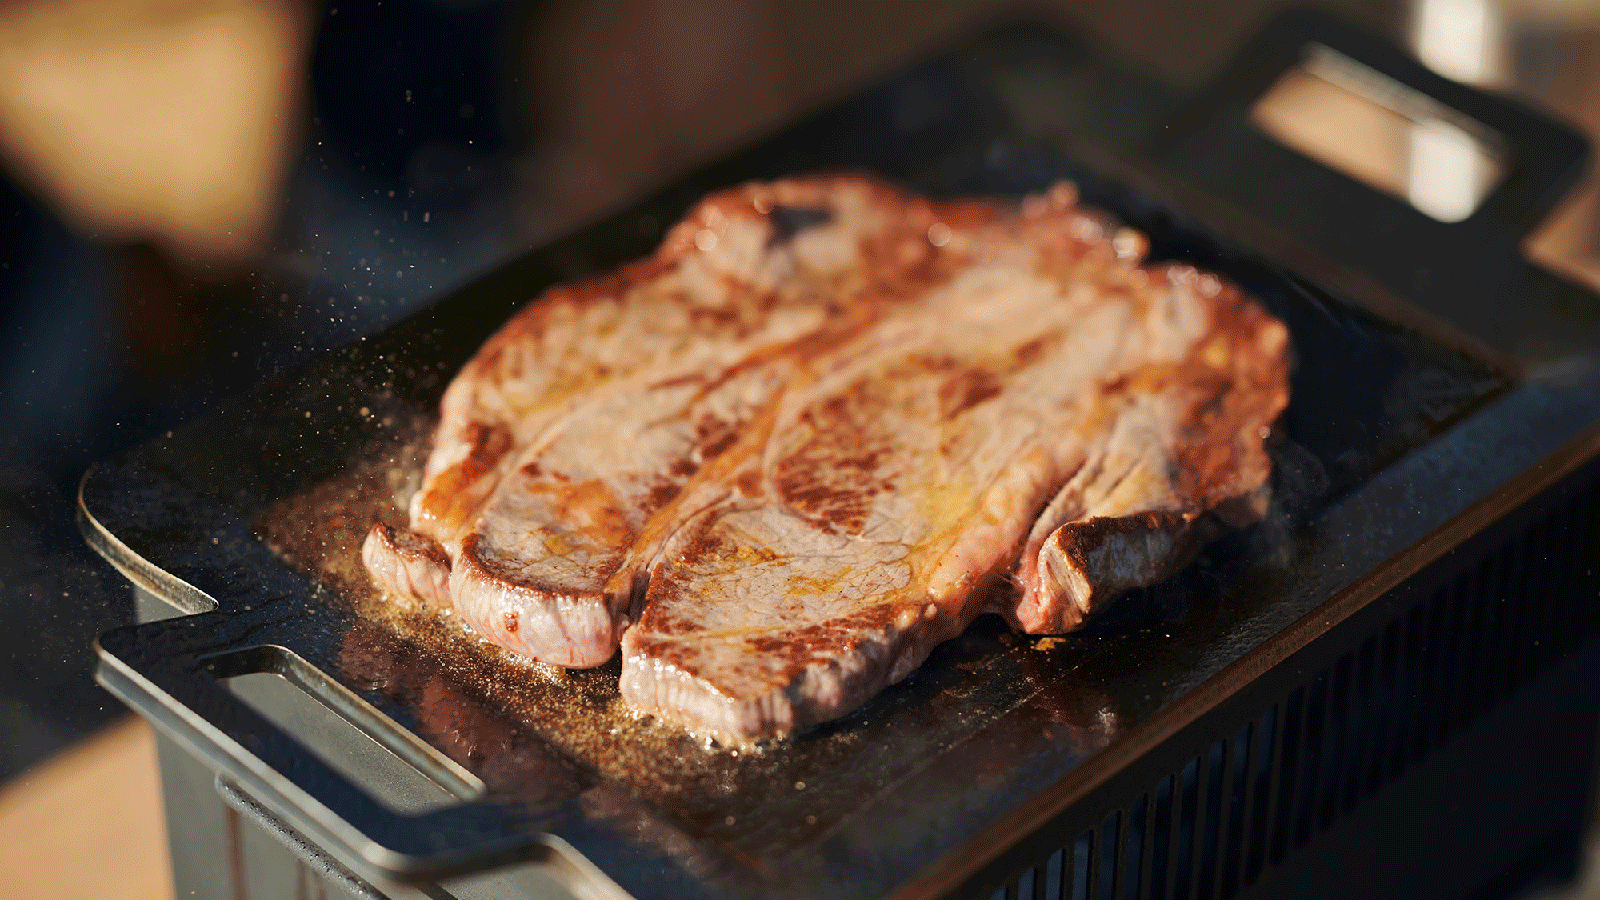

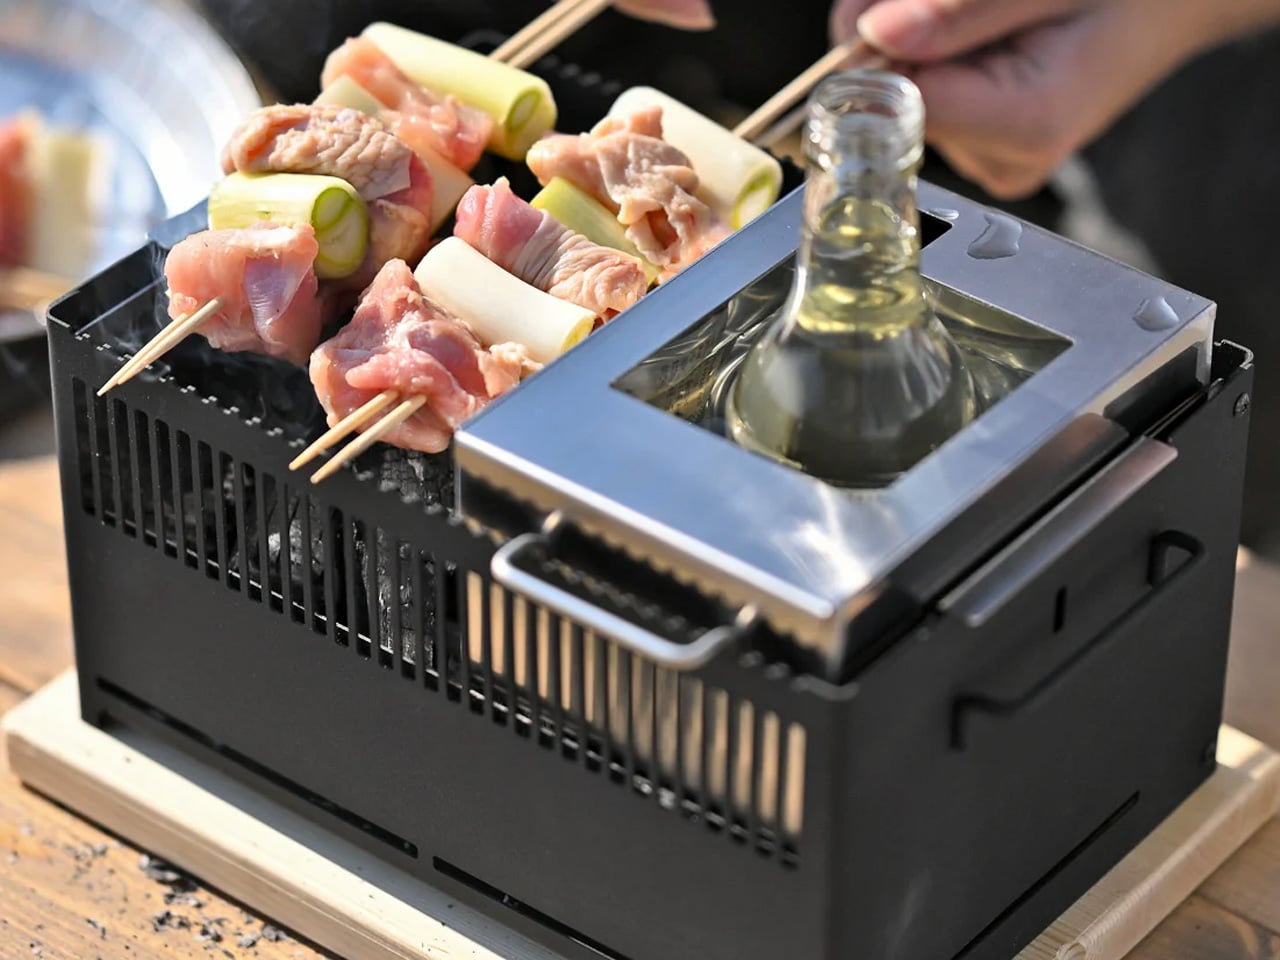
The first question any small outdoor space asks of a grill is whether it can disappear when not in use. This modular tabletop grill answers that cleanly. Its parts separate and stack to support barbecuing, frying, grilling, steaming, smoking, or slow-cooking a stew — all on a surface small enough to sit on any patio table. The design doesn’t try to be everything at once; it brings exactly what you need for the style of cooking you’re doing that evening, then gets out of the way.
There’s also a bottle-warming module in the mix, which sounds like a novelty until the first cold autumn evening when mulled wine becomes the plan. Cleanup is as thorough as cooking; every modular part disassembles for washing, and nothing requires more effort than it should. For a compact yard where a full outdoor kitchen isn’t on the table, this is the kind of object that makes the limitation feel like a deliberate choice rather than a compromise.
What we like:
- Modular design covers six styles of cooking without occupying a permanent outdoor space
- Parts disassemble quickly, keeping cleanup as easy as the setup
What we dislike:
- Multiple components mean multiple things to keep organized between uses
- Better suited for cooking for two or four than for a larger gathering
2. porTable
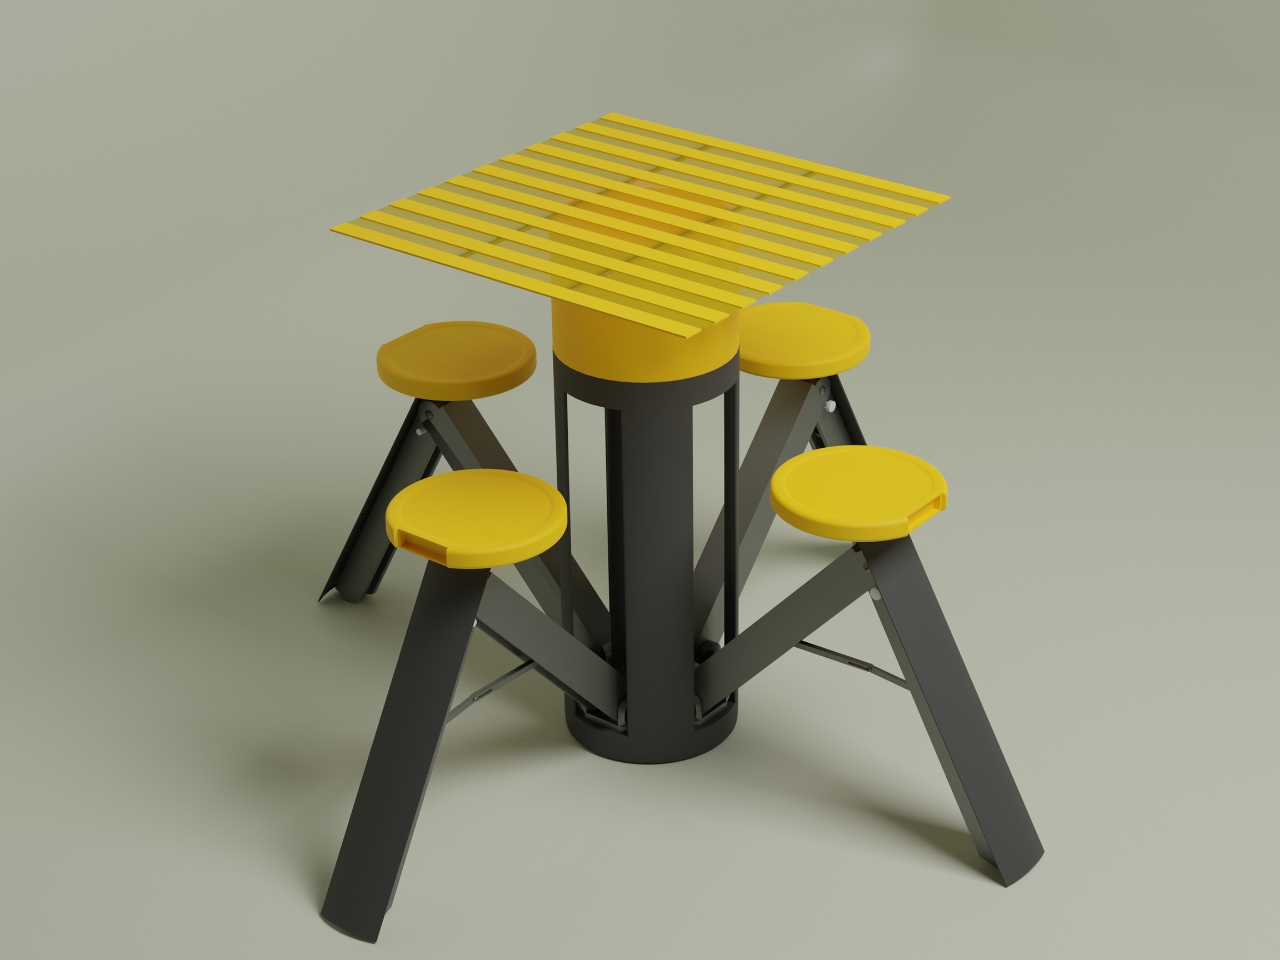
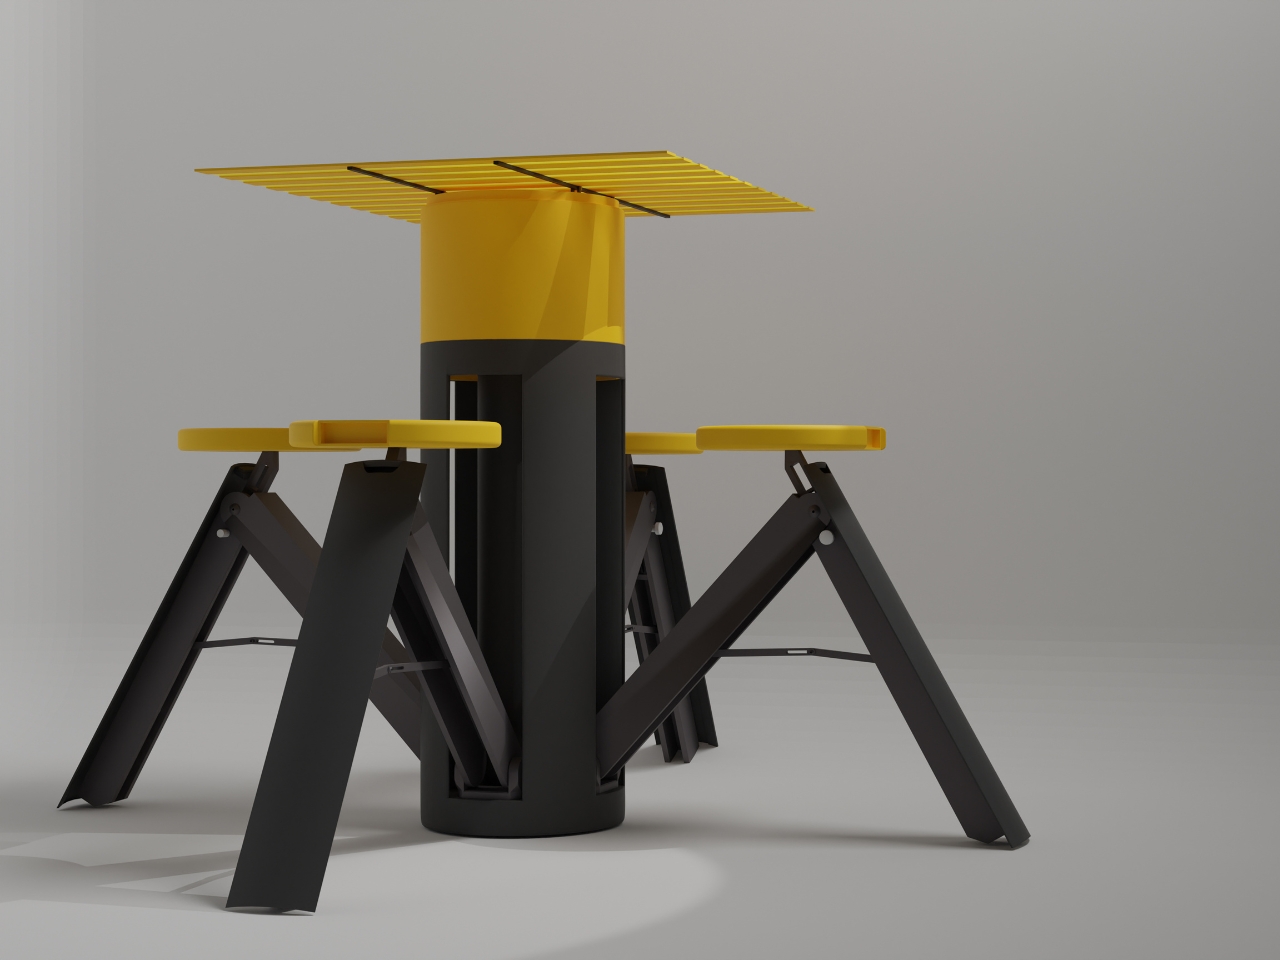
At rest, porTable looks like a bold geometric container — yellow lid, charcoal body, the kind of object you’d leave on a shelf without apology. In use, it becomes a complete outdoor dining setup for four: fold-out seats, a sturdy tabletop, no tools required, no leftover parts. The transformation from container to furniture takes under a minute, which means the decision to eat outside is never more than sixty seconds away from actually happening.
The yellow and charcoal palette is doing real design work here — friendly without being childish, modern without being cold. More importantly, the concept solves the core tension of tiny outdoor living: you want furniture, but you don’t want furniture taking up space when it’s not in use. porTable collapses that contradiction entirely. It lives as a single compact cylinder until the moment it’s needed, then opens into something genuinely functional and good-looking. That kind of thinking is exactly what a small yard rewards.
What we like:
- An entire four-person dining set stores as a single portable object
- No tools or assembly knowledge needed to set up or break down
What we dislike:
- As a concept design, long-term durability in real outdoor conditions is still unproven
- The bold yellow colorway is a personality commitment that won’t suit every space
3. Birdbuddy Pro Solar
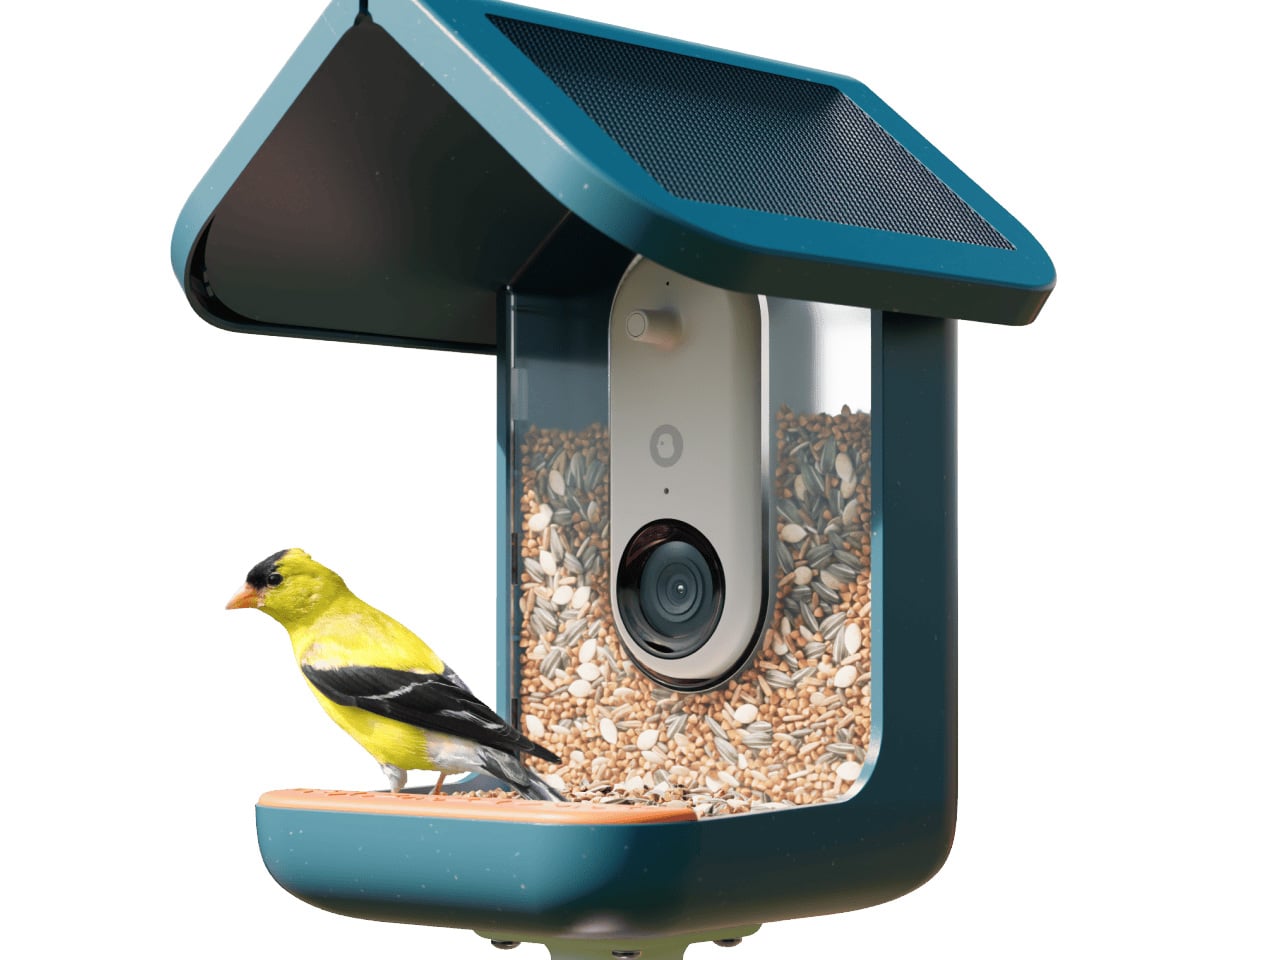
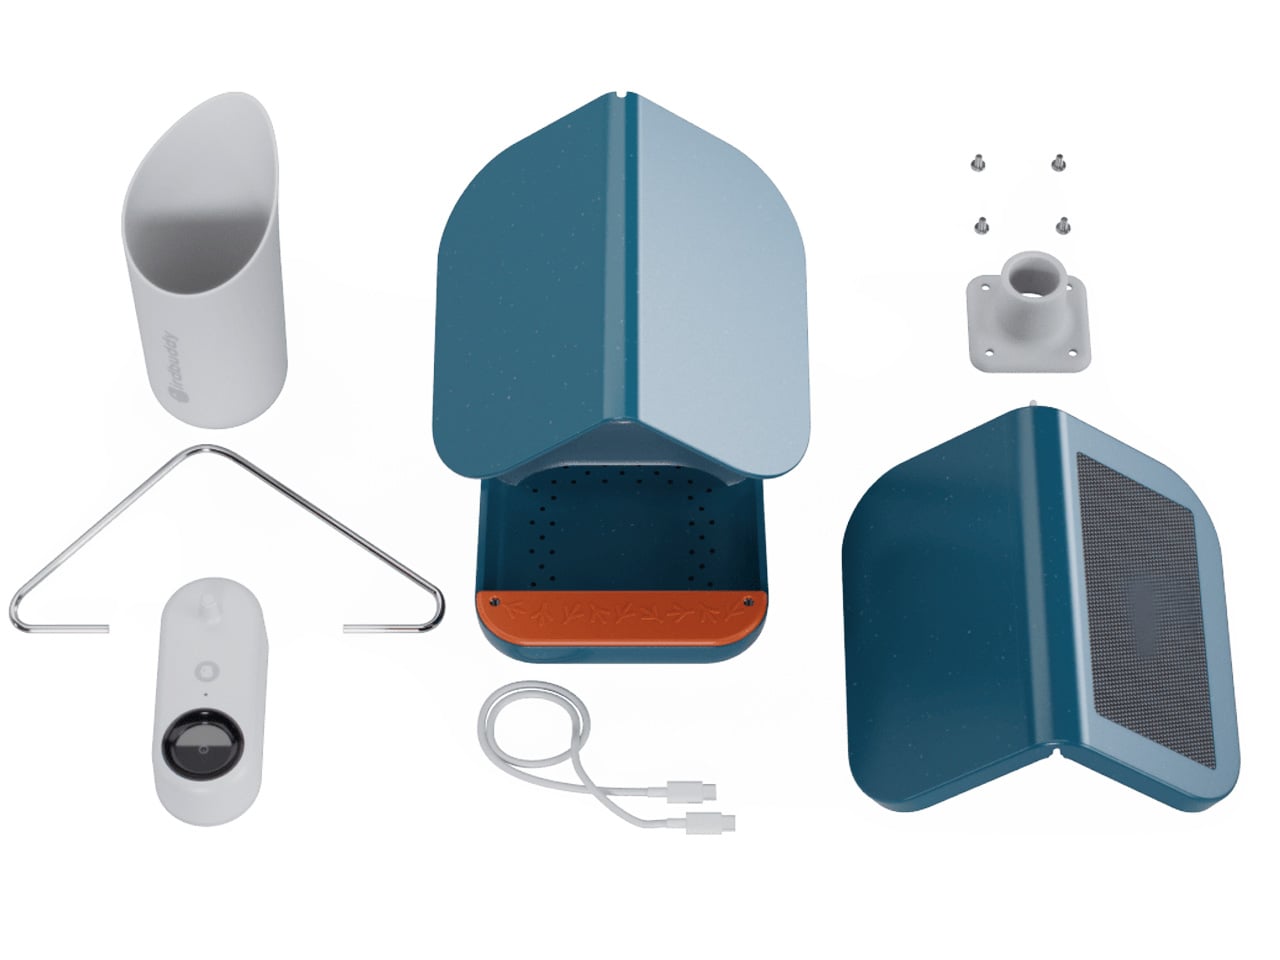
A bird feeder is, in most hands, a lump of plastic with seeds in it. The Birdbuddy Pro Solar is something else entirely — a solar-powered AI camera system that identifies visiting birds, captures slow-motion HD video, and delivers it to your phone via a free app. The expanded field of view and improved sensor handled dappled backyard light without washing out the image. What you get isn’t just a feeder. It’s a front-row seat to the wildlife that was already there.
For a tiny outdoor space, this might be the most meaningful addition on this list. It doesn’t take up floor area. It hangs from a fence or mounts to a wall, taking up exactly zero square footage. And it changes the character of the yard in a way that furniture simply can’t — from static backdrop to living environment. The AI identification runs automatically, building a personal record of every species that visits over time. It’s the rare outdoor product that gets better the longer it sits there.
What we like:
- Solar-powered design means no cables crossing the yard
- AI species identification works passively — no effort required from the user
What we dislike:
- Full camera functionality depends on a consistent Wi-Fi signal reaching the yard
- Ongoing seed refills add a small but real maintenance commitment
4. Slim Fold Dish Rack

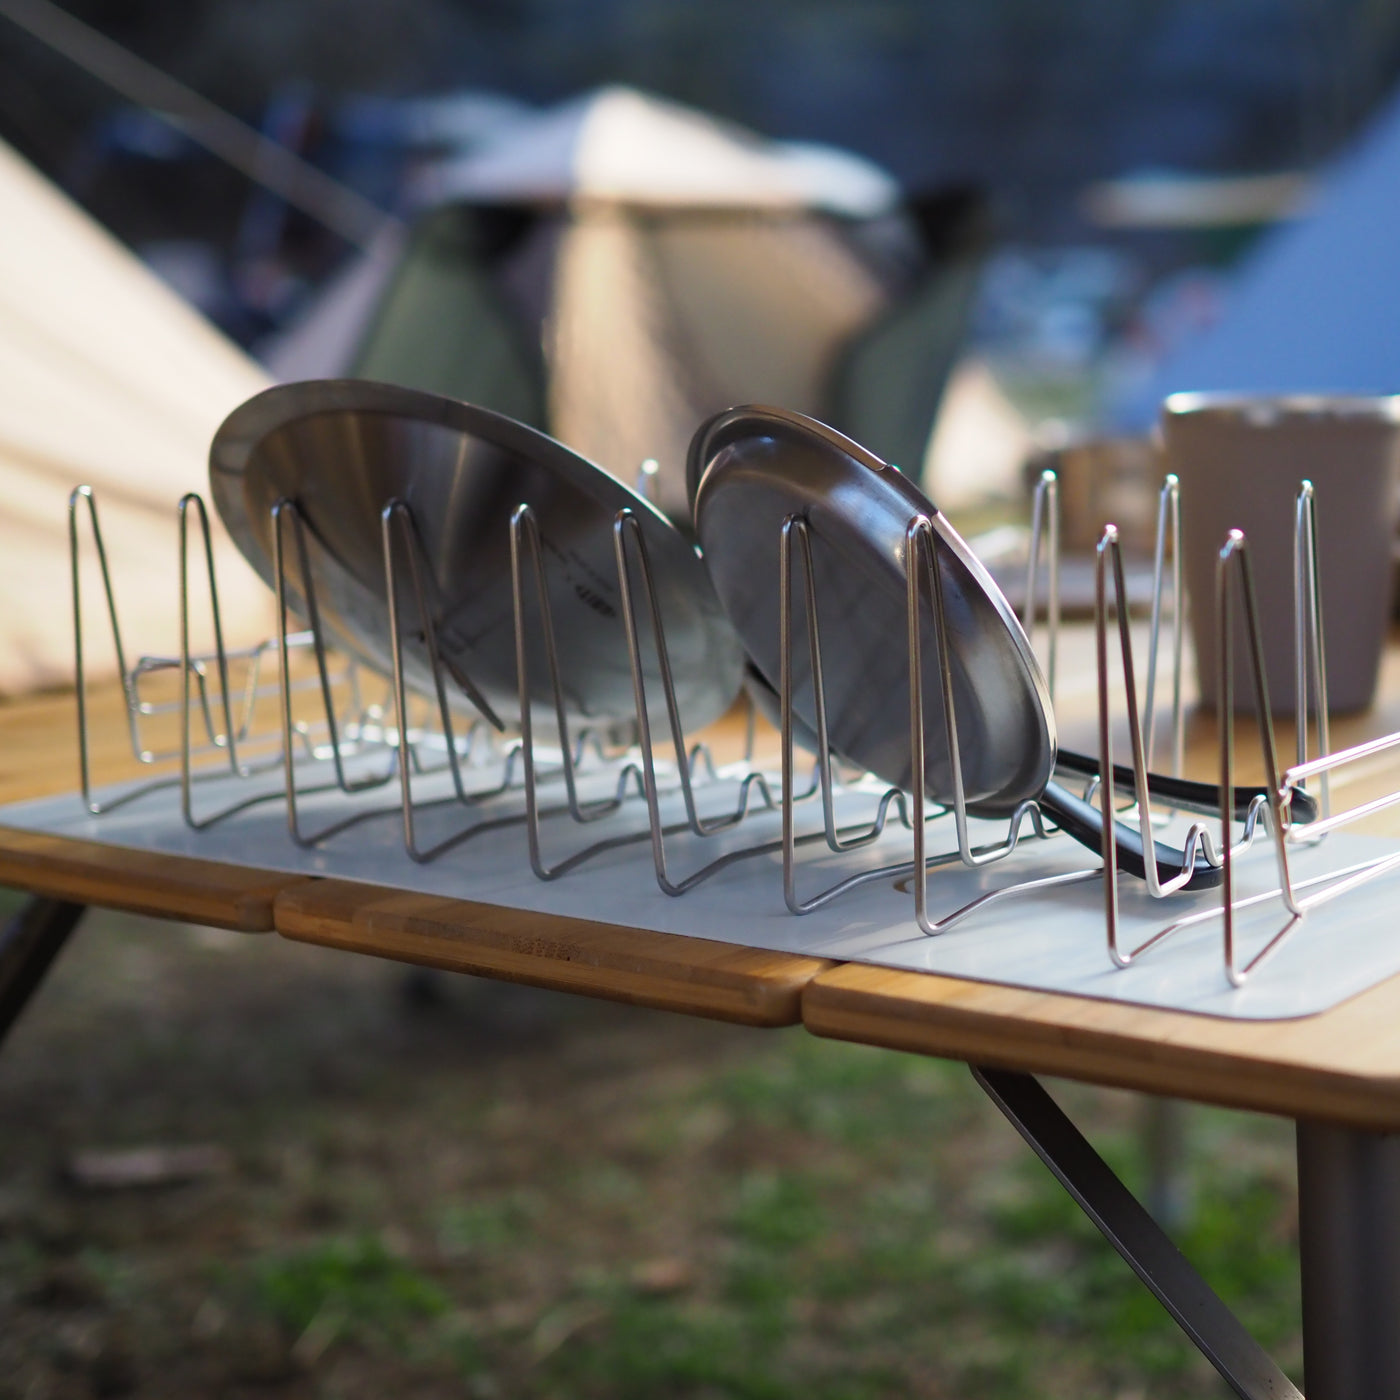
Most dish racks are compromises — too large for small spaces, too flimsy for daily use, too visually noisy to leave out. The Slim Fold Dish Rack collapses this problem with a patent-pending spring mechanism that shrinks a full 14-inch rack to 1.2 inches in under a second. That’s the difference between a dish rack that permanently occupies counter space and one that lives in a bag or a pocket. For outdoor cooking situations where surface area is already borrowed, that distinction is significant.
The ventilation geometry is engineered for real airflow — plates, utensils, and cookware of any size dry properly without needing to be repositioned or fanned out. The design is minimal enough that leaving it out doesn’t create visual clutter; storing it away feels almost like a trick. It’s also dishwasher-safe, which closes the loop on a product that exists to make cleaning easier. In a space where every object has to justify its presence, this one earns it quietly and completely.
What we like:
- Collapses to 1.2 inches — genuinely pocketable when not in use
- Dishwasher-safe, so the cleaning tool is easy to clean
What we dislike:
- The spring mechanism’s long-term durability across daily use remains to be tested
- At full extension, very large pots and baking trays will likely overhang the edges
5. Stack & Sprout
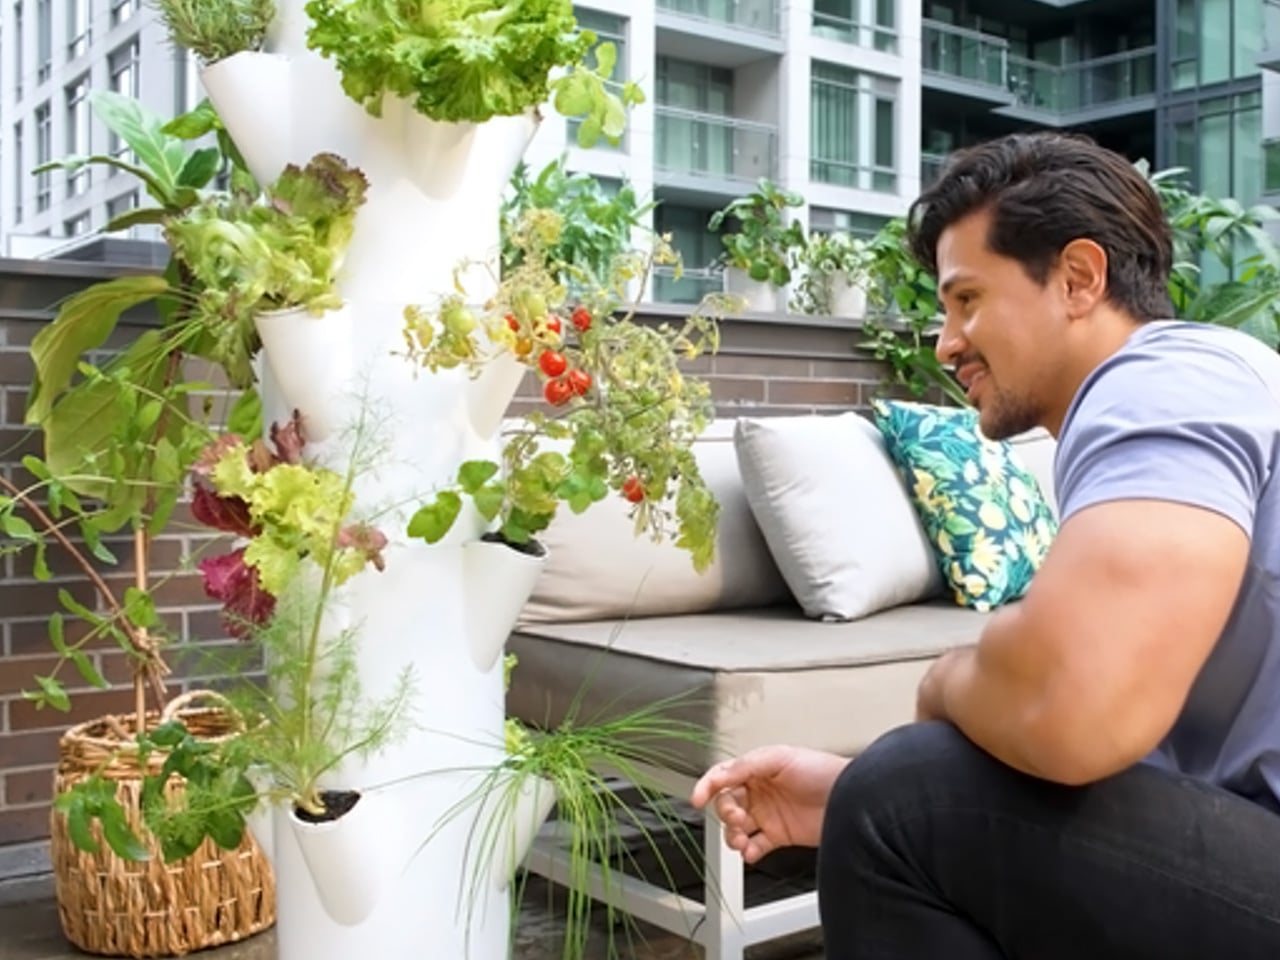

A 1×1 square-foot footprint for a full working herb garden is not a compromise — it is the point. Stack & Sprout’s modular tower stacks as high as the wall and ambition allow, with each module holding individual growing pods loaded with smart soil capsules. Fill the water tank, add seeds, and the system manages hydration from there. The result is a vertical column of living herbs that climbs the fence instead of spreading across the ground, leaving every inch of floor space exactly where it was.
What makes this work for a small outdoor space is how little it asks of the person using it. No specialized knowledge, no guesswork about watering schedules, no particular green thumb required. The modular format means you can start with three modules — basil, mint, rosemary — and add more as confidence grows. Fresh herbs picked ten seconds before they go into a dish taste genuinely different from ones that have spent a week in a grocery bag. Stack & Sprout makes that difference accessible to anyone.
What we like:
- Modular height adapts to any wall space, from a single tier to a full vertical installation
- Self-watering system removes the most common reason home herb gardens fail
What we dislike:
- Proprietary smart soil capsules create an ongoing replacement cost
- Taller configurations may need wall anchoring to stay stable in the wind
6. Forest Cooperage Cedar Soaking Tub
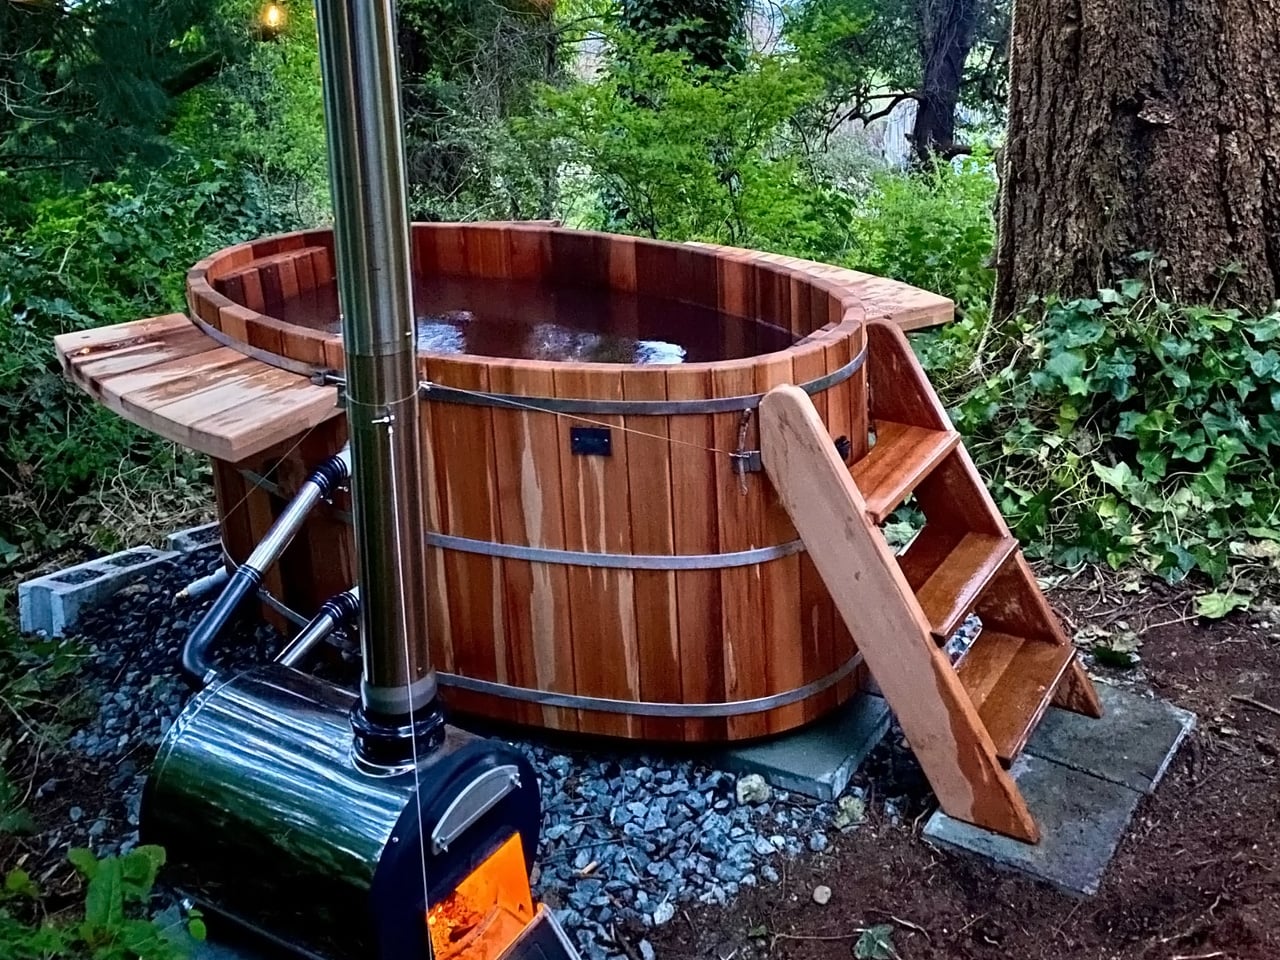
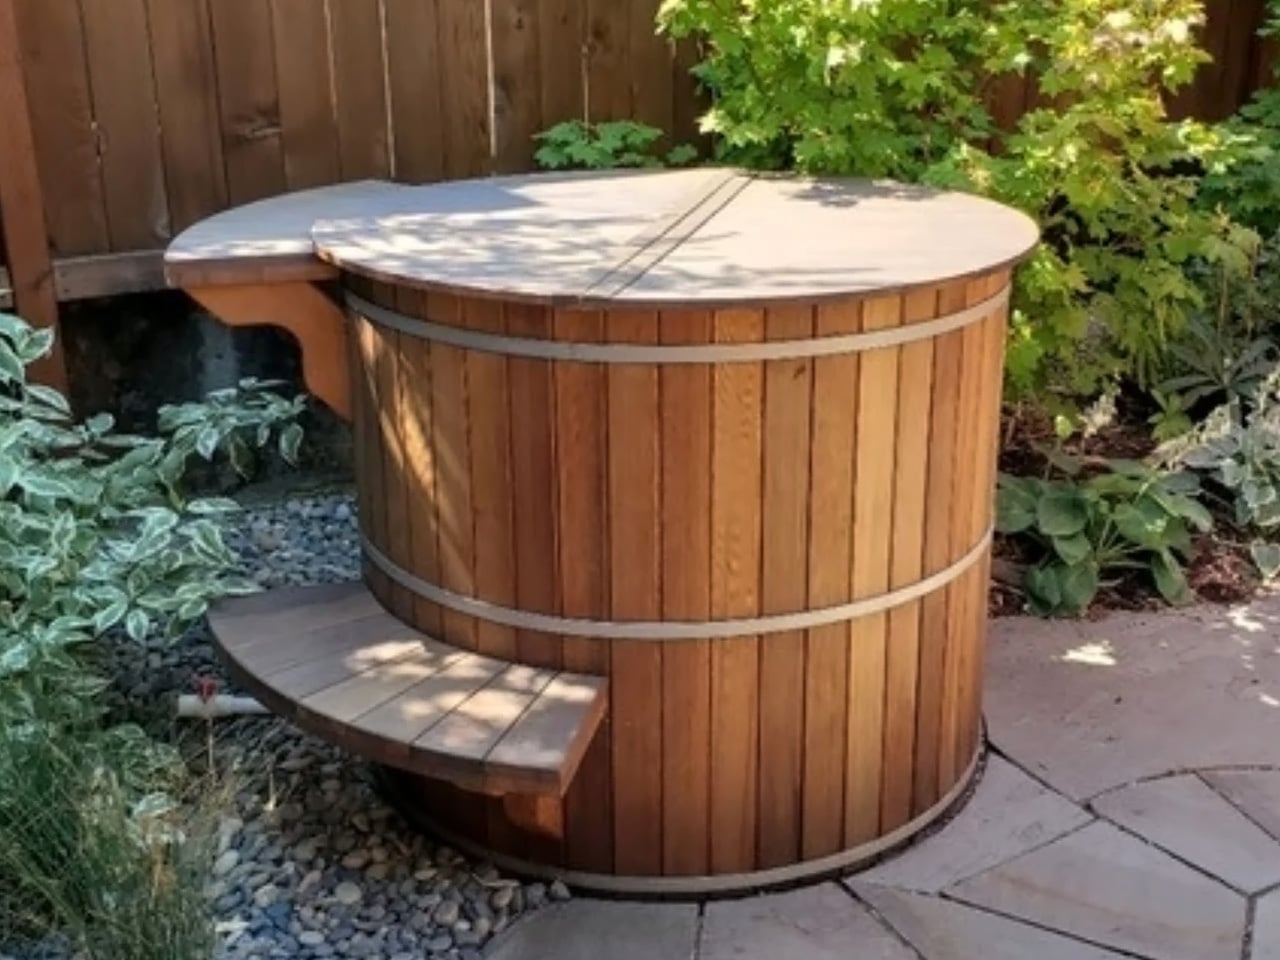
The Forest Cooperage cedar soaking tub is handcrafted on Vancouver Island from clear vertical grain Western Red Cedar, secured with stainless steel hoops. It sits directly on any level surface, fills from a garden hose, and heats with a wood-fired or electric immersion heater — no plumber, no electrician, no permanent installation required. The stave-and-hoop construction is the same method used in barrel-making for centuries, which is why it looks entirely at home outdoors next to bamboo, stone, and weathered wood.
What a cedar tub does to a small outdoor space is harder to explain than it sounds. It gives the space a reason to exist — not as a passageway or storage area, but as a genuine destination. An evening soak in a backyard cedar tub, surrounded by the natural scent of the wood and the quiet of a well-arranged small yard, is a genuinely different experience from anything else available at this price. In 300 square feet, this is the object that makes everything else around it feel intentional.
What we like:
- No permanent installation — fills from a hose and heats without any plumbing
- Cedar weathers beautifully outdoors, developing character rather than deteriorating
What we dislike:
- Regular maintenance is needed to keep the cedar properly hydrated and sealed
- Wood-fired heating requires planning ahead — this is not a spontaneous soak situation
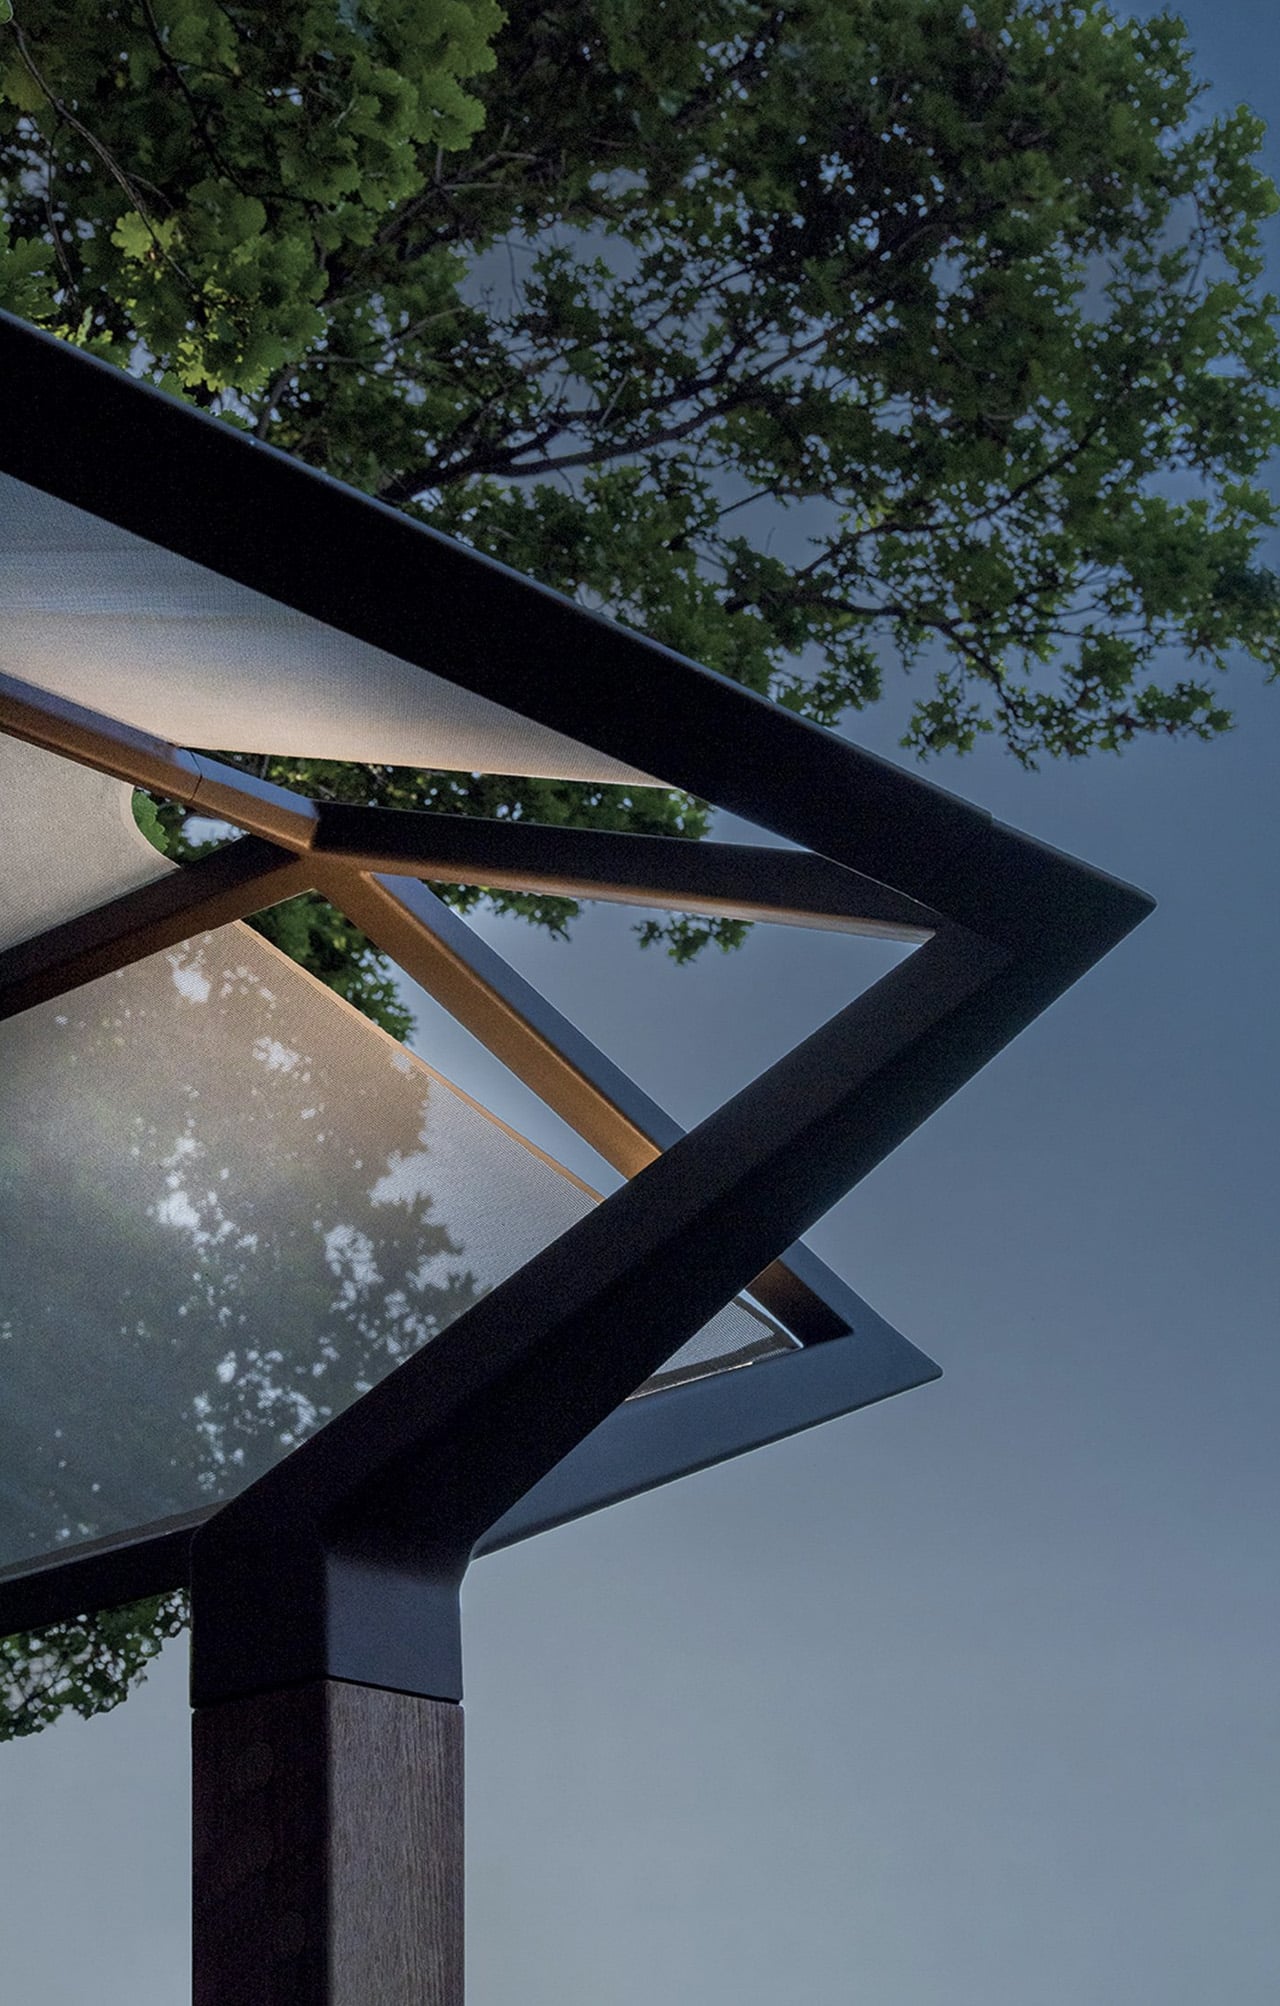
7. Airflow 8-Panel Fire Pit

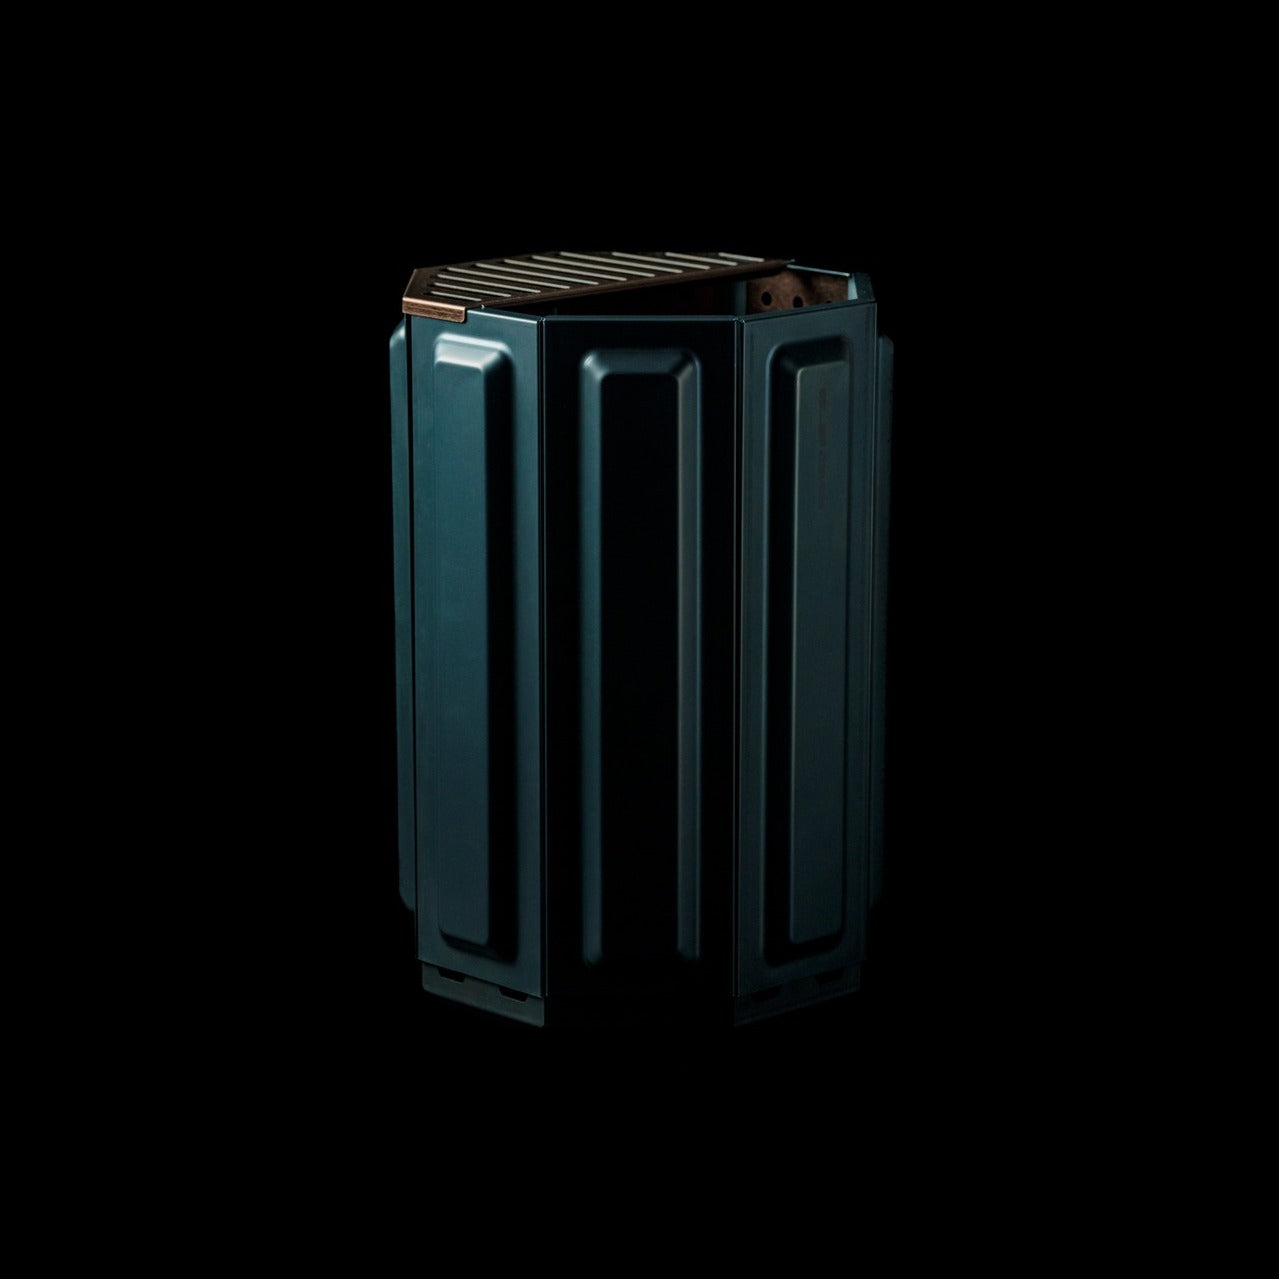
The Airflow fire pit is built around a single engineering insight: clean combustion requires oxygen at the base and a secondary combustion loop at the top. The eight removable panels form an octagonal cylinder with holes positioned precisely to channel fresh air to the base as the primary feed, then up through a double-walled cavity to the top vents as secondary combustion. The fire burns hotter, produces significantly less smoke, and leaves far less ash than a conventional open pit.
The eight-panel removable design does more than manage airflow — it gives you direct control over intensity. Remove panels to widen the burn; keep them assembled for a focused and efficient fire. For a small outdoor space where heavy smoke would ruin the evening entirely, this is the detail that separates a fire you can actually sit around from one that keeps everyone constantly repositioning their chairs.
Click Here to Buy Now: $325.00
What we like:
- Eight removable panels allow direct, intuitive control over fire intensity
- Secondary combustion system dramatically reduces smoke output in compact spaces
What we dislike:
- Eight separate panels add to the number of components to store between uses
- Steel construction will need occasional treatment to stay ahead of rust in wet climates
Small Space, Considered Objects
A well-used 300-square-foot yard doesn’t need more things in it. It needs the right things — objects that fold away cleanly, grow upward rather than outward, and look like someone thought carefully before placing them there. Each of these seven picks solves a real outdoor living problem without creating a new one, which is the baseline requirement for anything going into a space this small and this deliberately arranged.
The best version of a tiny outdoor space isn’t a smaller version of a large one. It’s something more deliberate — a set of objects that each do their job beautifully and step back when they’re not needed. Get these seven right, and a 300-square-foot yard stops feeling like a constraint entirely. It starts feeling like a choice you made on purpose.
The post 7 Best Tiny Home Outdoor Accessories That Turn a 300-Square-Foot Yard Into an Actual Living Room first appeared on Yanko Design.