We now have some idea of what's at stake in the longstanding feud between Elon Musk and OpenAI. As first reported by Bloomberg, the latest filing, as part of a lawsuit that accuses the AI giant of abandoning its non-profit status, claims that Musk is owed anywhere between $79 billion and $134 billion in damages from the "wrongful gains" of OpenAI and Microsoft.
Musk claimed in the filing that he's entitled to a portion of OpenAI's recent valuation at $500 billion, after contributing $38 million in "seed funding" during the AI company's startup years. Along with providing "roughly 60 percent of the nonprofit's seed funding," Musk offered recruiting of key employees, introductions with business contacts and startup advice, according to the filing. The monetary estimate comes from C. Paul Wazzan, a financial economist who's serving as Musk's expert in the case. According to Wazzan's calculations, OpenAI earned between $65.5 billion and $109.43 billion in wrongful gains, while Microsoft saw between $13.3 billion and $25.06 billion.
The lawsuit between Elon Musk and OpenAI dates back to March 2024, when the xAI CEO first filed a legal action claiming that OpenAI violated its non-profit status. Musk later added Microsoft as another defendant and even tried to get an injunction when OpenAI announced efforts to reorganize its corporate structure. Besides this suit, Musk has named OpenAI in another legal battle, accusing the company, along with Apple, of monopolistic practices that prevent xAI from getting a fair shot in the App Store.
This article originally appeared on Engadget at https://www.engadget.com/big-tech/elon-musk-is-looking-for-a-134-billion-payout-from-openai-and-microsoft-171824945.html?src=rss
Bookshelves quietly go from single row to double row, especially for manga where volumes multiply quickly. The front row looks great, the back row disappears behind it, and you end up playing memory games to remember which volume is hiding behind which spine. Collectors accept this as the price of a growing library, even though it makes browsing and rearranging annoying and means half your collection is essentially invisible unless you pull out the front row.
MG Raiser from MangaGuardian is a tiny shelf adapter that takes that double-row habit and makes it less painful. It is a compact L-shaped stand that lets you display two rows of manga in the same footprint, with the back row raised just enough to stay visible. Simple plastic geometry aimed squarely at overcrowded shelves, it solves a niche problem that anyone with more than 20 volumes has quietly dealt with at some point.
Sliding a few MG Raisers onto a shelf and lining up volumes, the front row sits where it always has, but the back row now rides on a small platform. You can still read every spine, which makes it easier to grab the next volume or rediscover something you forgot you owned. You get roughly twice the capacity in that section without turning the back row into a black hole where titles go to be forgotten.
The block-lift function is where the design gets a bit more clever. The back row and the Raiser act as a single movable unit, so when you want to reorganize you can pull out the entire raised row at once and drop it somewhere else on the shelf. For people who like to re-theme shelves, group arcs, or rotate what is on display, that small interaction saves time and keeps stacks from collapsing mid-move.
Each MG Raiser holds up to 10 items, typically five in front and five in back, with 84 mm width, 170 mm depth, and 150 mm height tuned for standard tankōbon-sized manga. The same proportions work for other similarly sized things, small paperbacks, light novels, or even game cases, so the design quietly extends beyond its original niche and could help anyone trying to squeeze more out of limited shelf space.
MangaGuardian sells other components like MG Tana and MG Sora for more elaborate setups, but MG Raiser stands on its own as a drop-in upgrade. You can use a couple in a single cube, line up several across a long shelf, or mix them with plain rows. It respects whatever furniture you already have, which is important when your shelves are already full of things you care about.
MG Raiser is unapologetically aimed at manga fans, yet the underlying idea, a raised second row that moves as a block, could help anyone trying to squeeze more out of a bookshelf without turning it into chaos. It is the kind of small, almost remedial design move that feels obvious once you see it, and that is usually a sign the designers were paying attention to how people actually live with their stuff instead of just offering another decorative shelf cube.
With the release of iOS 26, organizing your iPhone has become more intuitive and visually engaging than ever before. Apple’s latest update introduces advanced customization tools that allow you to balance functionality with style. Whether you’re aiming for a sleek, minimalist design or a highly organized layout, these five strategies will help you optimize your […]
Wouldn’t it be incredible if your office tasks could practically manage themselves? David Ondrej explains how Claude Cowork, an AI-powered application by Anthropic, is designed to make that vision a reality. Imagine effortlessly organizing files, tracking invoices, and streamlining workflows, all without needing any technical expertise. But here’s the catch: while Claude Cowork promises simplicity […]
Foldable phones are reshaping the mobile industry, with Samsung and Apple leading the charge. Both companies are focused on solving one of the most persistent challenges in foldable technology: eliminating visible creases in displays. The Galaxy Z Fold 8 from Samsung and Apple’s anticipated iPhone Fold represent the latest advancements in this field, each employing […]
California Attorney General Rob Bonta has sent a cease and desist letter to xAI, days after his office launched an official investigation into the company over reports that Grok was generating nonconsensual
If you’ll recall, xAI and Grok have been under fire for taking images of real individuals and putting them in revealing clothing like bikinis upon random users’ requests.
Bonta’s office demands that xAI immediately cease and desist from creating “digitized sexually explicit material” when the depicted individual didn’t consent to it or if the individual is a minor. It also demanded that xAI stop “facilitating or aiding and abetting the creation… or publication of digitized sexually explicit material” of nonconsenting individuals and persons under 18 years of age.
X changed its policies after the issue broke out and prevented the Grok account from being able to edit images of real people into revealing clothing. xAI also moved Grok’s image-generating features behind a paywall and geoblocked paying users’ ability to edit images of real people into bikinis, but only in regions where it’s illegal.
In his announcement, Bonta said xAI developed a “spicy mode” for Grok to generate explicit content and used it as a marketing point. The California AG also said that Grok-generated sexual images are being used to harass both public figures and ordinary users. “Most alarmingly, news reports have described the use of Grok to alter images of children to depict them in minimal clothing and sexual situations,” Bonta’s announcement reads.
“The actions above violate California law, including California Civil Code section 1708.86, California Penal Code sections 311 et seq. and 647(j)(4), and California Business & Professions Code section 17200,” it said. The state’s Department of Justice now expects to hear from xAI on the steps it’s taking to address these issues within the next five days.
xAI has been producing deepfake nonconsensual intimate images used to harass women & girls across the internet.
This is unacceptable. We’re demanding immediate answers on their plan to stop the creation & spread of this content.
This article originally appeared on Engadget at https://www.engadget.com/ai/california-ag-sends-cease-and-desist-to-xai-over-groks-explicit-deepfakes-140000574.html?src=rss
AirPods work most smoothly with Apple hardware, but they also connect reliably to Android phones, Windows laptops and other Bluetooth devices. The pairing process depends on the platform in use although the basics remain the same. Once the AirPods are placed in pairing mode, most devices detect them quickly and handle the remaining steps in the background. The guide below explains how to pair AirPods with Apple products, how the process differs on newer iPhones that support H2 features and how to connect them to non-Apple devices.
How to pair AirPods with Apple devices
Apple builds AirPods to pair almost instantly with devices in its own ecosystem. Opening the charging case near an unlocked iPhone or iPad usually brings up an on-screen prompt. Tapping Connect links the earbuds to the device and to every other Apple product signed into the same iCloud account. After that, switching between devices is automatic. Audio output follows the active device as long as each product is using updated software and is signed in with the same Apple ID.
If the pairing prompt does not appear, there are a few simple checks that help things move along. Opening the Control Center and selecting the audio output menu confirms whether the AirPods already appear as an available device. If they are listed there, choosing them establishes the connection. If they do not appear, opening the Settings app and checking Bluetooth usually reveals whether the AirPods are in range or already recognized. Opening the case while viewing the Bluetooth menu often triggers the pairing card once more.
The process is similar across Apple Watch and Mac. When the AirPods are already linked to an iPhone, they tend to show up automatically on a paired Apple Watch. On Mac, opening System Settings and viewing the Bluetooth section reveals the same device list seen on an iPhone. Selecting the AirPods from that list completes the connection and also syncs the pairing status back to every other Apple device using the same account.
Enhanced pairing with newer iPhones
Some newer iPhones support features enabled by the H2 chip used in newer AirPods models. With compatible AirPods, models such as iPhone 15 Pro, iPhone 15 Pro Max and the iPhone 16 lineup tend to deliver a faster and more responsive setup experience. When an AirPods case is opened near one of these phones, the device quickly detects the earbuds and displays the pairing card with little delay. This also tends to speed up transitions between devices and improves reliability when switching audio sources.
If the fast pairing prompt does not appear on a newer iPhone, reopening the case while the phone is unlocked is usually enough to reinitiate the process. It also helps to confirm that Bluetooth is turned on. Placing the AirPods back in the case for a few seconds and trying again will often reset the pairing state if the earbuds were connected elsewhere.
AirPods Pro 3
Engadget
How to put AirPods into pairing mode
Every AirPods model supports a manual pairing mode. This is essential when linking the earbuds to devices outside the Apple ecosystem, or when the automatic prompt fails to appear on an iPhone or Mac. On older AirPods models, pairing mode is activated by opening the lid and pressing and holding the setup button on the back of the case until the LED light flashes white. Newer models, including AirPods 4 and AirPods Pro 3, use a touch-based method instead. With the lid open, tapping the area near the LED light places the earbuds into pairing mode. Leaving the lid open keeps the AirPods discoverable for nearby devices. Closing the case ends the process and requires it to be repeated if the device fails to detect them.
Pairing mode does not remove any previous connections. It simply makes the AirPods available to new devices, which is helpful when switching between ecosystems. However, connecting to a new device usually takes priority. If the AirPods are already linked to something else that is nearby, turning off Bluetooth on the previously connected device prevents interference and helps the new device detect them more easily.
How to pair AirPods with Android devices
Although AirPods are designed for Apple hardware, they function like any other Bluetooth earbuds on Android. Opening the case and placing the AirPods in pairing mode allows Android phones to detect them through the standard Bluetooth menu. The earbuds appear in the list of available devices and selecting them initiates the connection. Once paired, AirPods work for calls and media playback. Some features, such as automatic ear detection and battery status indicators, may require a third-party app on Android and are not supported at a system level. Features such as spatial audio and device switching remain exclusive to Apple’s ecosystem but day-to-day performance is consistent on Android.
If the AirPods fail to appear, refreshing the Bluetooth device list on the Android phone usually helps. Making sure the earbuds are still in pairing mode is essential since the white LED indicator stops flashing after a short period. Reopening the case and holding the button again, or tapping on the front for newer models, restores discoverability.
How to pair AirPods with Windows laptops
Windows 11 handles AirPods as a regular audio device. Opening the Bluetooth and Devices menu in System Settings displays a list of nearby accessories. With the AirPods in pairing mode, the laptop should detect them and display them as an audio device. Selecting them completes the process and adds the earbuds to the device’s known accessories. Windows generally reconnects to AirPods automatically on future sessions as long as Bluetooth remains enabled.
If the earbuds do not appear in the list, toggling Bluetooth off and back on helps the system refresh the device scan. Checking whether the AirPods are already linked to a different device is another useful step. Windows sometimes struggles to take over a connection when the earbuds remain in range of a previously paired phone so disabling Bluetooth on the other device often resolves the issue.
Troubleshooting common pairing issues
Most pairing problems come down to the AirPods not being in discoverable mode or being connected to another device nearby. Resetting the earbuds solves many problems. On AirPods models with a setup button, placing the AirPods in the case, leaving the lid open and holding the button until the LED turns amber then white restores the factory pairing state. On newer models without a physical button, place the AirPods in the case, close the lid for about 30 seconds, then open it and quickly tap the front of the case three times. The status light should then flash amber and then white, to indicate that the reset is complete. This clears previous connections and makes the AirPods behave as if they are new out of the box.
Low battery levels can also interrupt pairing. Ensuring both the earbuds and the case have enough charge prevents unexpected disconnections during setup. Interference from other wireless accessories affects pairing on crowded networks. Moving to a quieter spot or turning off surrounding Bluetooth devices helps the AirPods stand out when scanning.
AirPods are built to pair quickly with Apple devices but they also integrate smoothly with other platforms. Keeping the earbuds in pairing mode and confirming that Bluetooth is enabled on the device in use ensures a smooth setup every time. Once connected, the AirPods tend to remember the device and reconnect whenever they are nearby which keeps day-to-day use simple regardless of the platform.
This article originally appeared on Engadget at https://www.engadget.com/audio/headphones/how-to-pair-airpods-with-any-device-140000234.html?src=rss
What if you could take the chaos of scattered research, endless documents, and overwhelming data and turn it into something clear, actionable, and even inspiring? Grace Leung walks through how NotebookLM, Google’s innovative AI platform, is reshaping the way professionals approach productivity and creativity. Imagine uploading dozens of files, PDFs, spreadsheets, or overviews, and seeing […]
I came out of my CyberGhost review with a positive opinion, feeling it had earned its spot in my best VPN roundup. However, even an expert review is subjective, and there's a chance CyberGhost will not work for you. If that’s the case, here's how to cancel your subscription.
How to stop your CyberGhost subscription renewing
Cancelling your CyberGhost subscription won't end it right away, unless you delete your account or get the refund (I'll explain how to do both of those later). Instead, the way to cancel CyberGhost is to stop your subscription from renewing at the end of each billing period. Once you've done that, you can keep using CyberGhost until your current period ends.
The following steps will cancel auto-renewal if you got CyberGhost through its website. If you bought it through an app store instead, see the next section.
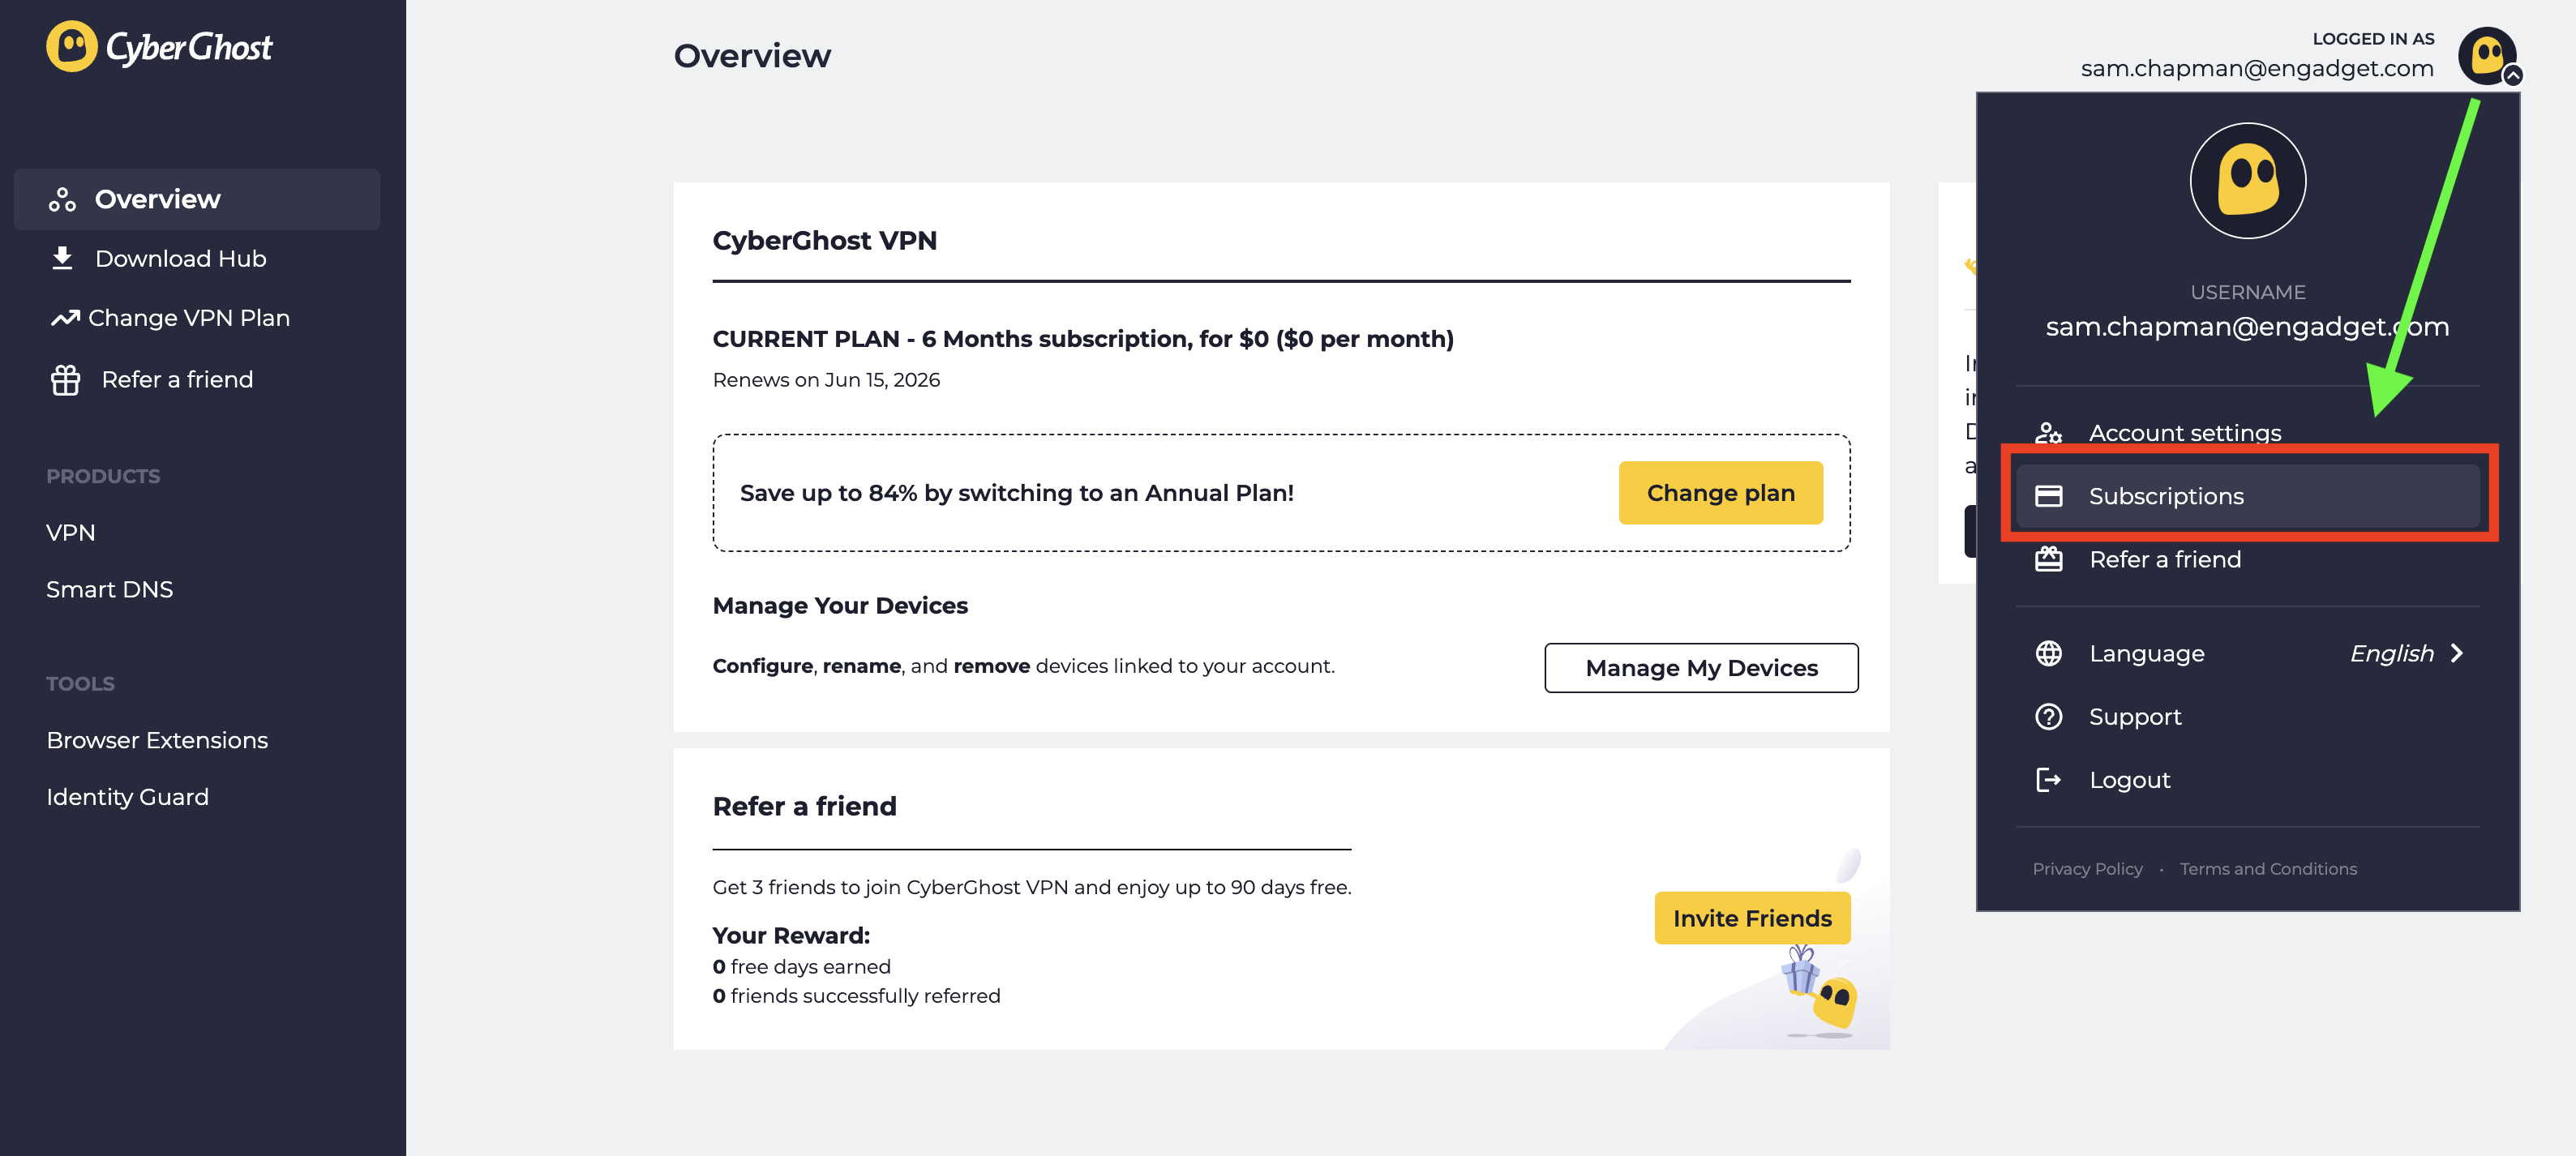
At the top-right of the screen, click the box labeled My Account. Enter your username and password if you aren't logged in already.
Look at the top-right corner of the new screen and click the CyberGhost logo next to your email address. From the drop-down menu, select Subscriptions.
Find the subscription you want to cancel and select Cancel Subscription.
When prompted, click Continue to Cancel.
Click the logo at top-right, then click Subscriptions to manage auto-renewal.
Sam Chapman for Engadget
This will turn off automatic billing for your account. The next time you would have been billed, your subscription will expire. You can resubscribe by purchasing another term. If you're within the refund period — 14 days for a monthly subscription and 45 days for all others — you can now request your money back.
How to cancel CyberGhost if you subscribed through an app store
When you subscribe to an app through the Apple App Store or Google Play Store, the store handles the billing; the app provider doesn't process the money itself. If you bought CyberGhost through an app store and want to cancel, you'll have to ask the app store in question, not CyberGhost. Here's how to do it.
If you subscribed through the Apple App Store, you'll need to cancel through your Apple ID. Here are the steps.
Open the Settings app on your home screen.
At the top of the Settings menu, you'll see your name. Tap it.
In your Apple Account menu, tap Subscriptions.
Scroll until you find your CyberGhost subscription, then tap on it.
Tap the words Cancel Subscription, then follow the prompts.
Here's what to do if you subscribed through the Google Play store. Similar to the Apple process, you'll go through the list of subscriptions on your profile.
Open the Google Play Store app.
Tap the circle in the top-right corner with the first letter of your name.
Find the Payments & Subscriptions menu and tap on it. On the next menu that appears, tap Subscriptions.
Scroll down until you find your CyberGhost subscription. Tap on it, then click Cancel Subscription.
Follow the prompts to complete cancellation.
How to delete your CyberGhost account
Before you set out to delete your CyberGhost account altogether, make sure you've cancelled auto-renew first by following the steps in the previous section. If you don't, you might still be charged for the subscription you're not using, and it's a huge hassle to end that without an account.
Once you've done that, log into your account on cyberghostvpn.com and click on your account profile at the top-right, just like when you canceled auto-renewal. Below the username/password window and the message about an activation key, you'll see the words Delete My Account in tiny letters.
How to find the button that deletes your CyberGhost account.
Sam Chapman for Engadget
Click on them. On the page that appears, select Delete My Account again. Follow any more prompts you're given to annihilate your username for good (note that you can't use it again afterwards).
How to get a refund from CyberGhost
To get a refund on your CyberGhost subscription, you have to be inside the window for the plan you chose. With a monthly plan, the refund period is 14 days. For all other plans, it's 45 days. If this time has elapsed, there's unfortunately no way to get your money back.
If you are within the refund period, you can get your money by sending a request through customer support. You can email support@cyberghost.ro, submit a ticket through this link or open a live chat conversation by clicking the Live Chat button at the bottom-right of any page on cyberghostvpn.com. No matter what method you choose, the conversation will go faster if you have your order number on-hand — check your inbox if you don't know it.
Start a live chat conversation by clicking the live chat button at the bottom-right of any screen on CyberGhost's website.
Sam Chapman for Engadget
If you went through an app store, you'll need to request your money back from that platform instead. Apple and Google Play handle their own monetary transactions, which means they also process refunds.
Best CyberGhost alternatives
After you've cancelled and/or deleted CyberGhost out of your life, you still need a VPN; the benefits of masking your IP address and changing your virtual location don't go anywhere. You can check out my best list (linked at the top) or best free VPN roundup for ideas, or check out the review for my favorite service, Proton VPN.
Proton VPN is my top choice because of its focus on user freedoms and attention to quality in everything it does. If you're willing to pay a bit more for extreme simplicity and total reliability, ExpressVPN is ideal for beginners. If you're a speed demon and just want to keep your downloads fast, go with Surfshark.
This article originally appeared on Engadget at https://www.engadget.com/cybersecurity/vpn/how-to-cancel-cyberghost-and-get-a-refund-130000311.html?src=rss
One thing that the world has been learning the past few years is that people deal with grief differently. That’s why we can never judge how people react to death of loved ones, beloved pets, other living creatures, and even life changes. Artists and creative people in particular sometimes have profound ways of honoring whatever it is that they have lost.
When a 65-year-old oak tree in Steve Parker’s front yard died from a fungal disease called oak wilt, he wanted to create a tribute to this tree that served as a refuge for migratory birds in their area. What he created was a sound sculpture, a record player that could play actual discs with bird songs, a fitting honor to the life and legacy of the tree.
Parker cut the trunk of the diseased tree into “wood cookies” or cross-sectional slices. He then carved grooves directly into the discs to create playable records. He then built a victrola or record player that is specifically designed to play the wooden records. This player is placed on a pedestal and the round tree slices are displayed on the walls behind it.
What plays on the wooden records is equally special. He etched the songs of migratory birds that once nested in the oak tree. You hear a scratchy, wooden sound which actually reminds you of that branch that would hit the side of an old farm house, which can be nostalgic or creepy depending on your experience of it.
Creating these wooden records wasn’t easy. Live oak is notoriously difficult to work with because it cracks as it dries, and many woodworkers avoid it entirely. But Parker saw those imperfections as part of the piece’s authenticity. Those cracks and warps in the sound aren’t flaws, they’re features that honor the tree’s natural character even in death.
But the wooden records are only part of “Funeral for a Tree.” Parker also created a companion sculpture called “Sheng Shrine”: a plant-like, valve-driven instrument built from salvaged brass valves from euphoniums and trumpets, copper tubing, and breathing bags. What makes this piece particularly moving is what animates it: CPAP machines and ventilators, the same medical equipment used to help people breathe when they’re ill.
These breathing machines give life to discarded Chinese shengs (mouth organs). The sheng is traditionally associated with the phoenix, and the word itself means life, voice, and sound in Mandarin. Parker collaborated with sheng virtuoso Jipo Yang, who interpreted the bird calls and performed short compositions around them. The sounds you hear include the clicks of tiny relays, the grunts of air pumps that almost sound like snores, and the wheezing as air pushes through the reeds. It’s mechanical yet deeply emotional.
There’s another layer to this work that makes it even more poignant. Parker realized that his grief for the tree echoed the loss of his father to cancer. Both were slow, inevitable declines where care could not prevent loss. When his father was really sick, Parker’s family monitored his breathing to assess his comfort and sense where his body was going. Those CPAP machines and ventilators in “Sheng Shrine” carry those memories. They’re devices associated with life support, transformed into instruments that give breath to dead instruments playing songs for a dead tree.
What makes “Funeral for a Tree” so powerful is that it’s not Steve Parker performing a requiem for the tree. It’s the tree performing its own memorial service. The wood itself becomes the instrument, the bird songs it once sheltered become the music, and the breath that once rustled through its leaves is replaced by mechanical breathing that keeps the dirge alive.
In transforming something most people would haul away as waste into a functioning musical instrument, Parker reminds us that grief doesn’t have to be silent or passive. Sometimes the most profound way to honor a loss is to let it speak for itself, to give it voice and breath and let it tell its own story. In doing so, he’s created something that transcends the personal: a meditation on memory, loss, and the ways we try to hold onto what’s gone.