The market for compact smartphones didn’t disappear because people stopped wanting them; manufacturers simply decided the economics didn’t justify the engineering. The iPhone 13 mini was the last great holdout, and its discontinuation left a void that has been filled with nothing but silence. That makes this CMF Phone Mini concept, posted by designer Preet Ajmeri on the Nothing Community forum, feel less like a flight of fancy and more like a genuine market opportunity. It suggests a smarter middle path for small phones, one built around accessibility and modularity rather than specs-sheet maximalism. This isn’t just another shrunken flagship render; it’s a thoughtful take on what a small phone in 2025 ought to be.
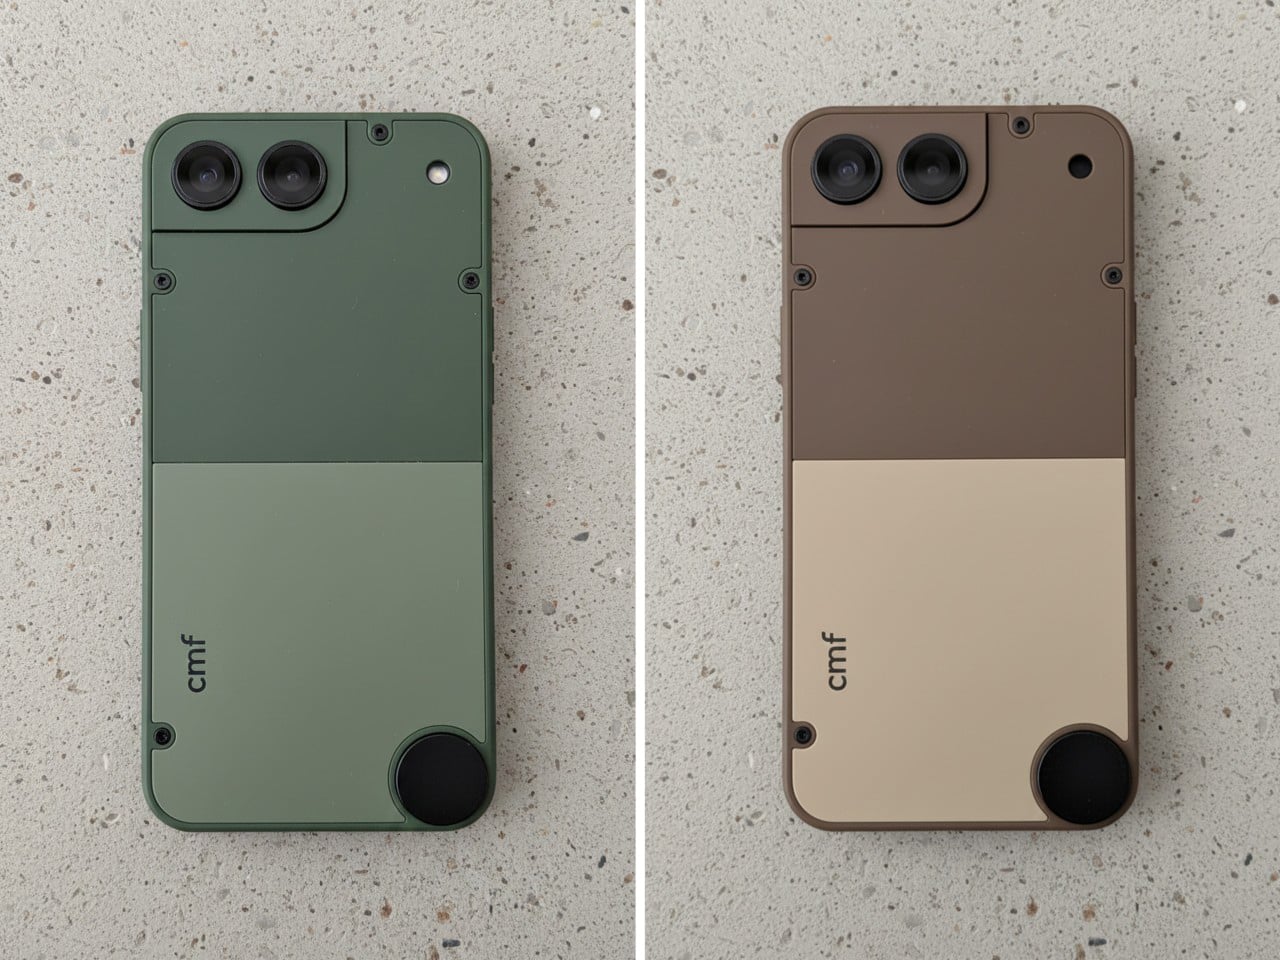
What makes Ajmeri’s concept work is its complete lack of flagship pretension. The design has a satisfying, tool-like quality, with an aesthetic that leans closer to a Braun appliance than a miniaturized glass sandwich. The two-tone back panels, secured by exposed screws, are a direct nod to the modularity of the CMF Phone 1 and 2 Pro. That little circular element in the lower corner is a brilliant touch, practically begging for a lanyard or a clever magnetic accessory. The camera housing is integrated into a stepped corner plate, making it feel like a distinct, functional component rather than a generic camera island. It’s an honest object, designed to be held and used without demanding reverence.
Designer: Preet Ajmeri
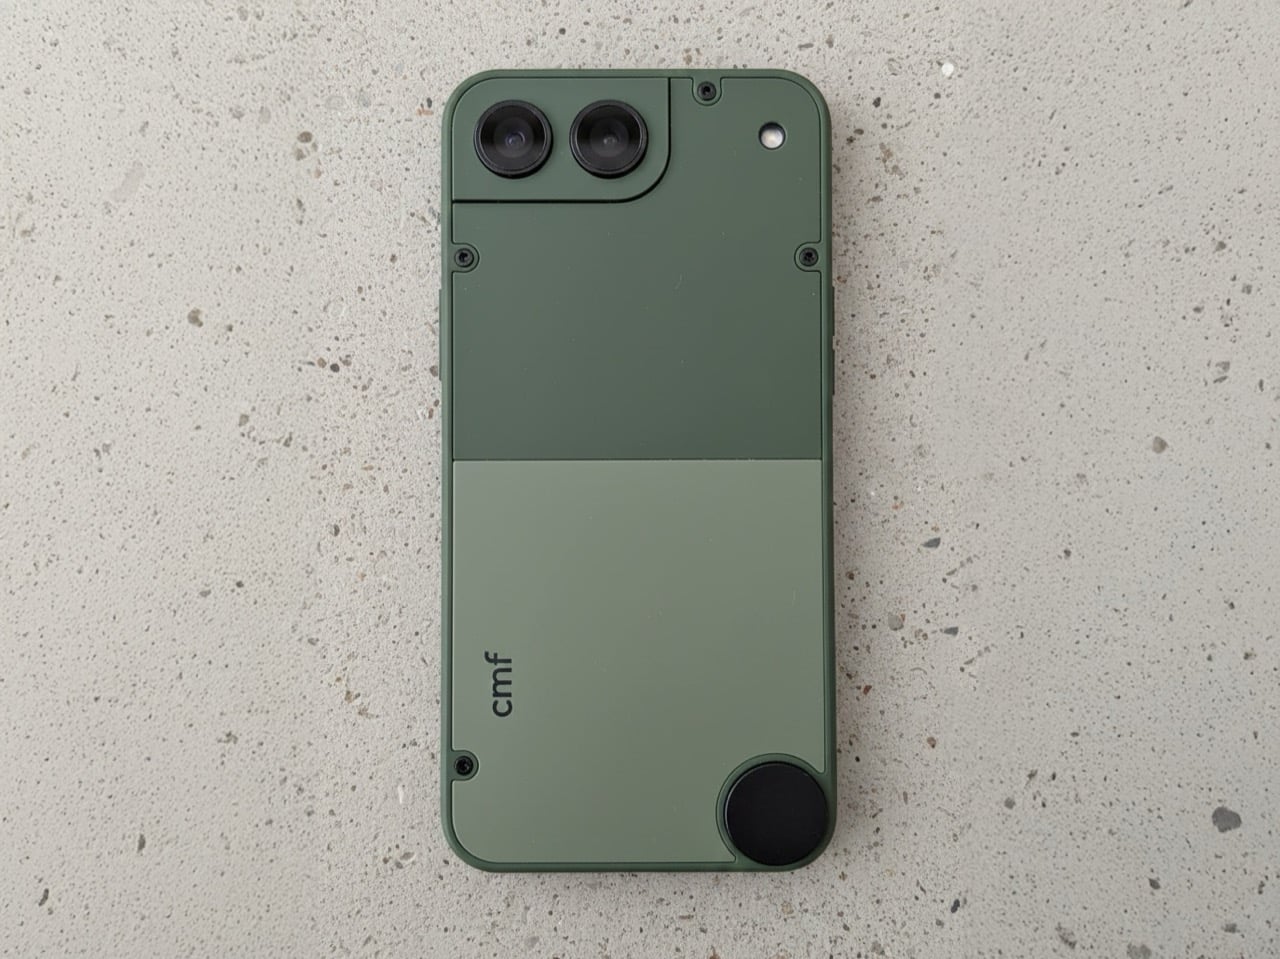
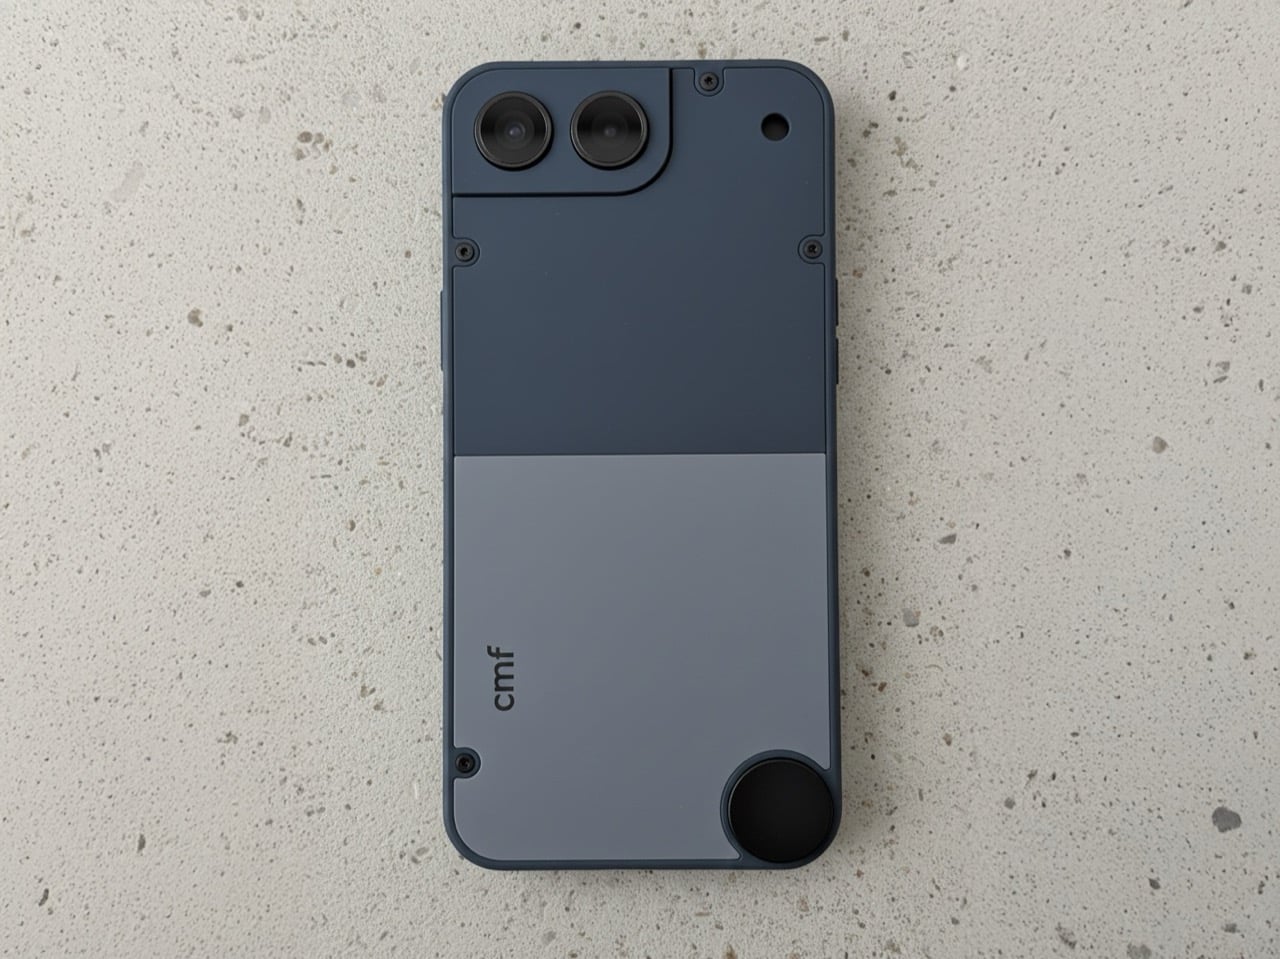
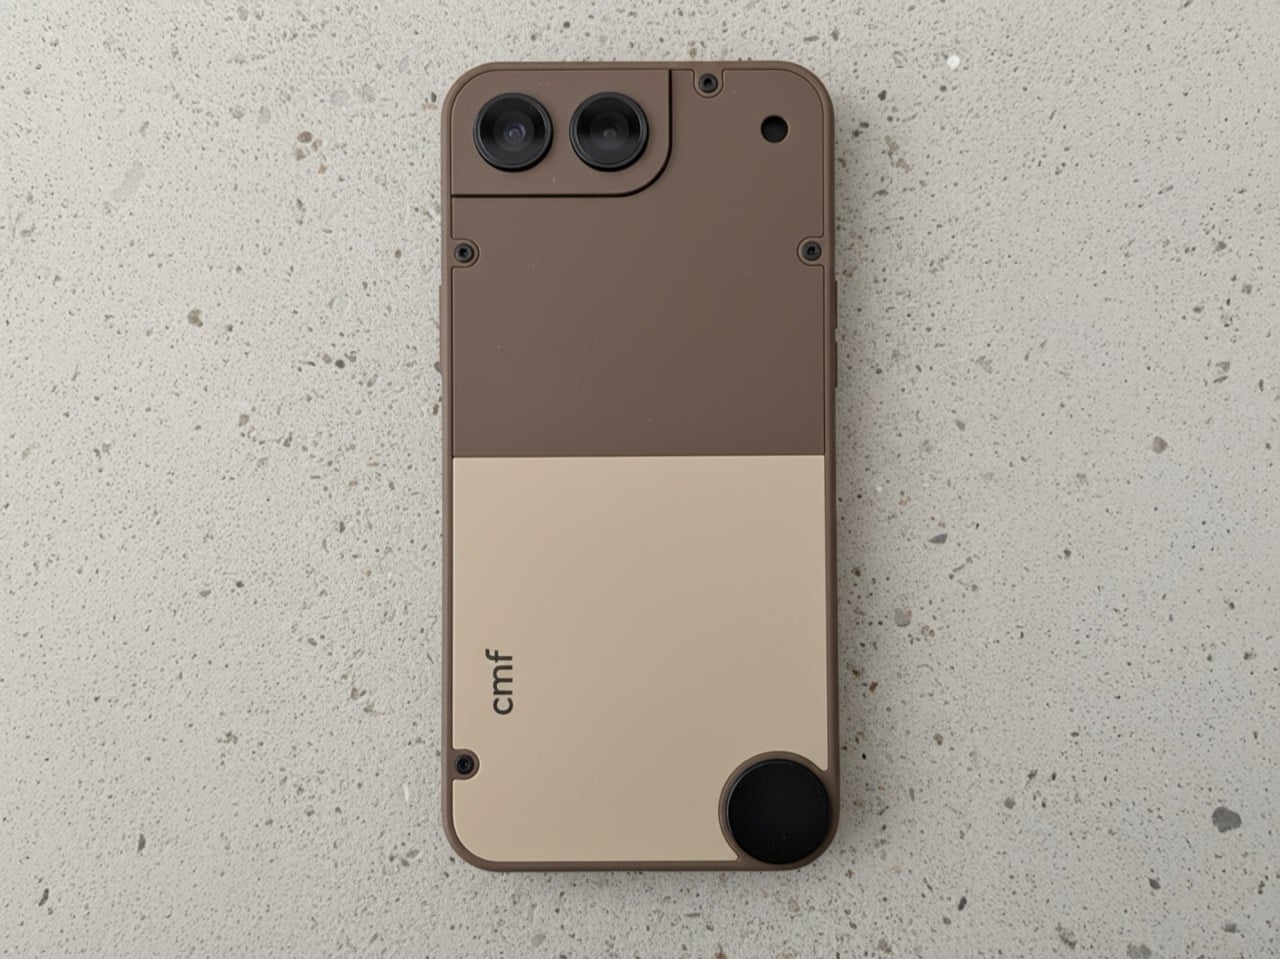
The colorways Ajmeri mocked up are subtle, and a deviation from the flagship phones’ vibrant color schemes. The sage green has a distinct, almost military-grade feel, while the slate blue is more of a classic tech color. But that brown and cream version is the real standout; it feels like something Braun would have designed in 1975, a perfect piece of retro-futurism. The hard split between the two tones gives it a clear visual hierarchy, and the presumed matte texture looks like it would feel fantastic in the hand. That aside, the modularity is still retained, with the screw-in design, and the knob on the bottom for fixing accessories.
This thing would live or die in the sub-$300 space, and that’s exactly where it belongs. You wouldn’t expect a top-tier Snapdragon processor here; a power-efficient MediaTek Dimensity 7000-series chip would be more than enough to drive a 5.4-inch OLED display without destroying the battery. And battery life would be the biggest engineering challenge, as it always is with small devices. But the appeal isn’t raw performance. The appeal is ergonomics, a one-handed user experience, and a design that has more personality than anything five times its price. CMF has already proven it can deliver a thoughtful software experience on a budget, and that’s all a device like this would need.
So, will Nothing ever actually build it? Almost certainly not, and that’s the real shame. The big players are too risk-averse to cater to a niche they’ve already declared dead. But this concept proves the desire for a well-designed, affordable, and genuinely compact phone is very much alive. It’s a perfect fit for a brand like CMF, which has built its identity on challenging the assumption that budget-friendly has to mean boring. The first company to take a chance on a design with this much character and common sense won’t just sell a phone; they’ll create a cult classic.
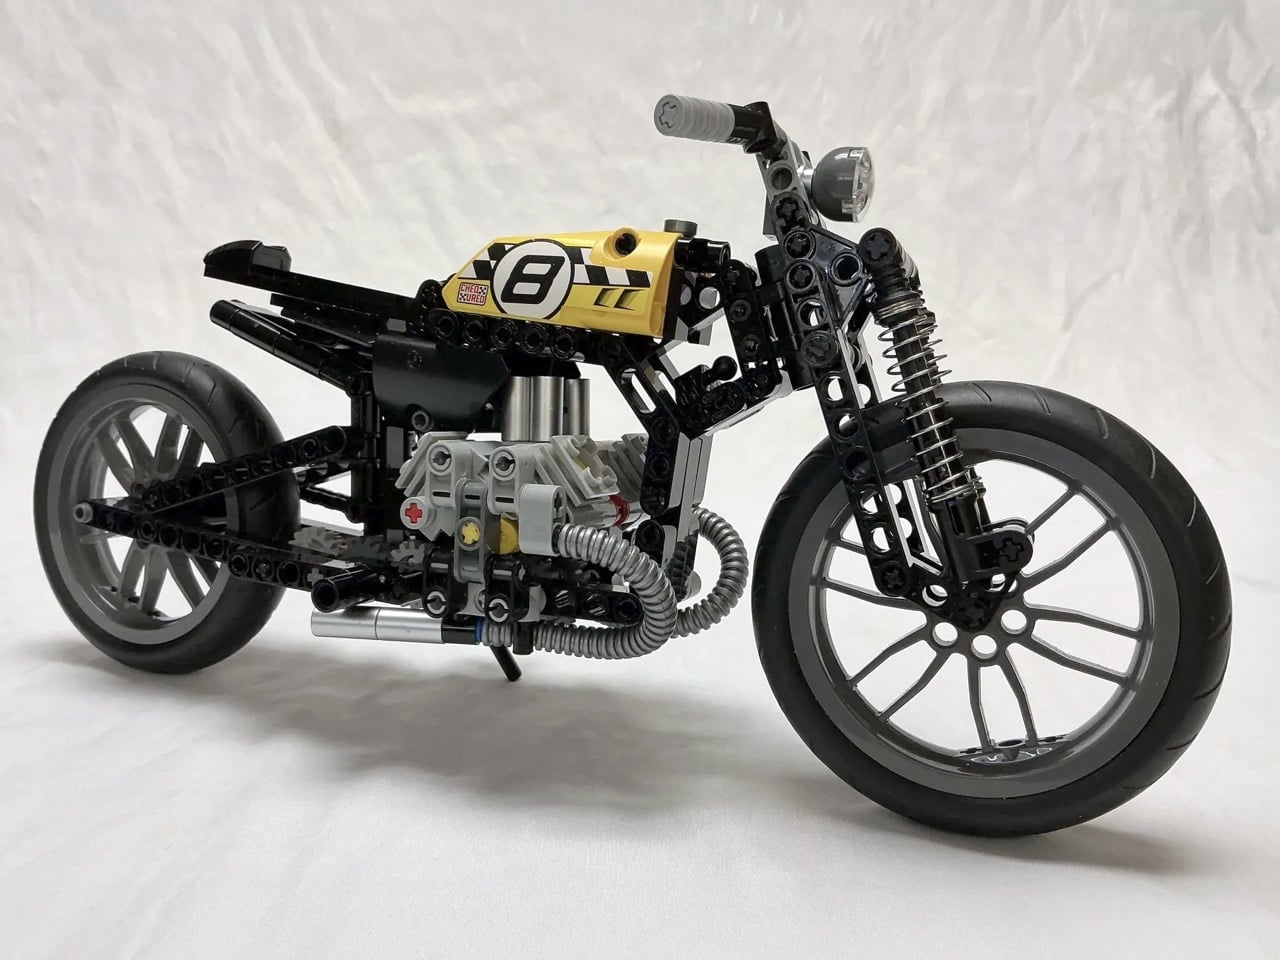
Ballpoint pen springs probably weren’t on your list of unofficial-yet-essential LEGO Technic parts, but this bobber MOC (My Own Creation) makes a compelling case for raiding your desk drawer. The twin coiled springs flanking the front forks and tucked behind the rear wheel handle suspension duties with surprising visual authenticity. They compress and extend just like real motorcycle shocks, adding functional movement to a build that already nails the stripped-down bobber aesthetic.
Bobbers emerged from post-war American garages when riders started cutting away everything unnecessary from their motorcycles. The philosophy was simple: lose the extra weight, keep what makes it run. This LEGO version channels that same spirit with its exposed twin-cylinder engine, bare-bones frame, and that yellow racing tank sporting a bold number 8. The builder modified LEGO Technic set 42036 into something far leaner and more specialized, swapping the original suspension components for those ingenious pen springs and repositioning elements to achieve proper bobber proportions.
Designer: MadamMelodicRaisin104
The pen spring hack solves a real problem in LEGO motorcycle builds. Technic sets come with their own suspension systems, sure, but they’re often bulky or visually clunky at this scale. Real bobber shocks are these long, exposed coil-over units that sit right out in the open, part of the bike’s visual language. Standard LEGO shock absorbers don’t quite capture that look. They function fine mechanically but lack the visual density and tight coil pattern you see on actual motorcycles. Pen springs nail the aesthetics, which works perfectly for this MOC because visuals are everything. The Bobber isn’t entirely functional, but the suspension (even if static) looks the part.
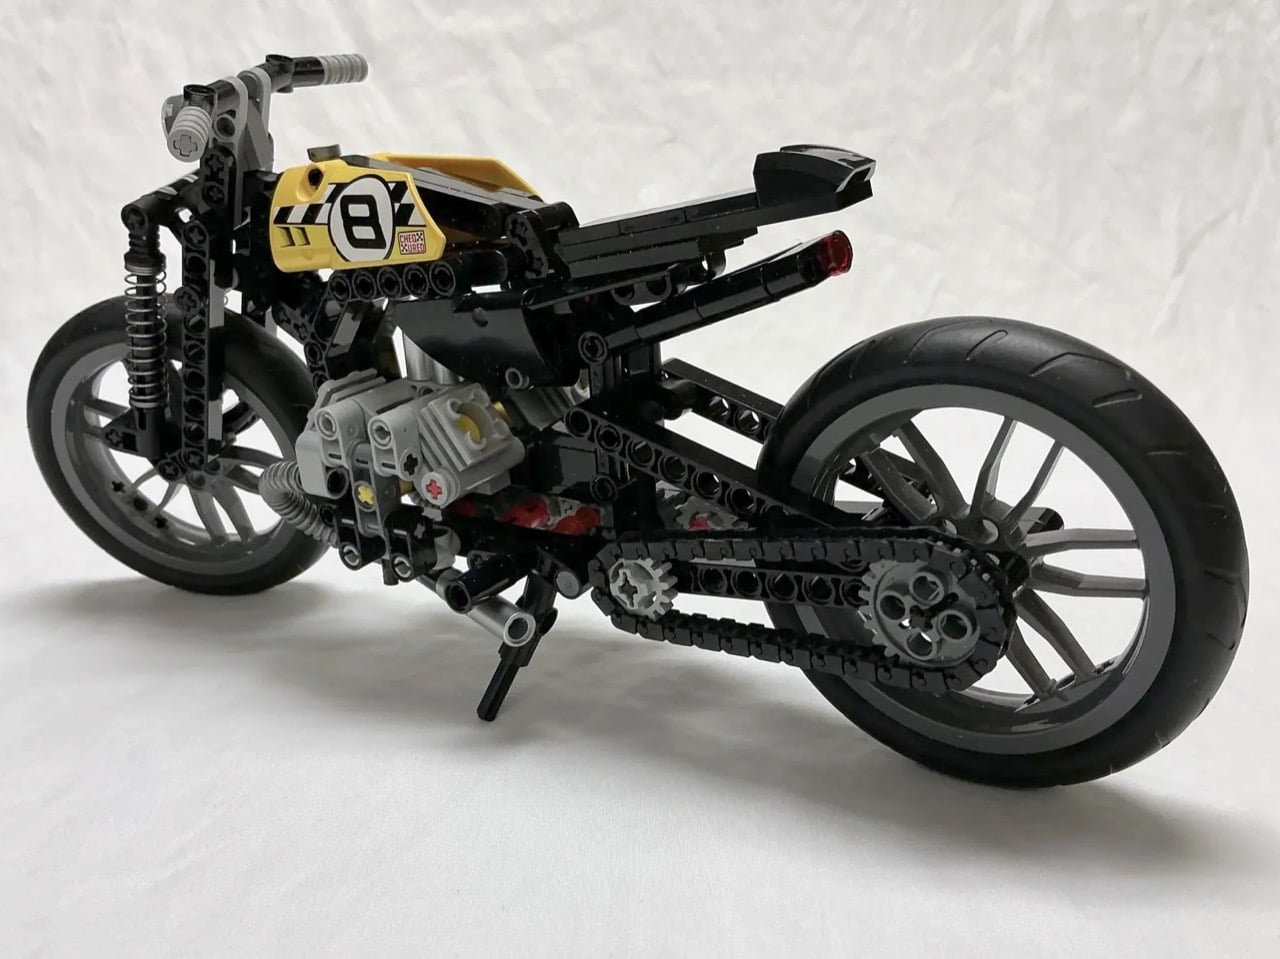
Set 42036, the donor bike here, originally builds into either a chopper or a street bike configuration. Both versions skew whimsical, which works for LEGO’s typical audience but doesn’t scratch the itch if you’re after something with genuine mechanical credibility. The builder kept the core engine assembly and frame geometry but ditched the fanciful proportions. Bobbers sit low, with the seat almost directly over the rear axle and minimal distance between components. This build compresses everything into that tight package, pulling the handlebars back into a more neutral position and mounting the foot pegs mid-frame rather than forward where cruisers typically place them. Mid-controls make sense for bobbers because the whole point was maneuverability and quick handling, not long highway cruises with your feet stretched out front.
The kickstand correction might seem minor but it speaks to the builder’s attention to detail. The original Technic chopper configuration puts the stand on the right side, which is wrong for actual motorcycles. Real bikes park on the left because that’s where the shifter lives and you need clear access when you’re mounting from the curb side. Swapping it over takes maybe five minutes but it shows someone who actually rides or at least understands how these machines work in the real world. Same logic applies to adding the foot pegs, which the kit omits entirely. You can’t have a rideable motorcycle without somewhere to put your feet, even in miniature form.
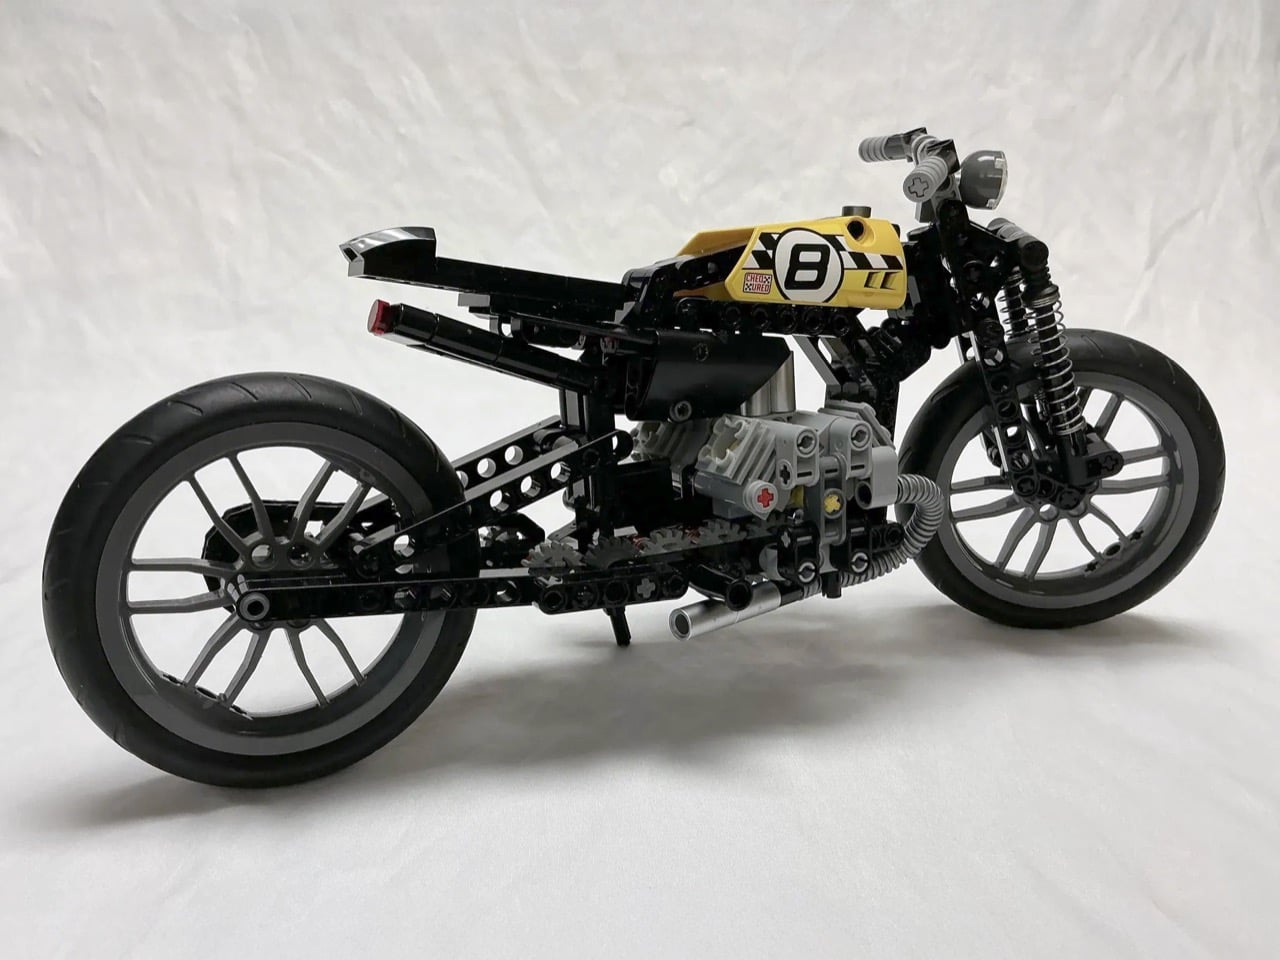
The yellow racing livery with that big number 8 pulls the aesthetic away from typical black-on-black bobber builds and into flat track racing territory. Flat trackers are bobbers’ dirt-slinging cousins, stripped down for speed on oval dirt tracks. The color choice keeps the build from looking too generic while the racing plate gives it a story beyond “stripped motorcycle.” The tail section stays minimal, just a small seat cowl and rear fender. Nothing to disturb the clean line running from tank to tail. The fat rear tire balances against that narrow front wheel, classic bobber proportions that suggest power and grip where it matters most. Those pen springs keep catching your eye though, because they’re so perfectly scaled and so absurdly obvious that you wonder why more builders haven’t figured it out.
The catch, however, is that this Bobber only exists in the metaverse… or rather LEGO’s own virtual verse, called the LEGO Ideas forum. Designed as an online platform for LEGO enthusiasts to share their own creations and vote for their favorites. MOCs that cross the 10,000 vote threshold get sent to LEGO’s internal team for review, and if successful, get turned into a box set that all of us can buy! I don’t see LEGO launching kits that require dismembering ballpoint pens for their springs (because that’s technically an ‘illegal’ form of building a brickset), but I’m sure there’s a pneumatic Technic part somewhere in LEGO’s arsenal that will work. If you want to see that happen, however, step 1 is to cast your vote for this gorgeous build on the LEGO Ideas website.
If Part 1 of this list proved that nostalgia is having a moment, Part 2 is here to show you that 2025 wasn’t only about looking backward. Sure, we are obsessed with what came before, but the best designs this year didn’t just resurrect the past, they remixed it with enough modern intelligence to feel genuinely new. This is where things get interesting: when designers stop treating retro as a costume and start using it as raw material. The result is products that feel familiar enough to trust but fresh enough to justify their existence in a world already drowning in stuff.
So here are the next 10 designs that made 2025 unforgettable. Some lean hard into nostalgia. Others push so far forward they feel like prototypes from 2030. A few manage to do both at once, which might be the most 2025 thing possible. Whether you spent this year glued to design blogs or just trying to keep your head above water, these picks represent the moments when form, function, and cultural timing aligned perfectly. Let’s dig into the second half of what made this year worth paying attention to.
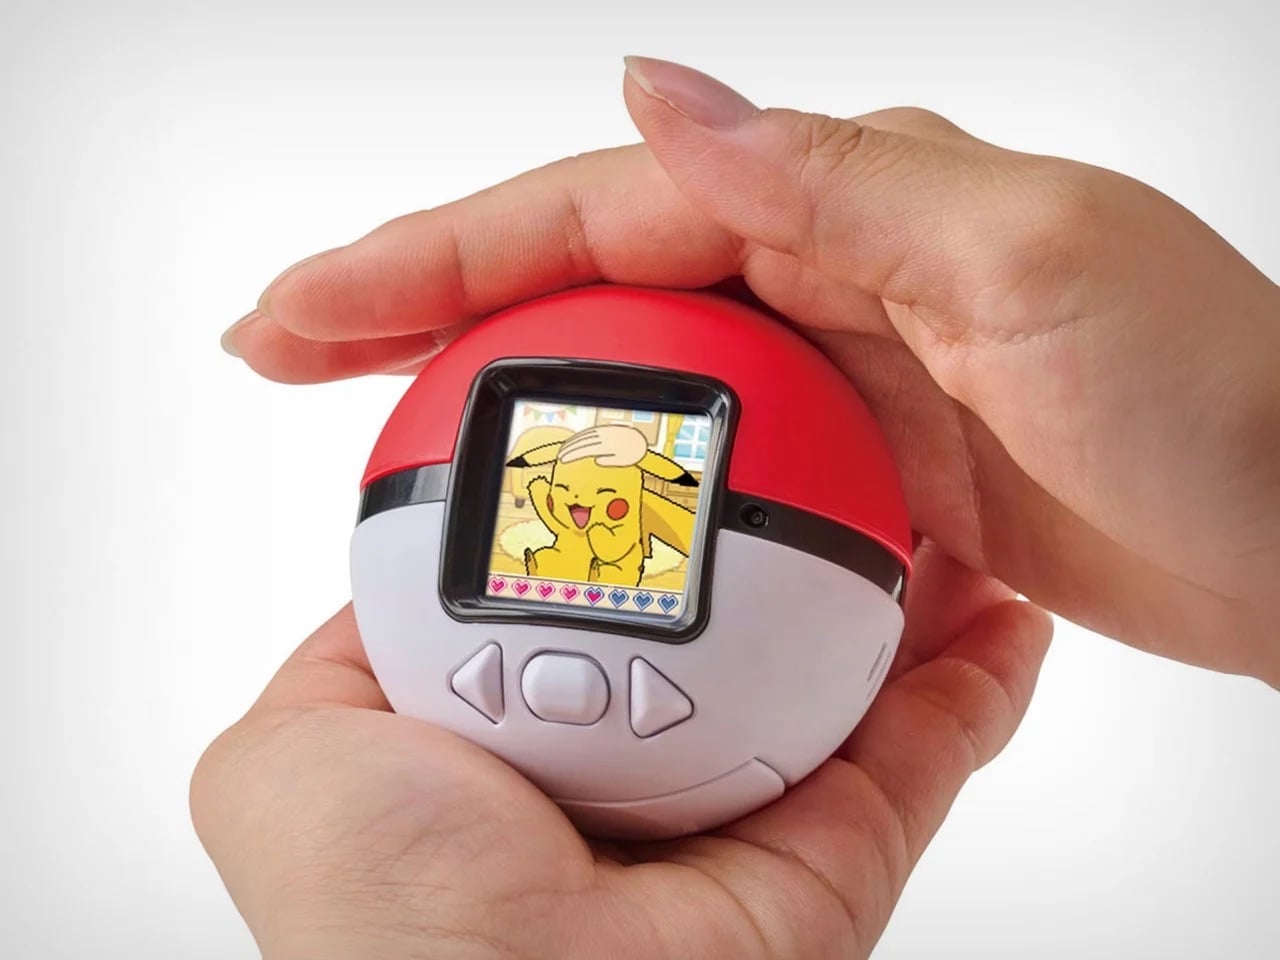
1. Poke-Nade Monster Ball by Takara Tomy & The Pokémon Company
Nostalgia is a fickle mistress! She shows up when you least expect her, whispers about the good old days, and convinces you to spend money on things that have no business existing in 2025. Case in point: Pokemon just dropped the Poke-Nade Monster Ball, which is essentially a Tamagotchi disguised as a Pokéball, and millennials are losing their collective minds over it. This is not groundbreaking technology. This is not solving any real problems. This is pure, weaponized nostalgia, and it is working exactly as intended.
The device takes everything we loved about late-90s virtual pets and wraps it in Pokemon branding so potent you can practically hear the theme song playing. A color LCD screen sits inside a touch-sensitive shell shaped like an actual Pokéball, letting you stroke, tap, and physically interact with your digital companion. Pet it gently and it reacts with happiness. Tap persistently and it falls asleep. The gestures unlock deeper animations as your friendship level grows, which is a clever evolution of the old Tamagotchi button-mashing routine. But let’s be honest, the innovation here is minimal. What they are really selling is the emotional real estate Pokemon and Tamagotchi occupied in our childhoods, repackaged with a slightly better screen and some capacitive touch sensors. And you know what? That is enough. Because nostalgia does not need to innovate. It just needs to remind you of a time when feeding a pixelated creature between math classes felt like the most important responsibility in your life. Pokemon knows this. They counted on it. And judging by how fast these things are selling out, they were absolutely right.
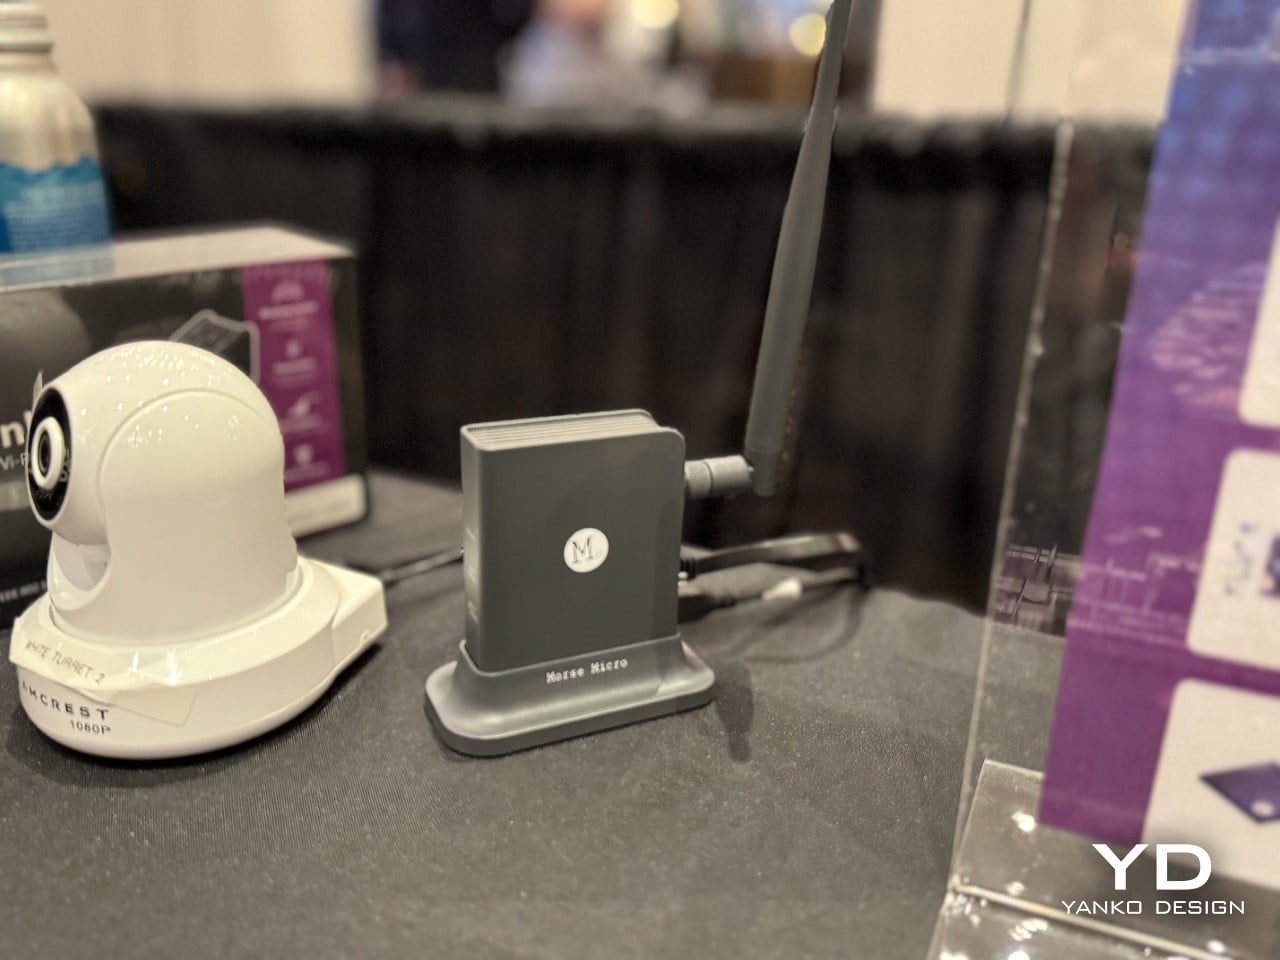
2. Wi-Fi HaLow (with 9.9 mile connectivity) by Morse Micro
And to counteract that, here’s some serious tech innovation from the beginning of the year that grabbed eyeballs. While most brands relied hard on nostalgia, Morse Micro decided to solve a problem that has plagued connectivity since WiFi was invented: range. The Wi-Fi HaLow system delivers connectivity across a 9.9-mile radius using sub-GHz radio waves, which means it can punch through walls, penetrate obstacles, and maintain signal strength over distances that would make standard Wi-Fi routers give up and go home. Traditional Wi-Fi operates on crowded high-frequency bands that struggle beyond a few dozen meters and get blocked by anything denser than drywall. HaLow operates at lower frequencies with significantly better propagation characteristics, turning your home network into something closer to a neighborhood utility than a room-specific convenience.
The implications go way beyond streaming Netflix from your driveway. You could theoretically connect to your home network from the grocery store, maintain smart home control from miles away, or create IoT networks that span entire campuses without repeaters or mesh nodes cluttering every hallway. Industrial applications become viable where they were previously impossible, rural connectivity suddenly looks feasible without expensive cellular infrastructure, and the whole concept of what a local network means gets redefined. This is not retro. This is not nostalgic. This is pure forward momentum, the kind of innovation that makes you wonder why we spent decades optimizing the wrong frequencies when the solution was sitting in a less congested part of the spectrum the whole time. If 2025 taught us anything, it is that sometimes the best way forward has nothing to do with where we have been.
3. Nintendo Wii U Revival by Brenden Sullivan
The Wii U was Nintendo’s most spectacular failure in recent memory, a console so confusing in its messaging and underwhelming in its execution that even hardcore fans pretend it never happened. Yet here comes a concept that asks: what if we took the one genuinely clever idea from the Wii U, the gamepad with the built-in screen, and rebuilt it for the Switch 2 era? This Wii U revival concept imagines a companion device that pairs with Nintendo’s next console, offering dual-screen gameplay, touch controls, and the asymmetric multiplayer experiences that made the Wii U interesting for about five minutes before everyone forgot it existed. It is nostalgia for hardware that barely had time to build nostalgia in the first place, which makes it either brilliantly contrarian or deeply misguided depending on how charitable you are feeling.
What makes this concept work as a 2025 artifact is that it refuses to let a good idea die just because the original execution flopped. The Wii U’s tablet controller was ahead of its time in some ways and catastrophically behind in others, but the core premise, that asymmetric information and split-screen interactions could create new gameplay dynamics, never got a fair shot. This concept takes that kernel and strips away everything that made the original clunky: the limited range, the single-controller restriction, the confusion about whether it was a handheld or a console accessory. By positioning it as an optional sidekick to the Switch 2 rather than the main event, it fixes the branding disaster while keeping the innovation. It is nostalgia weaponized correctly, not as pure recreation but as salvage operation, pulling the worthwhile parts from the wreckage and giving them a second chance in a context that might actually appreciate them.
4. No.1/1000 Titanium Fractal Vise by Titaner
Most tools are designed to disappear into workshops, utilitarian objects that do their job without demanding attention. Titaner’s titanium fractal vise does the opposite. It announces itself as both precision instrument and sculptural object, with a body machined from solid titanium and a fractal pattern that serves actual structural purposes rather than just looking cool. The geometry distributes clamping force efficiently while reducing material weight, which means the mathematical beauty is not decorative, it is load-bearing. Limited to a small production run, each vise is CNC-machined to tolerances that make it as much a collector’s item as a working tool, the kind of thing that sits on a workbench and makes visitors ask questions before they realize it actually functions.
What makes this a 2025 design rather than just expensive engineering porn is the way it represents a larger shift in how we think about tools and objects. We are moving past the idea that functional items need to be aesthetically neutral, that beauty and utility occupy separate categories. This vise proves you can have museum-grade craftsmanship in something designed to grip metal and take abuse. It is the intersection of maker culture, precision manufacturing, and the growing appreciation for objects that justify their cost through both performance and presence. There is no nostalgia here, no retro callback, just an argument that everyday tools can be extraordinary if we stop accepting mediocrity as the baseline. It is innovation in the form of asking why more things are not built this well, and then actually building one to prove the point.
5. WP200 Pro Modular Smartphone by OUKITEL
Modular smartphones have been promised, prototyped, and abandoned so many times that most people stopped believing they would ever work. Then the rugged WP200 Pro from OUKITEL shows up with a detachable display that does not just disconnect, it transforms into entirely different devices. The screen pulls away from the phone body and can be reconfigured as either a smartwatch strapped to your wrist or an earbud clipped to your ear. The phone itself continues functioning with a secondary display underneath, so you are not sacrificing core functionality when you repurpose the main screen. It is the kind of absurdly ambitious design that sounds like vaporware until you see the mechanical hinges and magnetic connections that make it plausible.
This is innovation trying to solve a problem nobody asked for but might actually appreciate once it exists: the fact that we carry multiple screens doing similar jobs when one good screen could rotate between contexts. Why own a phone, smartwatch, and wireless earbuds when one modular system could cover all three? The rugged construction suggests this is built for field work, outdoor use, or situations where carrying multiple fragile devices makes no sense. It is the opposite of nostalgia, there is no retro aesthetic here, no callback to simpler times, just aggressive forward-thinking that asks whether our current device ecosystem is as optimized as we assume. Whether it ever ships is anyone’s guess, but as a statement of intent, it proves that some designers are still more interested in what comes next than what came before.
6. Kangourou Tiny Home by Quadrapol
Tiny homes have been sold as this romantic solution to housing affordability and minimalist living, but they come with one universal design flaw that nobody wants to admit: climbing a ladder to your bed every night gets old fast. Especially if you have kids, aging parents, mobility issues, or just a baseline desire to not break your neck at 3am during a bathroom trip. This family-friendly tiny home named Kangourou redesigns the entire layout to put every sleeping space on the ground floor, which sounds simple until you realize how much spatial gymnastics that requires in a structure measuring under 400 square feet. The designers pulled it off using sliding partitions, convertible furniture, and clever vertical storage that keeps the ceiling height usable without forcing anyone to sleep in what amounts to an attic crawlspace.
What makes this relevant to 2025 is that it represents tiny home design finally maturing past the Instagram aesthetic phase. For years, tiny homes prioritized looking good in photos over actually functioning as long-term residences, which is why so many ended up as glorified vacation rentals rather than permanent housing solutions. This design prioritizes livability, accessibility, and the reality that families need private sleeping spaces that do not require ladder proficiency. It is not flashy. It is not trying to reinvent architecture. It is just solving a known problem with enough intelligence that it stops being a problem, which might be the most underrated form of innovation. If the tiny home movement wants to be taken seriously as housing rather than lifestyle content, this is the direction it needs to go: less emphasis on clever lofts, more focus on whether you would actually want to live there past the honeymoon phase.
7. Pexar Starlight 15.6″ Picture Frame by Lexar
Wizarding photographs in Harry Potter had one feature that always felt unfair: they moved, waved back, captured the full motion of a moment instead of freezing it into stillness. Muggles have been trying to close that gap ever since, and digital picture frames are basically our best attempt at making photos feel alive without actual magic. The Pexar Starlight takes that idea and adds ambient backlighting, turning a 15.6-inch display into something that sits between traditional frame and mood lighting. Photos cycle through with adjustable brightness that shifts based on time of day, so your memories glow softly in the evening and stay crisp during daylight hours. It is designed to blend into home decor rather than scream “tech gadget,” which is harder than it sounds when you are essentially mounting a screen on the wall.
What separates this from the dozens of other digital frames cluttering the market is the execution of details most brands ignore. The matte finish reduces glare without killing color vibrancy. The frame itself comes in multiple finishes so it does not look like every other black-bezeled rectangle. Setup happens through a companion app that actually works instead of requiring a computer science degree to navigate, and photo uploads can be automated from cloud storage so you are not manually curating every week. The backlight feature is the real differentiator, creating depth and warmth that makes photos feel more like displayed art than screensaver content. It is not trying to replace your phone’s photo library. It is trying to give your best shots the kind of presence they deserve, somewhere between nostalgia object and functional decor, which is exactly where digital frames should have been aiming all along.
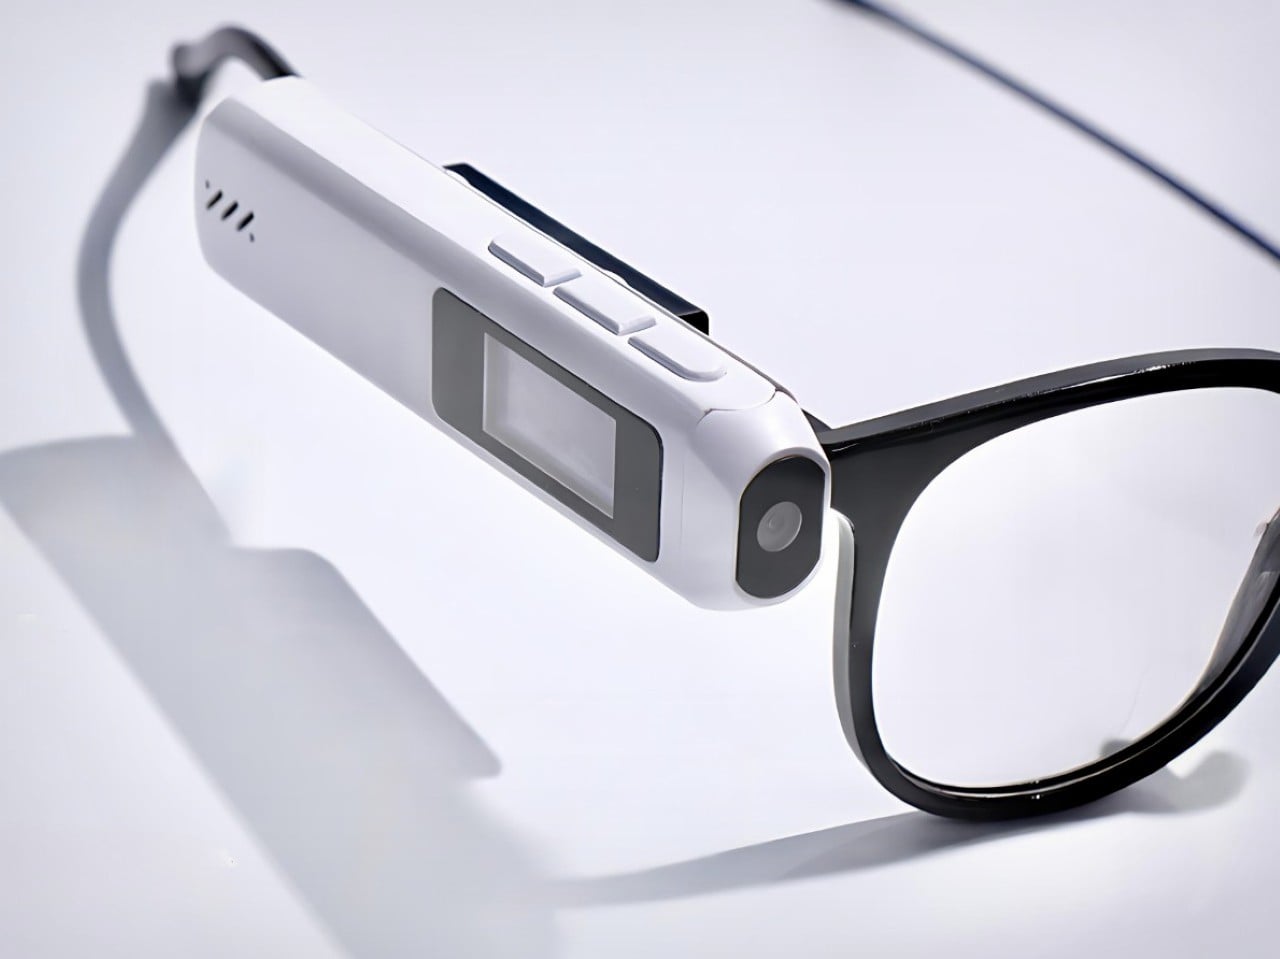
8. CAMIO Wearable by BQEYZ
Meta’s smart glasses cost several hundred dollars and lock you into their ecosystem, their frames, their design language, and their gradual feature rollout that always feels like paying for a beta test. Meet CAMIO, a $79 snap-on module from an upstart competitor that takes a different approach: it clips onto any pair of glasses you already own and turns them into recording devices with a tiny camera, built-in storage, and wireless connectivity. You keep your prescription lenses, your favorite frame style, your existing investment in eyewear. The module just adds the capture functionality without forcing you to replace everything. It records video, snaps photos, and syncs to your phone over Bluetooth, handling the basics without trying to be a full augmented reality platform or AI assistant.
The genius here is recognizing that most people do not want to replace their glasses, they just want their glasses to do more. Meta’s approach requires buying into their hardware completely, which is a tough sell when you have frames you like or prescriptions that need specific lenses. This module treats smart features as an add-on rather than a replacement, which dramatically lowers the barrier to entry both financially and practically. It is not going to match Meta’s polish or integration depth, but it does not need to. It just needs to capture moments hands-free and stay out of the way when you are not using it. For seventy-nine dollars, that is a value proposition that makes sense in a way premium smart glasses still struggle to justify. Sometimes the best innovation is not building something entirely new, it is building something that works with what people already have.
9. Small House On A Corner Lot by KOMINORU Design
Tokyo real estate operates on a completely different logic than most cities. Space is so expensive and scarce that architects have spent decades perfecting the art of making tiny footprints feel livable, even generous. This Japanese tiny home takes those spatial compression techniques and pushes them further, creating a dwelling that maximizes every cubic inch without feeling claustrophobic or compromised. The design uses vertical layering, multifunctional furniture, and strategic transparency to make a structure barely wider than a parking space feel like a complete home rather than an elaborate closet with plumbing.
What sets this apart from typical tiny home design is the cultural context. Japanese architecture has been optimizing small spaces for centuries, long before minimalism became a lifestyle trend or tiny homes became YouTube content. This design pulls from that tradition: sliding shoji-inspired partitions that reconfigure rooms on demand, sunken floors that create separation without walls, storage integrated into every surface so nothing feels like dead space. Natural light floods in through carefully positioned windows that also provide ventilation and visual connection to the exterior. The result is a home that feels intentional rather than constrained, where every design choice serves multiple purposes and nothing exists just for show. It is a masterclass in efficiency that does not sacrifice comfort, proving that small spaces stop being a limitation once you design specifically for them instead of trying to cram traditional layouts into compressed square footage. If urban density is the future, this is the blueprint for making it actually desirable.
10. Saros Z70 by Roborock
Robot vacuums have gotten really good at one thing: vacuuming. They map your floors, avoid obstacles, empty themselves, and generally handle the task they were designed for with increasing competence. But they have always had one glaring limitation: if there is a sock on the floor, a charging cable, a kid’s toy, anything that is not flat dirt or debris, the vacuum just routes around it or gets tangled and calls for help. The Roborock Saros Z70 fixes this with the most obvious solution nobody thought to mass-produce until now: it adds a robotic arm. A literal articulated arm that extends from the vacuum’s body, grabs objects off the floor, and moves them out of the way so it can continue cleaning underneath. Socks, shoes, small towels, cables, anything under a certain weight gets picked up and relocated to a designated drop zone.
This is innovation that feels overdue the moment you see it. We have had the mechanical capability to build grabber arms into consumer robots for years, but nobody committed to the engineering challenge until Roborock decided the robot vacuum category had gotten boring enough to need disruption. The arm uses vision recognition to identify objects, assess their weight and shape, and determine whether they are safe to grab, which prevents it from trying to lift furniture or drag your laptop across the room. It is not perfect, weight limits and object recognition will have edge cases, but it represents a fundamental expansion of what a cleaning robot can do. Instead of just reacting to obstacles, it actively manipulates its environment to complete its job. That is a step change in capability that makes every previous robot vacuum feel like it was solving only half the problem. If this actually ships at a reasonable price point and the arm proves reliable, it will instantly make the entire existing market feel outdated, which is exactly what genuine innovation is supposed to do.
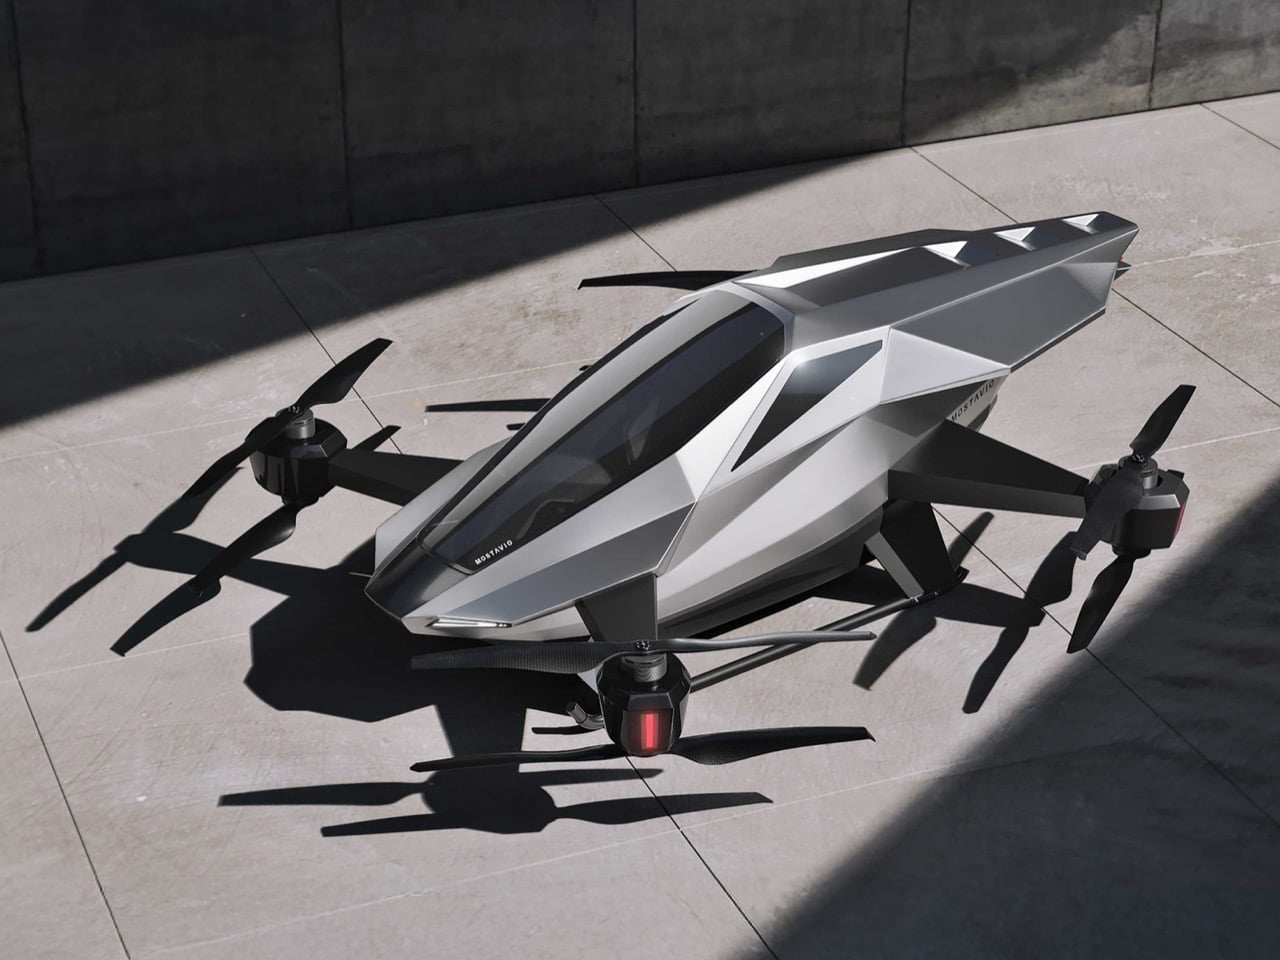
Flying cars have been vaporware for so long that most concepts blur together into the same generic pod-on-rotors aesthetic. Then MOSTAVIO’s MX1 lands in your feed, and suddenly you’re reminded why great industrial design still matters. The angular, almost origami-like bodywork earned this Toronto startup the 2025 Red Dot Award: Design Concept, validating what your eyes already know. Unlike the Cybertruck’s deliberately unfinished brutalism, the MX1 feels thought through to the last crease. Every facet serves both form and function, channeling the legendary design philosophy of masters like Giugiaro and Gandini.
The single-seat cockpit opens like a fighter jet, the panoramic window stretches wide for an unobstructed view, and the whole package sits on co-axial rotors that look more like sculptural elements than utilitarian hardware. MOSTAVIO wrapped these features in composite bodywork that appears to shift in the light, aggressive yet refined. The VR-based autonomous control system means you don’t need a pilot’s license to appreciate what they’ve built here, just an appreciation for design that refuses to compromise. This is what happens when someone actually cares about making future mobility look like it belongs in the future.
What makes the angularity work here, where other attempts have failed, is the controlled complexity of the surfacing. The body isn’t made of simple, flat planes. Look at the way light travels across the fuselage in the photos; you can see subtle curvature and tension in every facet, creating highlights that define the form. This is sophisticated stuff, the kind of surfacing you see on a Lamborghini, where every crease is intentional and contributes to the whole. It’s a design that looks like it was sculpted, not just extruded. The result is a visual language that feels lightweight, technical, and incredibly sharp, like a high-end piece of architectural hardware given flight.
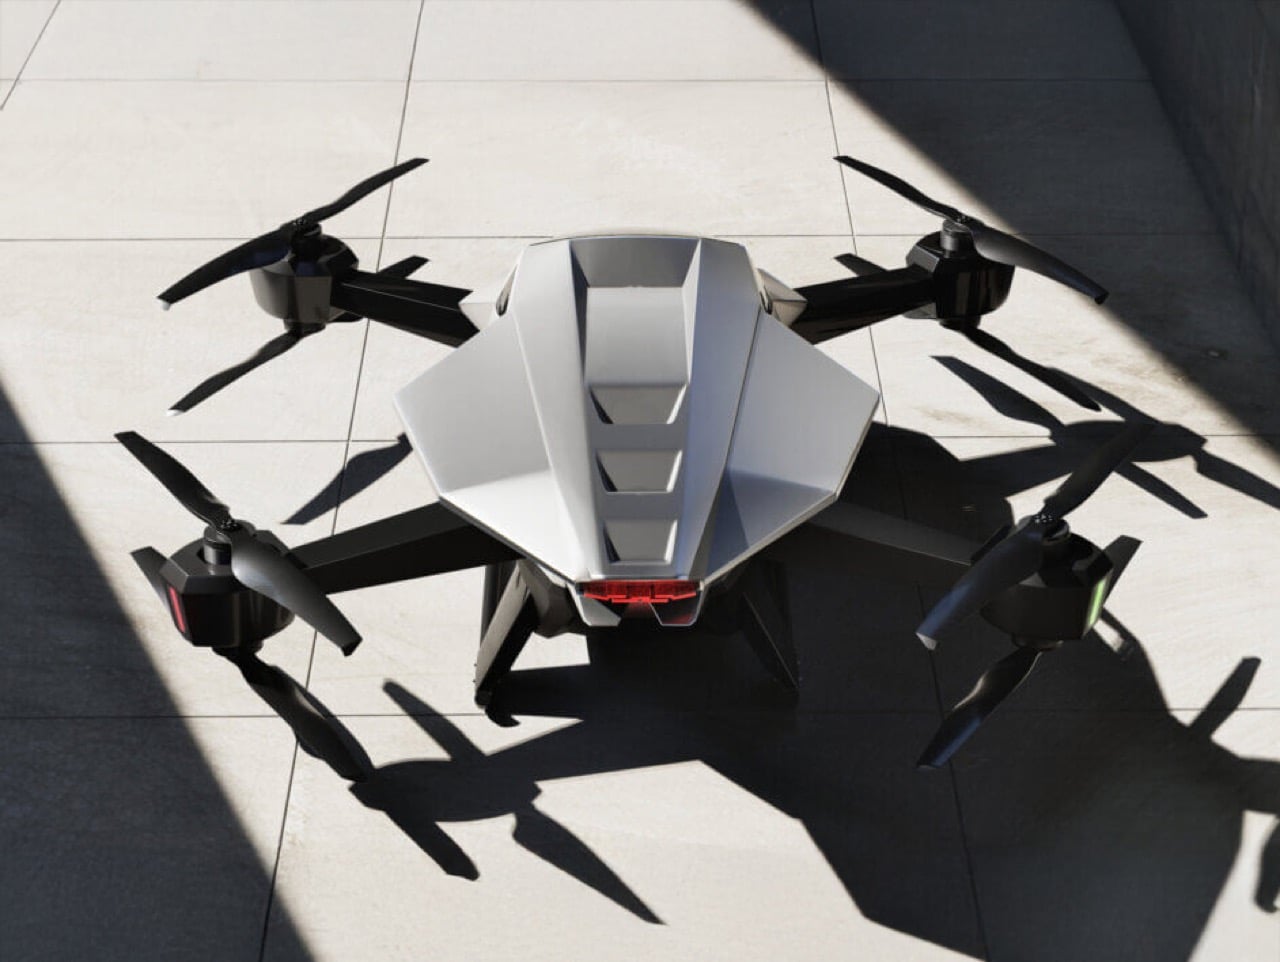
That design discipline extends to the integration of functional parts. The co-axial rotor arms blend into the body with carefully managed fillets, making them feel like organic extensions of the main form instead of bolted-on appendages. The canopy shut-lines follow the body creases perfectly, and the single rear light is tucked neatly into the tail. This is the hard part of vehicle design, where engineers and designers usually fight to a clumsy compromise. Here, it feels like the designers won. They took the necessary components of a quadcopter and made them integral to the aesthetic, creating a cohesive object that looks right from every angle.
Of course, winning a Red Dot for a concept is the design world’s equivalent of getting a screenplay optioned. It doesn’t mean the movie is getting made tomorrow, but it confirms the script is brilliant. So before you get your wallet out, know that the MX1 is a proof-of-concept. You can’t buy one. Its job is to attract attention, secure funding, and serve as a design study for a future 2-3 passenger vehicle that MOSTAVIO plans to develop. It’s a physical mission statement, a declaration of intent. And as far as intentions go, this one is about as compelling as it gets. We’ll be watching.
I read somewhere that Nostalgia sells harder than Innovation and it really made me do a double-take. Does it make sense? Well, not really, considering how fast things are progressing on the robotics and AI front – but here’s where I’d like to believe that statement rings true. Take a look at culture – old music is in again, Taylor’s new album is an homage to the old. Thomas Bangalter of Daft Punk made his first stage appearance in nearly a decade. What about movies, you ask? They’re shooting the next Shrek film, Robert Downy Jr. is back at Marvel, and heck, Shia LaBoeuf just announced his return to Transformers. Tech is playing the retro game very well too, whether it’s reissuing of old-style hardware, emulators, or even trends like transparency that remind us of the Nintendo GBA and the iMac G3. The grand point I’m making here, is that this last year has been an absolute pendulum, swinging between extremes, aesthetic styles, ideologies, and eras.
So we zeroed down to 20 designs (spread across two articles) that represent what 2025 gave us. These are the first half of our top picks from the year, gathering designs that we as editors loved, but also taking you, the reader into account. After all, we don’t write in a vacuum. We try to find designs and tech that genuinely impress or inspire you, and if you’ve been spending 2025 doing a bunch of other things (like surviving) apart from reading Yanko Design, here are 10 handpicked (yes, I picked them myself!) designs that encapsulate the BEST of 2025. Stay tuned for part 2!
1. Google Pixel Headphones by Sidhant Patnaik
Sometimes concept renders accomplish more than actual products ever could. Designer Sidhant Patnaik’s Google Pixel Headphones exist only as pixels and Photoshop layers, yet they have sparked more genuine excitement than most real hardware launches Google has executed in years. The design borrows visual cues from the Pixel phone lineup, clean geometric forms, two-tone color blocking, subtle branding, while integrating Gemini AI as a core feature rather than an afterthought. Imagined controls include gesture-based interactions, seamless Pixel ecosystem integration, and the kind of ambient intelligence that Google keeps promising but rarely delivers in satisfying ways. It looks credible enough that people keep asking where to buy it, which is both flattering to the designer and damning to Google’s actual product strategy.
Here’s the uncomfortable truth this concept exposes: Google has all the pieces to dominate the premium headphone market but refuses to assemble them. They own best-in-class voice recognition, industry-leading AI through Gemini, deep Android integration, and more audio patents than most people realize. Apple charges $550 for AirPods Max and can barely keep them in stock. Nothing launched Headphone (1) at $299 and sold out immediately despite being a first-generation product from a startup. Meanwhile Google sells Pixel Buds that nobody talks about and leaves the over-ear category completely vacant. The demand is screaming at them through every comment section under this concept. When a render generates this much enthusiasm, it stops being fantasy and starts being a market signal Google is choosing to ignore.
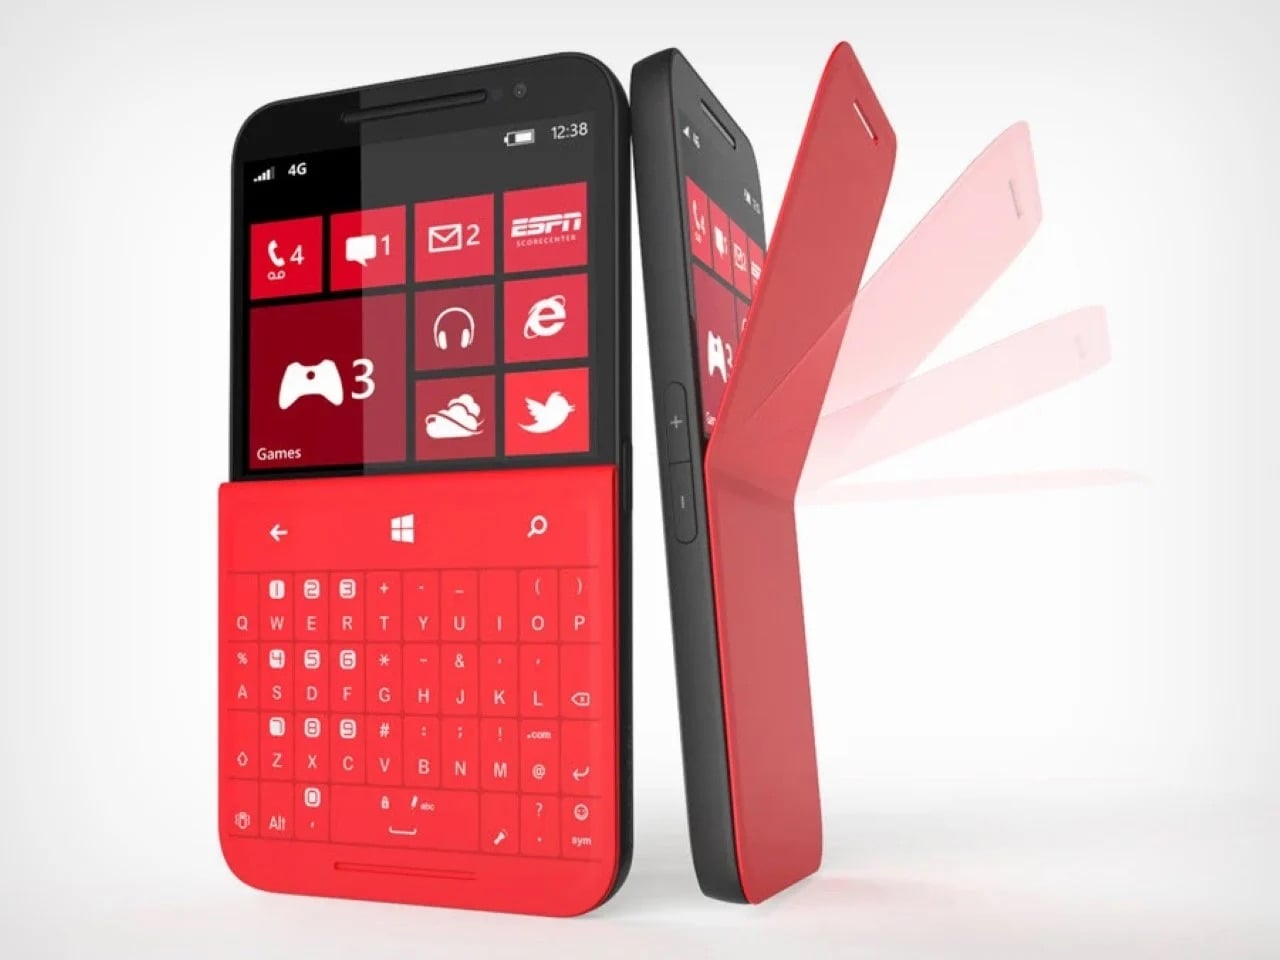
2. Concept Plumage by Jet Weng
One of the ‘best’ designs of 2025 is actually from nearly 13 years ago! Isn’t that insane?! But that’s how you define ‘ahead of its time’, I guess. Designed by Jet Weng, this absolutely genius keyboard design solves the modern-day smartphone’s BIGGEST problem – the fact that touchscreen keyboards still suck. Concept Plumage is a flip-case that integrates a full QWERTY keyboard into the back of your phone’s protective cover. When you need to type something longer than a text message, you flip the case around to reveal physical keys that give you actual tactile feedback. When you’re done, it folds back flush against the phone, adding virtually no bulk to your everyday carry. The whole system lives within the footprint of a standard phone case, which means you get BlackBerry-level typing precision without sacrificing the sleekness of modern smartphone design.
What makes this concept so painfully relevant in 2025 is that we are still dealing with the same frustrations Weng identified over a decade ago. Autocorrect still mangles sentences. Thumbs still obscure half the screen. Typing anything substantial on glass remains an exercise in patience and typo correction. The design world spent years convincing us that we would eventually master touchscreen typing, that our muscle memory would adapt, that software would get smarter. Instead, we just learned to accept mediocrity. Plumage refused that compromise, offering a solution that feels both retro and futuristic, like someone time-traveled from 2013 with the one idea we should have mass-produced immediately.
3. Public Library by Thilina Liyanage
Some libraries try to attract bookworms. This one commits to the metaphor so completely that walking inside feels like stepping between pages. Thilina Liyanage’s Public Library‘s exterior mimics an open book mid-read, with two curved structures meeting at a spine, their forms arching upward like paper caught in a breeze. Floor-to-ceiling glass panels stretch across both halves, flooding the interior with natural light that shifts throughout the day, casting reading nooks into soft afternoon glow or sharp morning clarity depending on where the sun sits.
Inside, the architect abandoned the grid entirely. Shelves curve with the walls, following the book-like contours instead of fighting them. Reading spaces cascade across multiple levels connected by flowing staircases that feel more like narrative transitions than functional infrastructure. The central atrium, positioned where the spine would be, rises through all floors and functions as both circulation hub and dramatic gathering space. Materials skew minimal and futuristic, lots of white surfaces, polished concrete, transparent railings, so nothing competes with the architecture’s bold gesture. It is the kind of space that makes you want to linger even if you didn’t come to read, which might be the highest compliment you can pay a library in 2025.
4. HubKey Gen2 by HubKey
The modern laptop gives you two USB-C ports and expects you to figure out the rest yourself. Most people end up with a drawer full of dongles, one for HDMI, another for ethernet, maybe a card reader that works half the time, all daisy-chained together in configurations that feel temporary but somehow become permanent. HubKey Gen2 consolidates that mess into an 11-in-1 hub with an unusual twist: it includes physical shortcut keys and a rotary knob on top, turning connectivity infrastructure into an actual control surface. Four programmable buttons and a central dial let you trigger macros, adjust volume, skip tracks, or launch applications without reaching for the keyboard. It treats the hub as something you interact with regularly rather than plug in once and forget about.
The headline upgrade is dual 4K at 60Hz, both HDMI outputs running simultaneously without bandwidth compromises or resolution drops. Add 100W pass-through charging, a 2.5Gbps ethernet port, 10Gbps USB-A data transfer, SD and microSD slots, and a 3.5mm audio jack, and you have covered most desk setups without needing secondary adapters. The customizable keys support complex shortcuts through companion software, which means editors can bind them to timeline controls, designers can trigger layer actions, and anyone else can just use them for Spotify and Zoom mute. It is a small addition that changes how the device sits in your workflow, shifting it from passive infrastructure to active tool. Most hubs disappear under your desk. This one earns a spot within arm’s reach.
5. Switzerland Passport Re-design by RETINAA
Most passports are exercises in bureaucratic minimalism, but Geneva-based studio RETINAA treated Switzerland’s passport redesign like a cartographic love letter. The new passport centers around water, Switzerland’s most defining geographic feature, with a hydrological map of the country’s rivers and lakes spreading across the inner cover. Each page features detailed illustrations of Swiss landmarks, architectural icons, mountains, and valleys rendered in precise line work that feels equal parts technical drawing and fine art. The design draws heavily from Switzerland’s rich tradition of cartography and graphic design, honoring the country’s obsessive attention to visual detail while meeting all modern security requirements. It is rare to see a government document that looks like it could hang framed in a design museum, but this one legitimately pulls it off.
The hidden layer makes it even better. Under ultraviolet light, topographic contour lines emerge across the pages, revealing Switzerland’s dramatic elevation changes in glowing detail. The Alps materialize as layered ridges, valleys sink into shadow, and the whole document transforms into something that feels alive. Water remains the conceptual anchor throughout, a nod to the country’s hydroelectric infrastructure and the way rivers and lakes have shaped Swiss identity for centuries. RETINAA managed to make a security feature feel poetic, which is not an easy trick. This is what happens when you let actual designers loose on something usually handled by committee and compliance officers. The passport does not just represent Switzerland, it performs the country’s design ethos with every page turn.
6. Modern Apple iPod by Zac Builds
See?! This is where Nostalgia really sells harder than Innovation! YouTuber Zac Builds took a fifth-generation iPod Video and resurrected it into what Apple should have made if they had any interest in keeping the product line alive. The outside looks nearly identical to the 2005 original, same click wheel, same proportions, same satisfying tactile response. Everything else is 2025. He swapped the 30-pin connector for USB-C, added Bluetooth 5.0 for wireless audio, upgraded the storage to a modern SD card solution, and installed custom firmware that supports FLAC, ALAC, and basically every audio format iTunes ever refused to acknowledge. Most importantly, the whole thing syncs like a standard USB drive, no iTunes required, no proprietary software gatekeeping your music library. Just drag and drop files like it’s 2003 but without the artificial limitations.
The build represents everything people loved about dedicated music players before smartphones absorbed their function. No notifications interrupting an album. No battery drain from a hundred background apps. No accidental skips from a touchscreen registering phantom taps in your pocket. Just a device that plays music exceptionally well and does nothing else. The fact that it took a hobbyist with a soldering iron to deliver this rather than Apple themselves says everything about where consumer electronics have drifted. Zac’s version honors the iPod’s legacy while fixing its most dated frustrations, which might be the perfect definition of thoughtful nostalgia. This is not a museum piece. It is a working argument for why single-purpose devices still matter in a world obsessed with convergence.
7. TobenONE 6-in-1 Hub by TobenONE
HDMI cables are the cockroaches of tech, somehow surviving every wireless revolution that should have killed them off by now. We beam 4K movies through the air, charge devices without plugging them in, and send gigabytes of data across continents in seconds, but connecting a laptop to a projector still means crawling under desks hunting for the right dongle. The TobenONE T1 finally addresses this absurdity with a transmitter-receiver combo that handles video streaming wirelessly while doubling as a fully functional USB-C hub. Plug the transmitter into your laptop, connect the receiver to your TV or monitor via HDMI, and the two talk to each other over 5G Wi-Fi at distances up to 30 meters. No network required, no firmware updates, no app to download and immediately forget your password for.
What separates this from the dozens of other wireless HDMI solutions is the fact that it doesn’t just replace one cable, it replaces six. The hub side includes multiple USB-A ports, an SD card reader, and pass-through charging, which means your laptop stays powered while streaming a presentation or mirroring gameplay. It handles 1080p at 60Hz, which is not cutting-edge but plenty adequate for most use cases outside of competitive gaming or pixel-peeping design work. The real appeal here is convenience compounded, eliminating both the video cable and the separate hub most people already carry. Conference rooms, living room setups, and anyone tired of the “which adapter did I forget this time” ritual will find this particularly satisfying. It is one of those products that feels obvious in hindsight, which usually means someone should have made it years ago.
8. LEGO Snow Globes by ItzEthqn
LEGO has been mining nostalgia so effectively for years that it barely registers as a strategy anymore, it just feels like what LEGO does. But every so often they drop something that reminds you how good they are at packaging childhood wonder into adult-friendly formats. These buildable LEGO snow globes hit that sweet spot perfectly: tactile enough to justify the LEGO branding, decorative enough to sit on a desk without looking like a toy, and seasonal enough to qualify as a gift without feeling like obligatory holiday merch. Each globe contains a miniature scene, winter villages, festive characters, iconic moments, all rendered in brick form and sealed inside a transparent sphere that sits on a buildable base.
The genius is in the scale and execution. These are not massive display pieces that demand shelf real estate and explanations to guests. They are compact, self-contained, and instantly recognizable as both LEGO and snow globe, which means they work as decor, conversation starters, or stocking stuffers without needing context. The build process is simple enough to be relaxing but detailed enough to feel rewarding, which is basically LEGO’s entire value proposition distilled into a seasonal format. They tap into two separate nostalgia streams simultaneously: the childhood joy of LEGO construction and the sentimental pull of snow globes as holiday symbols. It is a perfect example of nostalgia not just selling, but selling smart, giving people something familiar enough to want and novel enough to justify buying in the first place.
9. Plus Pool by Dong-Ping Wong, Oana Stanescu, Archie Lee Coates IV & Jeffrey Franklin
New York City has not had a functional public swimming spot in its rivers for generations, mostly because jumping into the East River carries the same appeal as bathing in a toxic soup. Plus Pool fixes this with an ambitious solution that sounds too simple to work but somehow does: a floating, self-filtering swimming pool that pulls water directly from the river and cleans it in real time. Shaped like an oversized plus sign, the design allows multiple swimming zones, kids’ area, lap lanes, lounging sections, all configurable depending on how many people show up. The filtration system uses multiple straining layers to remove debris and particles, then hits everything with UV treatment for disinfection, no chlorine involved. Construction finally started in 2025 after 14 years of bureaucratic delays, fundraising hurdles, and engineering challenges.
The pool itself is a 320-ton steel structure currently undergoing testing before it gets anchored near Pier 35 on Manhattan’s Lower East Side. A walkway will connect it to the shore, making it accessible without boats or special permits. Once operational, it will filter over half a million gallons of river water daily while people swim in it, turning one of the city’s most neglected natural resources into usable public space. The project represents a rare kind of urban optimism, the belief that infrastructure can do more than just function, it can invite people back to landscapes they abandoned decades ago. If it works as promised, Plus Pool will be the kind of civic landmark that makes people wonder why nobody thought to build it sooner, even though the answer is clearly that it took this long because ambitious public projects always do.
10. Dash Cam 4K T800 by 70mai
Most dash cams cover what is directly in front of you and maybe behind if you spring for the dual setup. That still leaves your sides completely vulnerable and your interior as an afterthought, which is a problem when insurance disputes or break-ins hinge on angles your camera never captured. The 70mai 4K T800 fixes this with three synchronized lenses: 4K front-facing, 1080p rear, and an interior camera that rotates 360 degrees. The front camera handles road footage with Sony STARVIS 2 sensor clarity, the rear covers tailgaters and parking lot incidents, and the interior lens can swivel to monitor the cabin or point sideways through windows to catch side-impact collisions and door dings. Together they eliminate the blind spots that turn minor accidents into he-said-she-said nightmares.
The system records all three feeds simultaneously and displays them in picture-in-picture mode on a 3-inch screen, giving you mission control visibility without needing to dig through separate files later. Built-in GPS tracks your route, the G-sensor triggers emergency recording on impact, and 24-hour parking surveillance keeps an eye on things when you are not around. At $323, it sits at the higher end of dash cam pricing, but it delivers the kind of comprehensive coverage that single and dual-lens setups simply cannot match. The logic is straightforward: if you are going to mount a camera system in your car, it might as well see everything worth seeing. This one does.
Yanko Design’s new podcast, Design Mindset, continues to bring fresh perspectives from design leaders around the world. Every week, this series (Powered by KeyShot) explores critical questions shaping the future of design, from recognition and validation to the evolving role of awards in our digital age. Episode 15 tackles a particularly timely subject: whether design awards still hold relevance when every designer has Instagram, Behance, and LinkedIn at their fingertips.
Jova Zec, Vice President of Red Dot Awards, joins host Radhika Seth for a candid discussion about the changing landscape of design recognition. As the second generation leading one of the world’s most prestigious design competitions (founded by his father, Professor Dr. Peter Zec), Jova brings a unique vantage point on how awards have transformed over three decades, from insider validation to global influence. He’s actively reshaping what recognition means in 2025 and beyond, viewing it as a responsibility rather than simply a reward.
From Visibility to Validation: What Awards Mean Now
Jova recalls a time when getting recognized meant appearing on TV or in newspapers. For designers especially, having their own platform was nearly impossible. But now, with Instagram profiles and countless social media options, the landscape has completely changed. This shift has fundamentally altered what design awards need to offer the creative community.
The focus has pivoted from providing visibility to providing qualification. Awards have evolved from megaphones to validators, from amplifiers to authenticators. Jova explains that nowadays, the emphasis lies on being qualified by Red Dot as somebody who produces something that carries genuine value, helping designers prove that their work matters beyond popularity metrics. In a world drowning in content, expert validation proves that a designer’s work holds timeless value beyond digital noise.
The Four Qualities That Separate Impact from Noise
Red Dot evaluates submissions based on four core qualities: functionality, use, responsibility, and seduction. Interestingly, Jova highlights seduction as perhaps the most important. This quality creates the emotional connection that makes consumers genuinely want a product. While functionality and responsibility might seem self-explanatory, seduction is what really drives desire and adoption in the marketplace.
This evaluation approach allows Red Dot to look past short-term viral gimmicks that might rack up likes online. The judges evaluate products on timeless criteria that have remained consistent across the award’s history. Washing machines, for instance, might all look similar to casual observers, but there’s often extraordinary design work happening in the details. Quality never changes; it’s about the experience. If you experience a quality moment with a product, that experience stays the same whether it happened 50 years ago or will happen 100 years from now.
Meta-Categories: Recognizing Invisible Excellence
One of Red Dot’s most significant evolutions has been the introduction of meta-categories. While core principles remain constant, these categories allow Red Dot to highlight specific aspects of design that deserve elevation. The innovative category, for example, recognizes technologically advanced ideas that may lack polish but carry revolutionary potential. Red Dot has also introduced a sustainability meta-category to encourage environmental responsibility.
When Radhika presents Jova with a hypothetical scenario (a sustainable packaging startup with genuinely innovative biodegradable materials that’s technically brilliant but doesn’t photograph beautifully), his response perfectly illustrates this approach. Such a product would win both the innovative award for finding a solution that could revolutionize the industry and the sustainability award for its environmental impact. Winners of these meta-category awards then gain access to a network that includes experts in visual and seductive design, fostering collaboration that can yield products blending sustainable innovation with high aesthetic quality. Leaving such innovation unrecognized is never an option.
Validation Matters at Every Career Stage
The conversation turns personal when discussing how recognition affects designers differently throughout their careers. Jova’s observation is insightful: the importance to the person themselves always stays the same. Whether you’re a design legend or an emerging talent, validation matters deeply.
For established professionals and design legends, winning a Red Dot confirms they’re still performing at the level they believe they are, that they remain in the mindset of the current generation. For young designers trying to establish themselves, awards serve as career kickstarters. Jova shares stories of students who took part in Red Dot, won something, and immediately got employed by major companies wanting their design talent. Beyond career advancement, recognition provides crucial feedback from professionals who aren’t involved in your project and may have never met you before. This validation boosts self-esteem and helps designers affirm they’re on the right path, especially when they’ve just created something great and need confirmation to continue in that direction.
Recognition as Responsibility: Creating a Better World
The overarching theme throughout the conversation is that recognition has evolved significantly in its purpose and meaning. As Jova reflects, he’s watched recognition transform from something designers hoped for to something they expect, from validation to influence, from celebration to obligation. Today, every designer has a platform, every product gets shared instantly, and everyone’s fighting for the same attention. The question isn’t whether awards still matter; it’s whether they’re measuring the right things.
When asked during the rapid fire round what recognition should ultimately create, Jova offers two words: a better world. The biggest misconception designers have about awards? That it’s all a scam. The most overrated aspect of design recognition today? Just designing something that is very popular but lacks usefulness. This episode of Design Mindset crystallizes something important: in an age when anyone can go viral and content floods every feed, expert validation becomes more critical than ever. Awards that maintain rigorous standards and evaluate based on timeless principles fulfill a vital function, steering the design community toward values that matter: quality, responsibility, innovation, and seduction. The future belongs to awards that actively create conditions for great design to flourish.
Design Mindset, Powered by KeyShot, premieres every week with new conversations exploring the minds shaping the future of design. Listen to the full episode with Jova Zec to hear more insights on recognition, Red Dot’s evolution, and what makes design truly timeless.
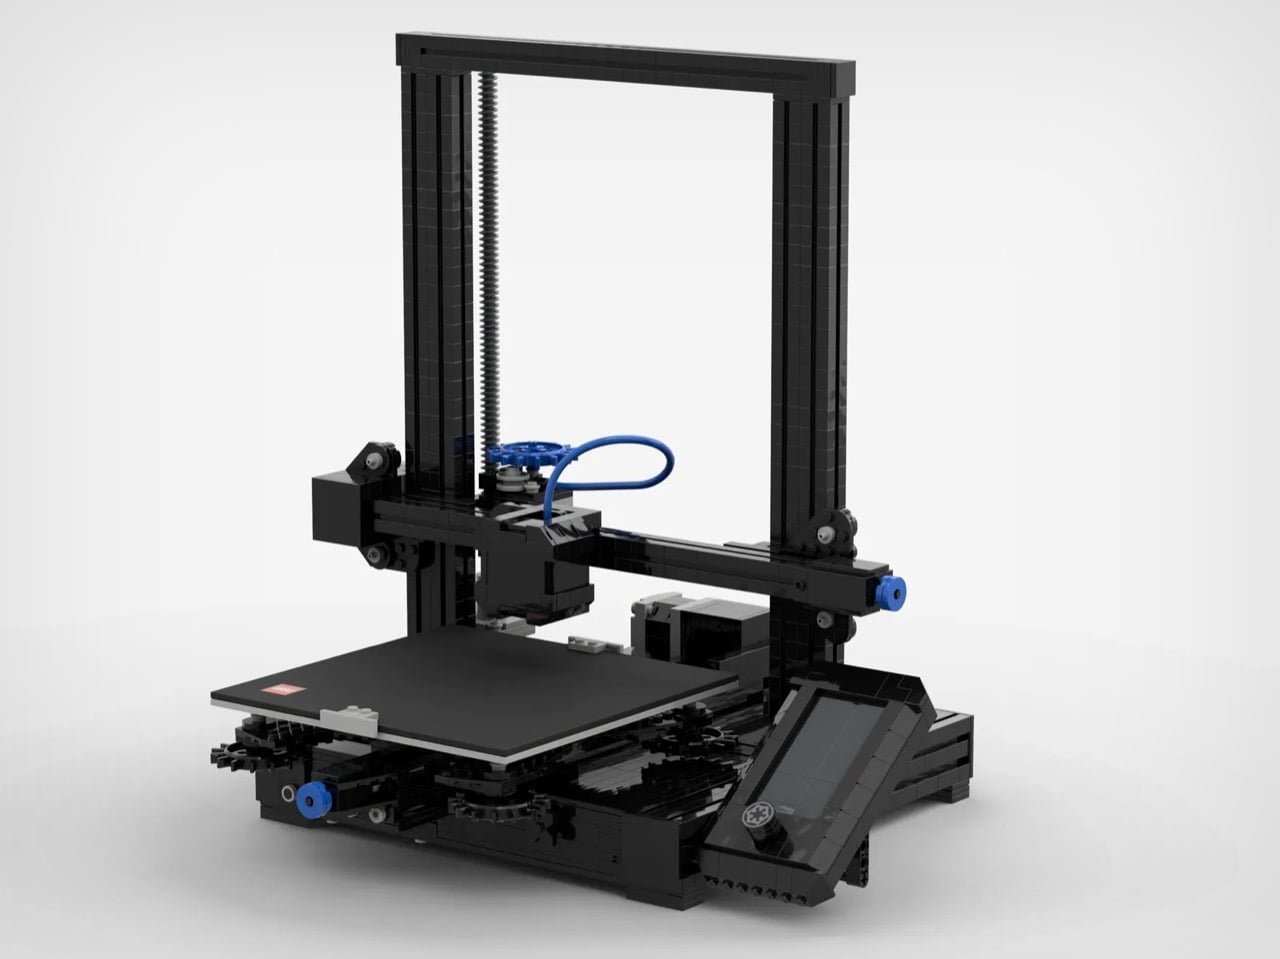
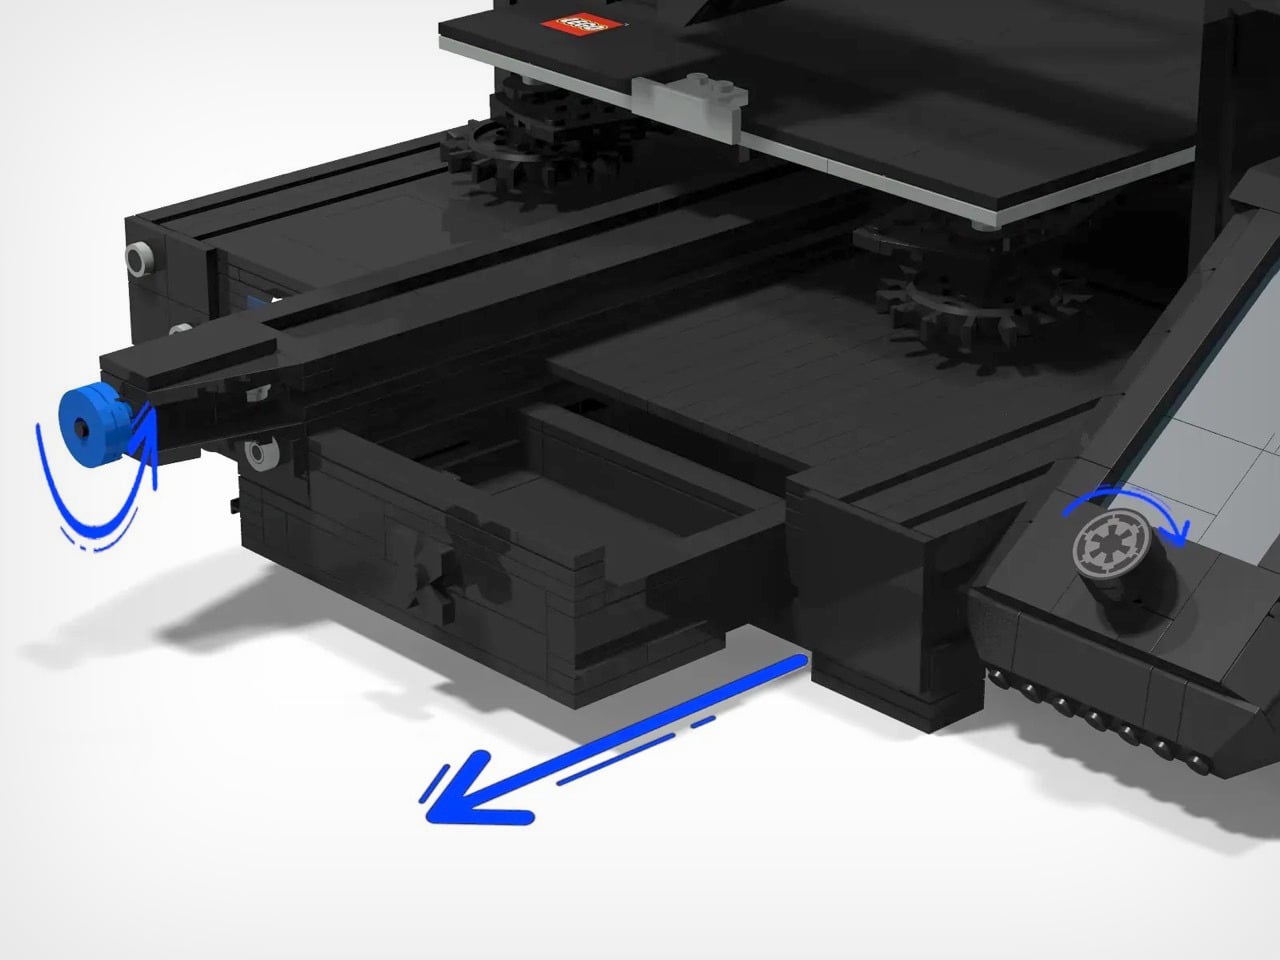
LEGO and 3D printing occupy similar creative territory, both letting you turn ideas into physical objects through systematic processes. Yet despite this natural kinship, there’s never been an official LEGO model of the specific machine that’s currently democratizing small-scale manufacturing. This fan submission fixes that gap with a recognizably Ender-inspired design that captures both the utilitarian aesthetic and basic kinematic structure of Creality’s popular printer lineup.
The build doesn’t actually function like some ambitious LEGO projects (there’s a working LEGO Turing machine out there made from 2,900 bricks), but that’s not really the point. Someone unfamiliar with 3D printing could assemble this and understand how Cartesian motion systems work, how the hotend assembly relates to the build plate, and why those vertical lead screws matter for Z-axis stability. For people who already own an Ender or similar machine, it’s more about the novelty and nostalgia of seeing familiar hardware translated into a tabletop collectible to admire and cherish.
Designer: Guris14
Paying homage to the Ender 3 is fitting, since it was literally the first 3D printer for so many people, quite like an entire generation having a Nokia first phone. Creality sold hundreds of thousands of these things, maybe millions at this point, and the design became the default mental image of what a 3D printer looks like for an entire generation of makers. That boxy aluminum frame, the single Z-axis lead screw on earlier models (this LEGO version appears to reference the dual-screw V2), the bowden extruder setup with that blue PTFE tube snaking from the frame-mounted motor to the hotend. That characteristic black and silver color scheme with blue accent components has become as visually shorthand for “budget 3D printer” as the beige tower was for 90s PCs. Designer Guris14 scaled the model down from the Ender 3 V2’s actual 220x220x250mm build volume to something desk-friendly, but kept the proportions honest enough that you immediately recognize what you’re looking at.
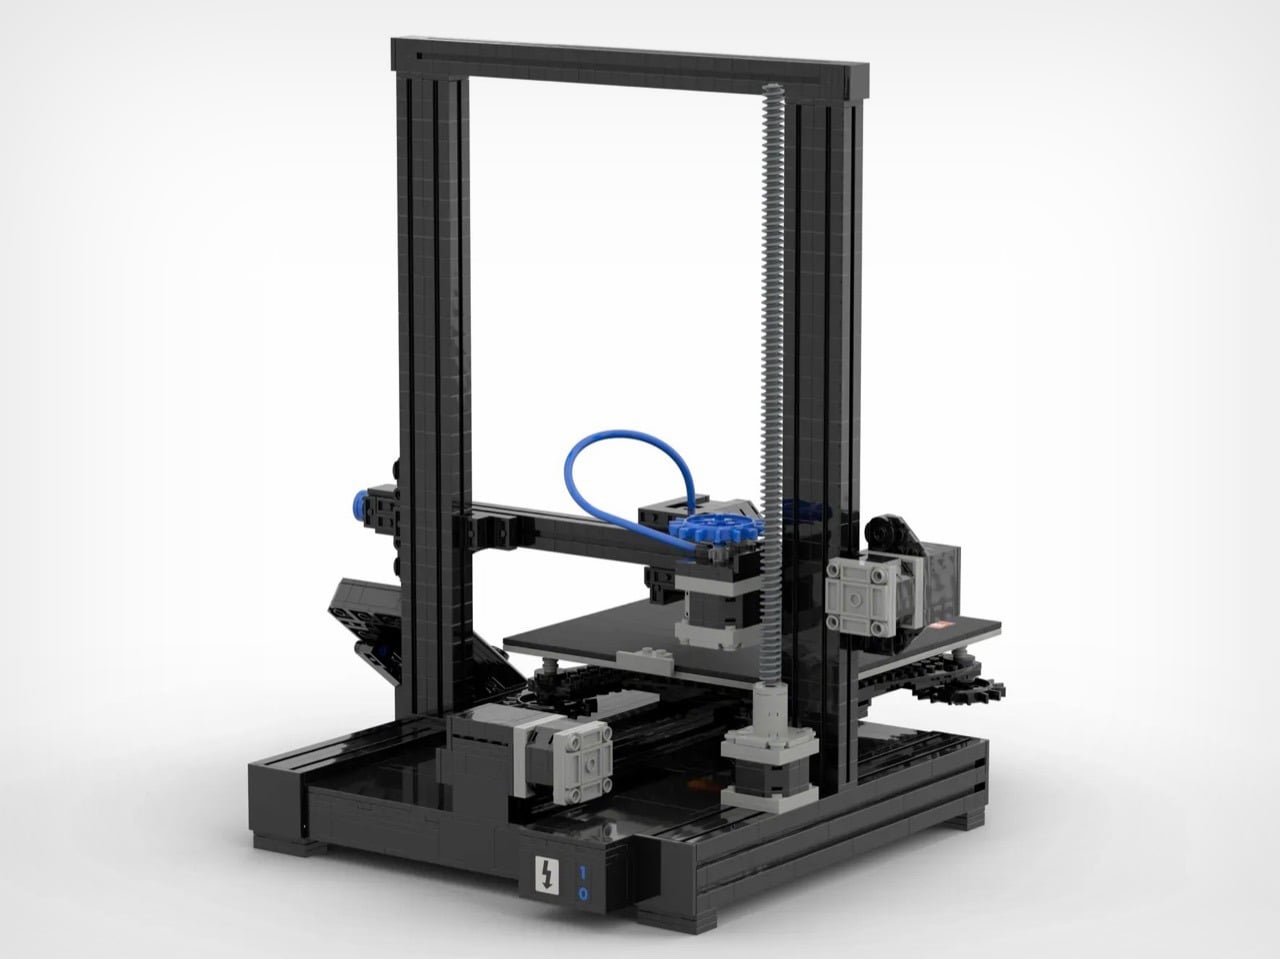
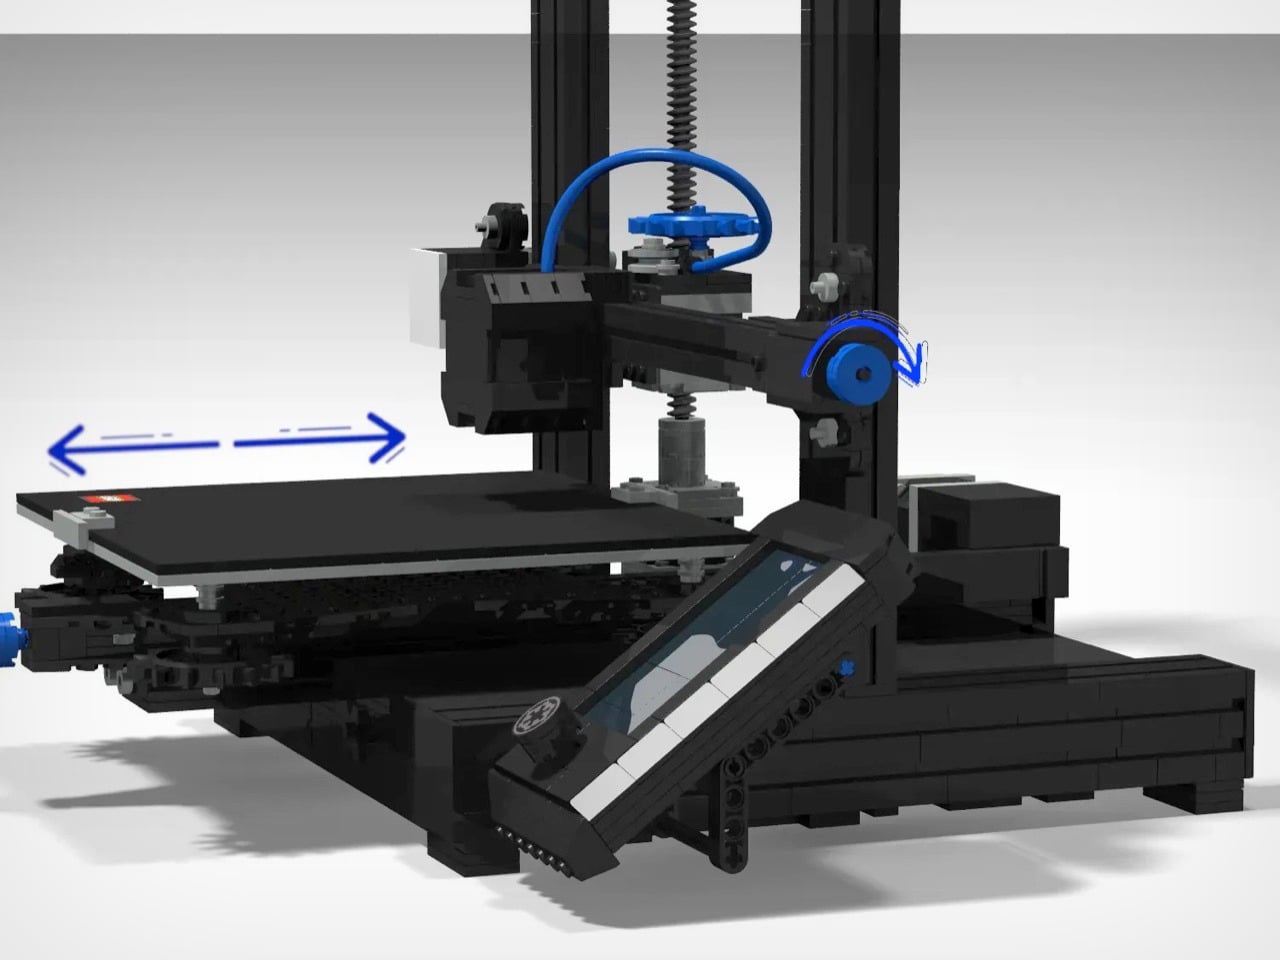
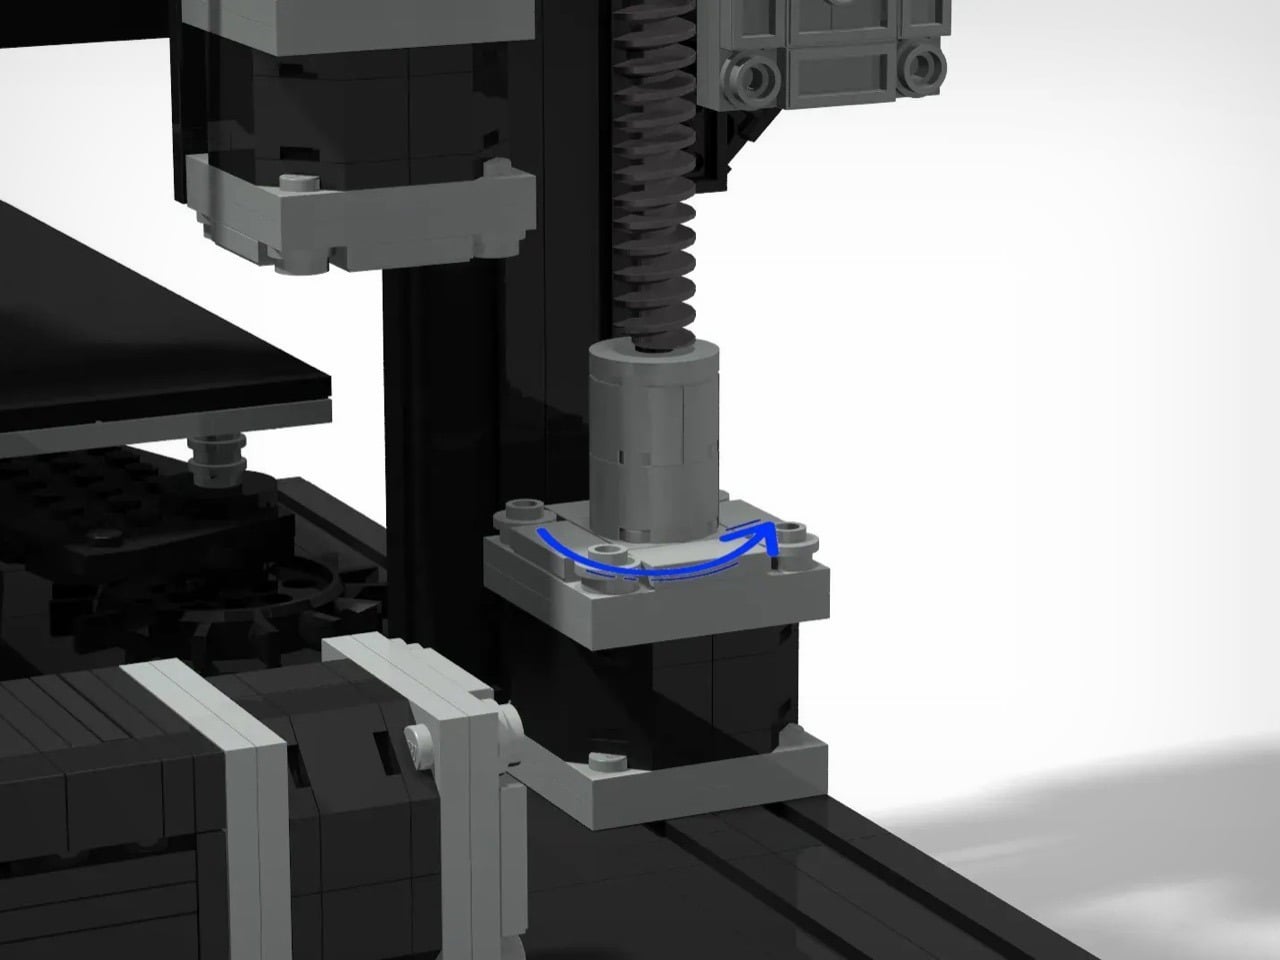
What’s impressive is how the mechanical systems translate into LEGO’s vocabulary without completely abandoning accuracy. The Z-axis uses what appears to be LEGO’s ribbed hose pieces to represent lead screws, with the gantry able to move up and down the vertical supports. The X-axis gantry rides on a black beam that mimics the 2040 aluminum extrusion found on real Enders, while the hotend assembly hangs from a carriage with that signature blue bowden tube curling back toward the extruder. The build plate sits on a Y-axis assembly with its own lead screw mechanism, and there’s even a LEGO logo on the build-plate, like perfectly placed branding!
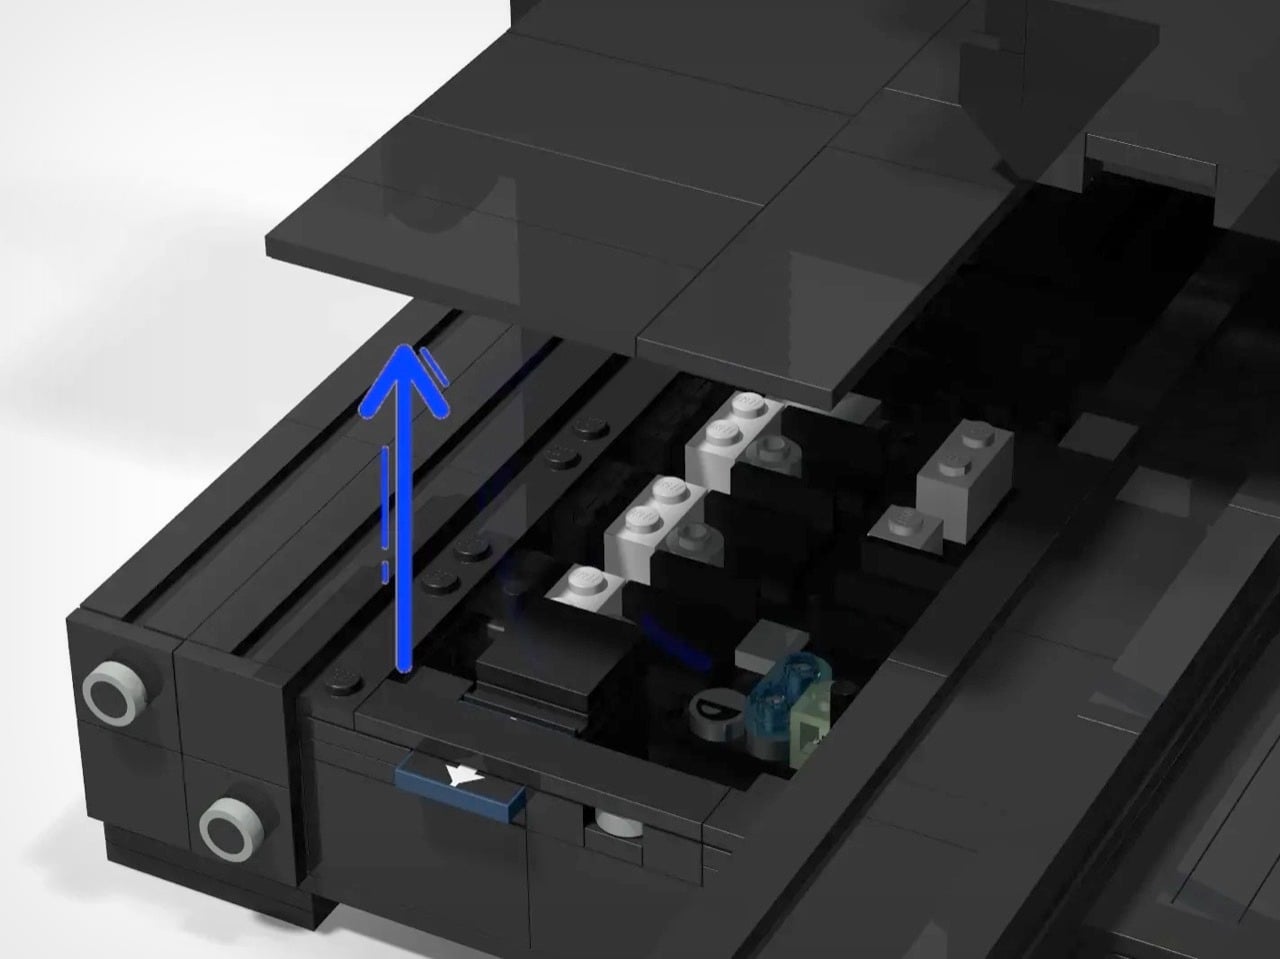
Flip the model and you’ll find representations of the motherboard and power supply tucked beneath the build plate, exactly where Creality positions them on the actual hardware. There’s that angled LCD screen mount on the front right corner, positioned just like the stock Ender setup. Even the spool holder perched on the top frame gets included, which is the kind of completeness that separates a thoughtful recreation from a surface-level approximation. You could hand this to someone who’s never seen a 3D printer and they’d walk away with a surprisingly accurate mental model of how these machines are structured.
The project currently sits on the LEGO Ideas website, where fans share their own creations and vote for their favorites. Lucky builds that hit the 10,000 vote mark move to the review stage where LEGO actually considers it for production. That’s always been the tricky part with Ideas submissions. You need a concept that’s simultaneously niche enough to excite enthusiasts but broad enough that LEGO thinks they can sell tens of thousands of units through their retail channels. A 3D printer model lives in an interesting space there. The maker community overlap is real and passionate, but you’re also asking LEGO to produce a set celebrating a technology that competes with their own manufacturing process in certain contexts.
Still, LEGO has greenlit plenty of sets that celebrate tools and technology. The Typewriter, the Polaroid camera, the various Technic construction vehicles, all of these acknowledge that people enjoy building detailed models of machines they find interesting or useful. A 3D printer fits that pattern perfectly, especially as these devices become more common in homes and schools. The educational angle writes itself: here’s a hands-on way to understand additive manufacturing without dealing with bed leveling or filament moisture. Whether that’s enough to get LEGO’s product team on board is another question entirely, but stranger things have made it through the Ideas gauntlet. The NASA Apollo Saturn V started as a fan submission. So did the ship in a bottle.
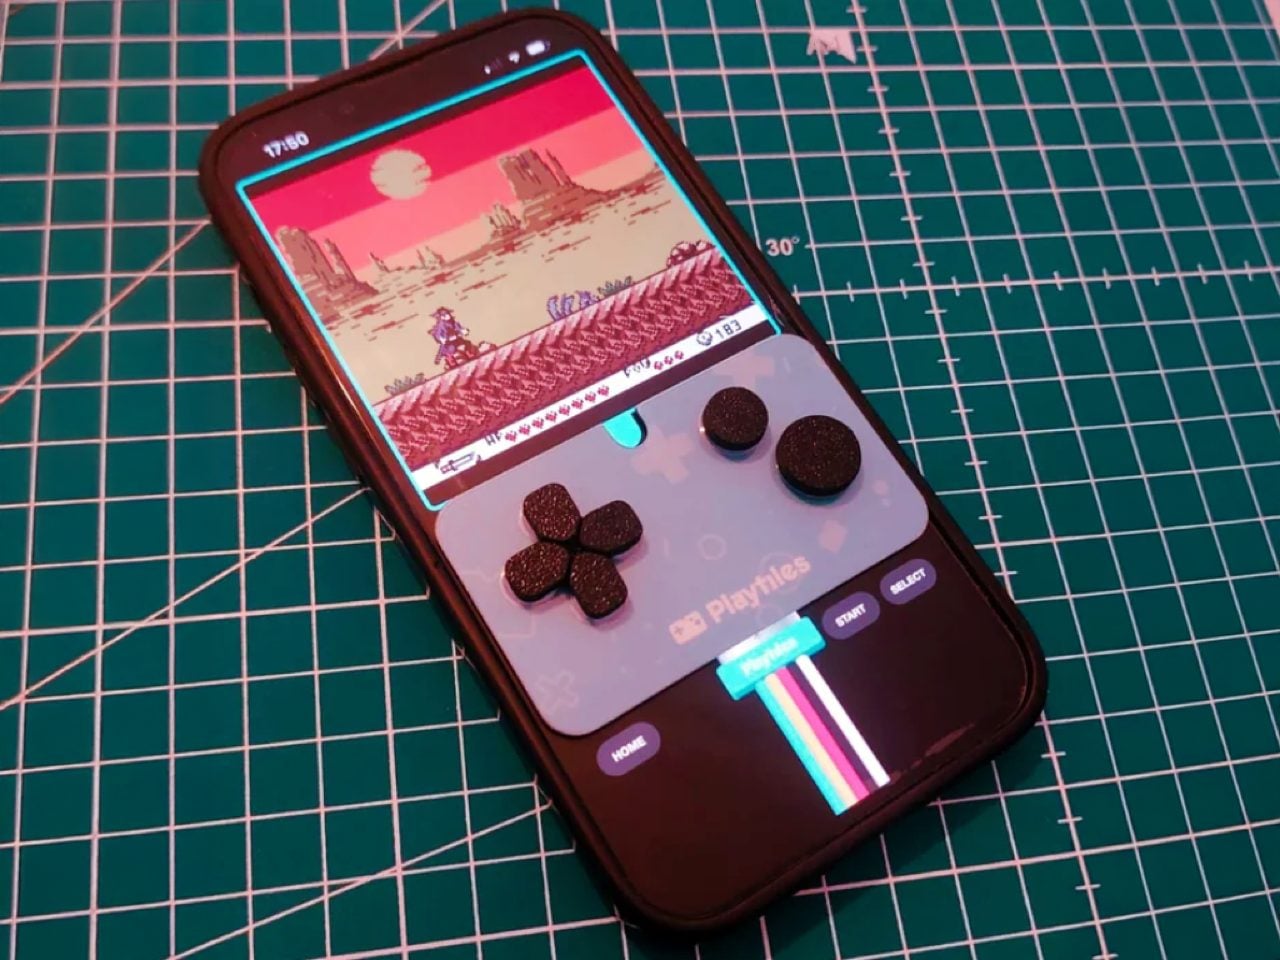
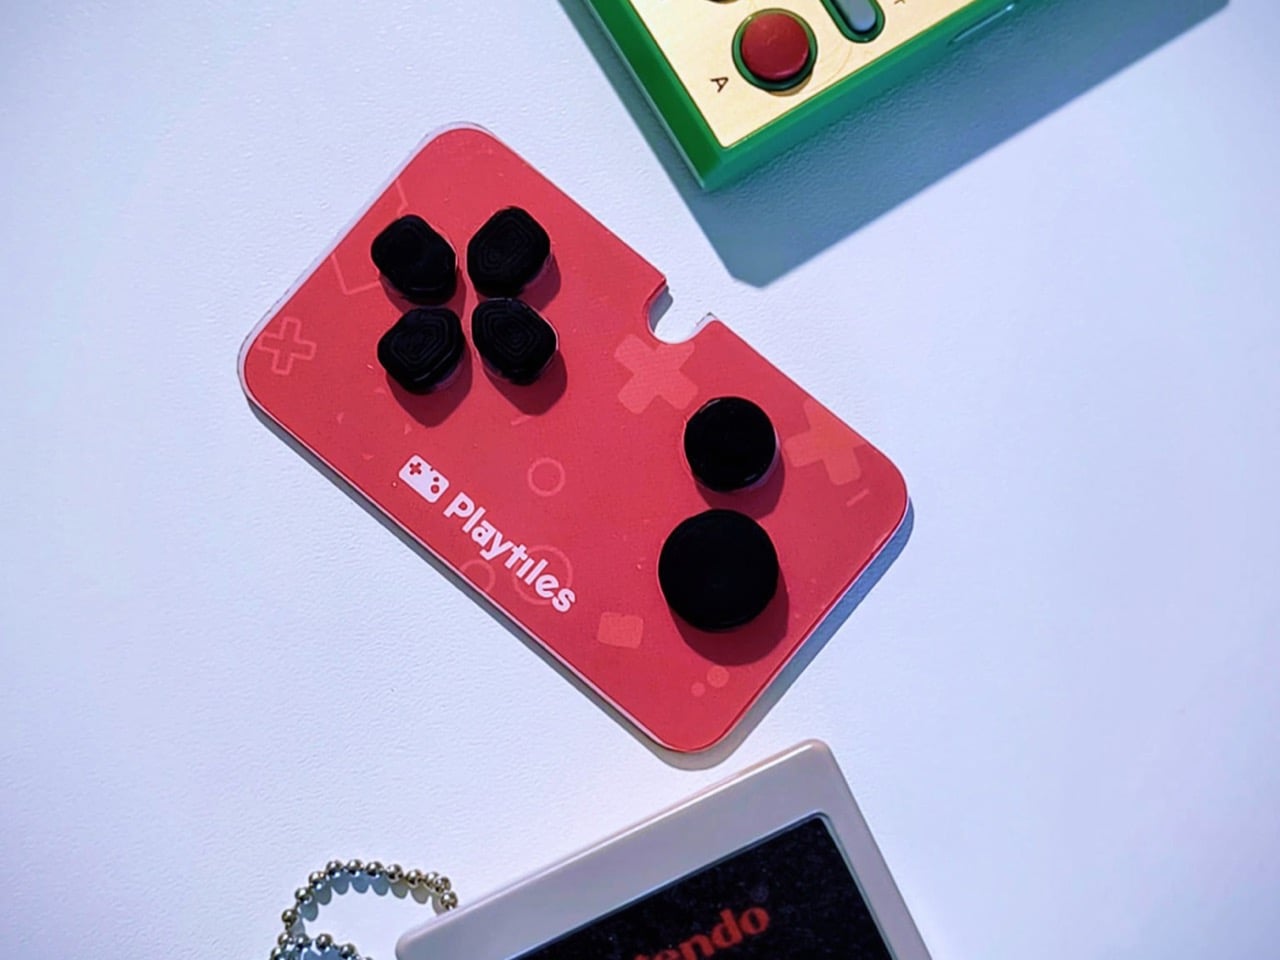
Playtiles looks like something that shouldn’t work. A thin piece of plastic with buttons, no electronics inside, sticking to your smartphone screen like a temporary tattoo. Yet this $12 accessory has managed to capture what expensive gaming phones and elaborate clip-on controllers often miss: the pure, uncomplicated joy of pressing actual buttons while playing retro-style games. The device ships with access to a curated library of indie titles that feel lifted straight from the Game Boy Color era.
The design strips away everything modern mobile gaming has become. No account setup, no firmware updates, no charging cables. You place it on your screen where the virtual controls appear, press the buttons, and play. Thousands of micro suction cups hold it in place during gameplay, and when you’re done, it slides back into your wallet next to your credit cards. After months of anticipation since July’s pre-order launch, units are now reaching backers who wanted to rediscover what handheld gaming felt like before touchscreens took over.
Designer: Playtile
The buttons work through capacitive conduction, using your own body’s electrical properties to register a press on the screen beneath. It’s a completely powerless system, which in a world of constant charging is a breath of fresh air. The entire polycarbonate unit weighs just 0.2 ounces and measures 2.68 by 1.57 inches, making it smaller than a credit card. This isn’t trying to compete with a Backbone or Razer Kishi; those are full-fledged peripherals that turn your phone into a console hybrid. Playtiles is a fundamentally different idea, an accessory so unobtrusive it feels more like a guitar pick than a piece of hardware.
Of course, the hardware is only half the story. The back of every Playtiles has a QR code that launches a browser-based OS, completely sidestepping the app stores. This is an incredibly shrewd move, giving the creators a direct channel to their audience without platform fees or gatekeepers. Early adopters who bought the Season 1 bundle get a new, bite-sized retro game delivered every week for twelve weeks, all built in GB Studio. This transforms a simple controller into a curated content platform. It solves the biggest problem with mobile gaming, which is finding good games amidst a sea of ad-riddled clones. You get a handpicked library that you know is designed perfectly for the D-pad and two-button layout.
You are obviously not going to be playing Genshin Impact on this thing. The two-button constraint is a feature, a deliberate design choice that forces a return to the focused game mechanics of the 8-bit and 16-bit eras. It works on any phone with a screen wider than 68mm, so long as the game lets you reposition the on-screen controls to align with the controller. That’s the key requirement. For $12, it’s an impulse buy that feels like a low-risk experiment in nostalgia. In a market where dedicated handhelds from companies like Anbernic command prices north of $100, the Playtiles carves out its own space by being almost disposable in price yet surprisingly robust in its concept.
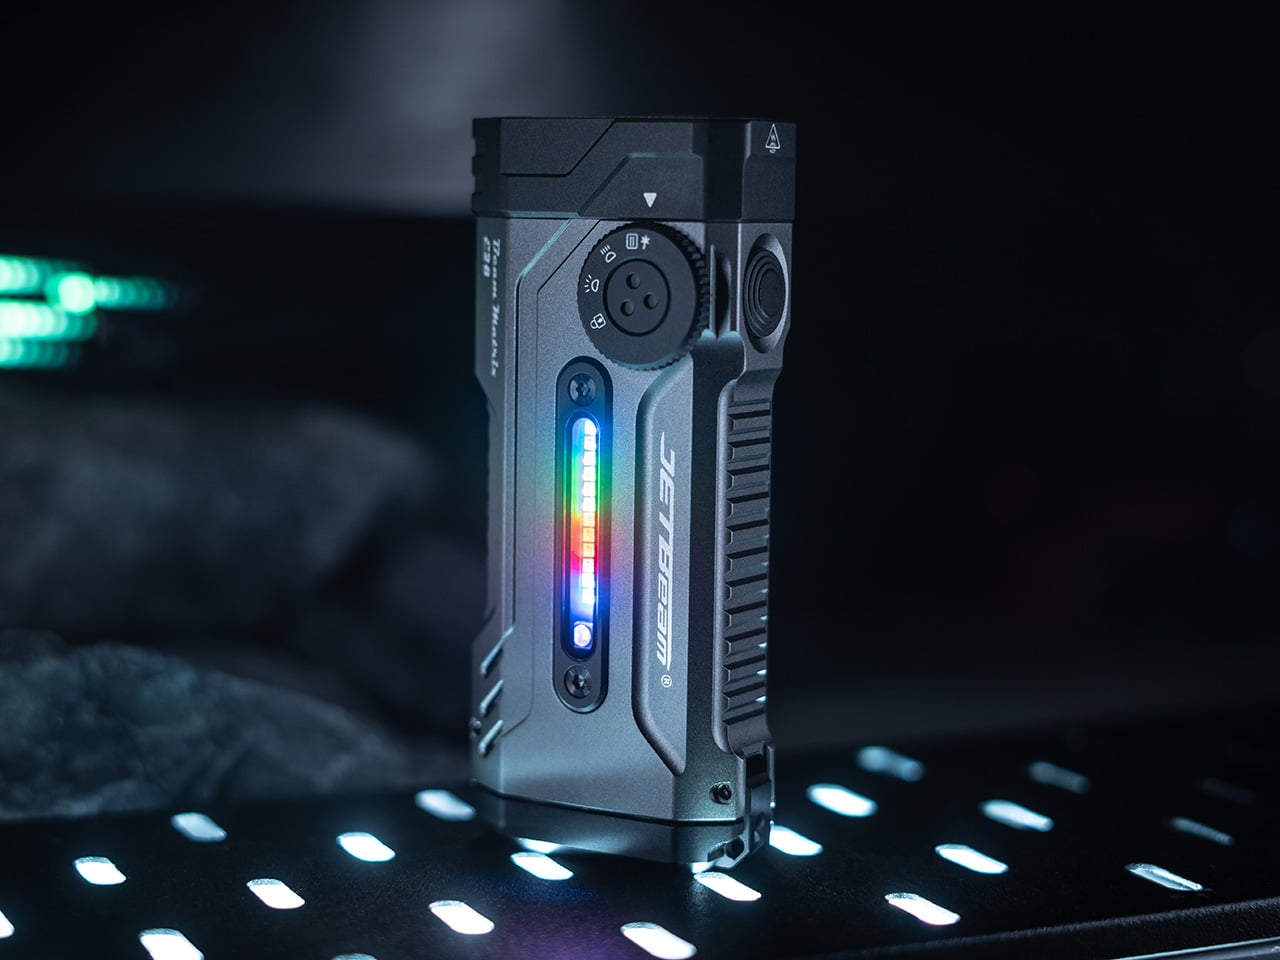
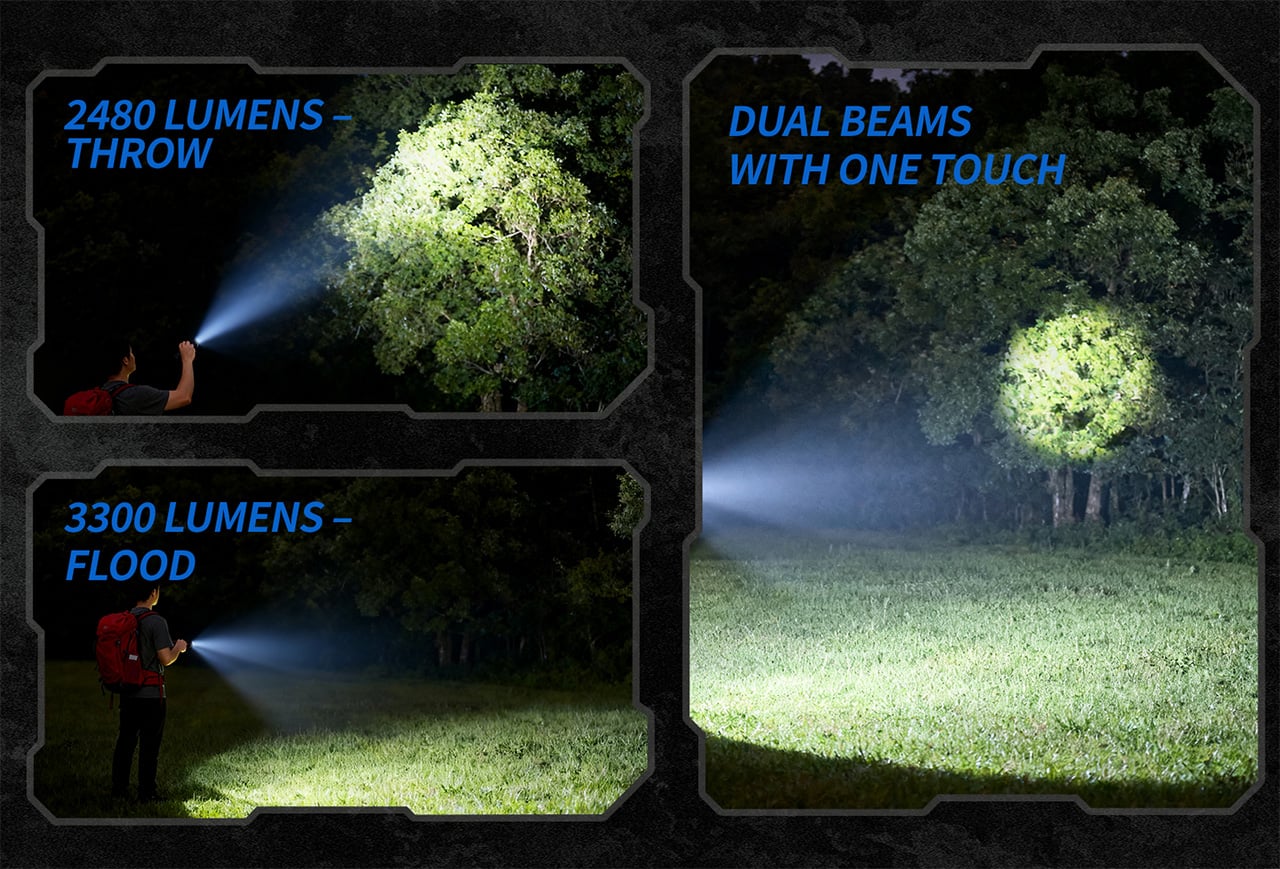
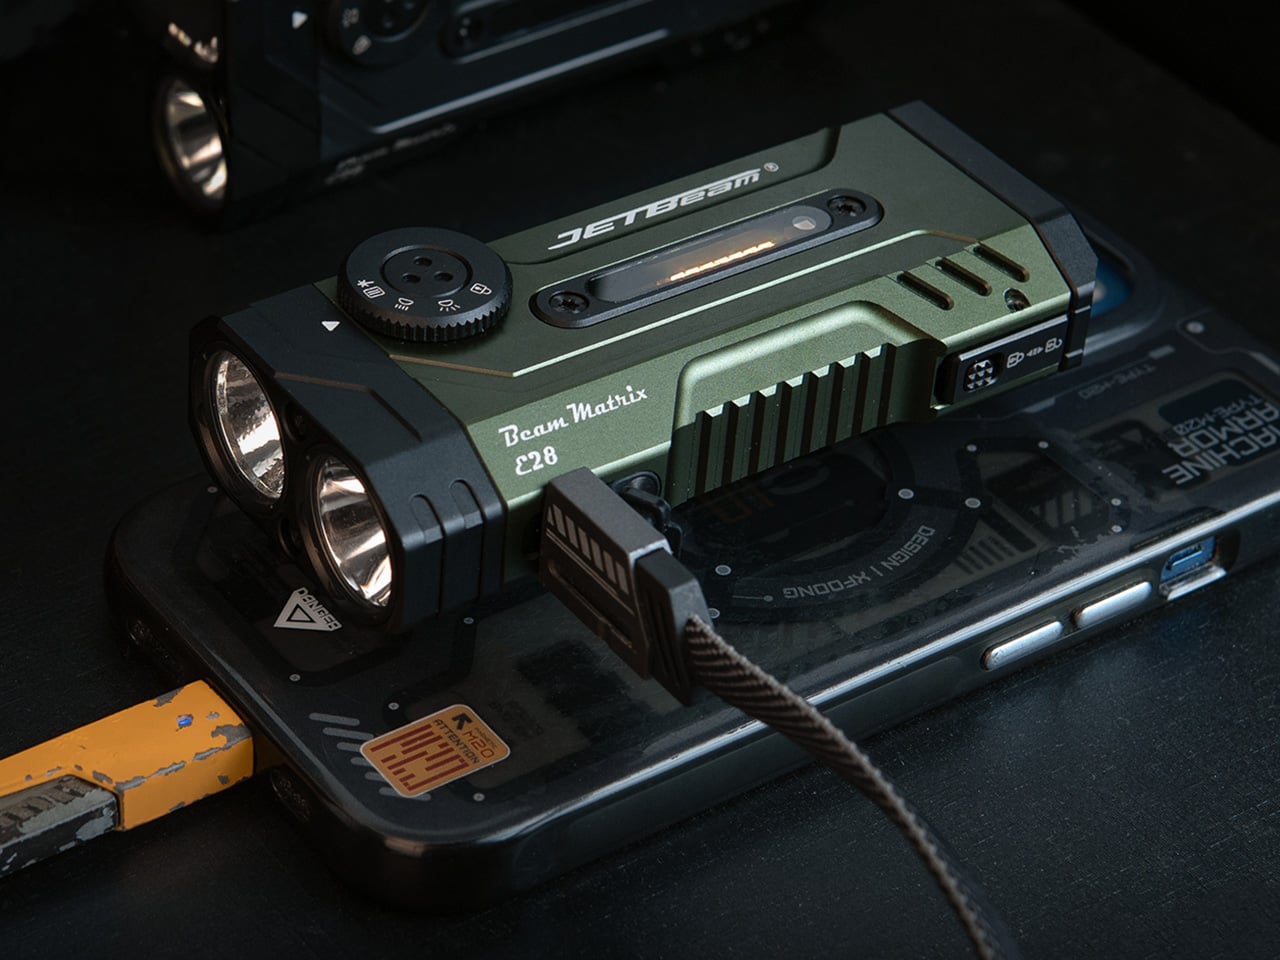
Most flashlights ask you to choose. Throw or flood. Pocket size or runtime. A simple beam or specialty features. Jetbeam’s E28 walks into the room and suggests you stop choosing altogether. This flat, brick-shaped EDC light packs dual independently controlled white beams (one flood, one throw), a 365 nm UV emitter, a 520 nm green laser, an RGB side strip with nine modes, and a 7,000 mAh power bank into a single 251-gram body. It is the sort of design that makes you wonder whether the engineers were trying to solve real problems or just win a feature-count contest.
Here’s the thing: the spec sheet sounds like overkill until you actually think about the situations where you need more than a basic beam. Checking a hotel room for cleanliness with UV. Using the laser as a presentation pointer by day and a pet toy by night. Mounting the light magnetically under a car hood while the flood beam lights your work and the throw beam spotlights a distant part number. The E28 is betting that enough people want a true multi-tool in flashlight form, and the early reviews suggest Jetbeam might be onto something.
Two 18650 cells sit inside a flat aluminum body measuring 107.6 × 48 × 26.6 mm, delivering 7,000 mAh of total capacity. That translates to 8.3 hours at 500 lumens in flood mode or 13.2 hours at 300 lumens in throw mode, which are the runtimes that actually matter when you cannot swap batteries mid-hike. Moonlight mode allegedly hits 350 hours, though nobody is realistically running a light that dim for two weeks straight. The dual-cell setup adds weight, pushing the E28 to 251 grams with batteries installed, but that heft comes with the benefit of never worrying about your light dying during an evening walk or a weekend camping trip.
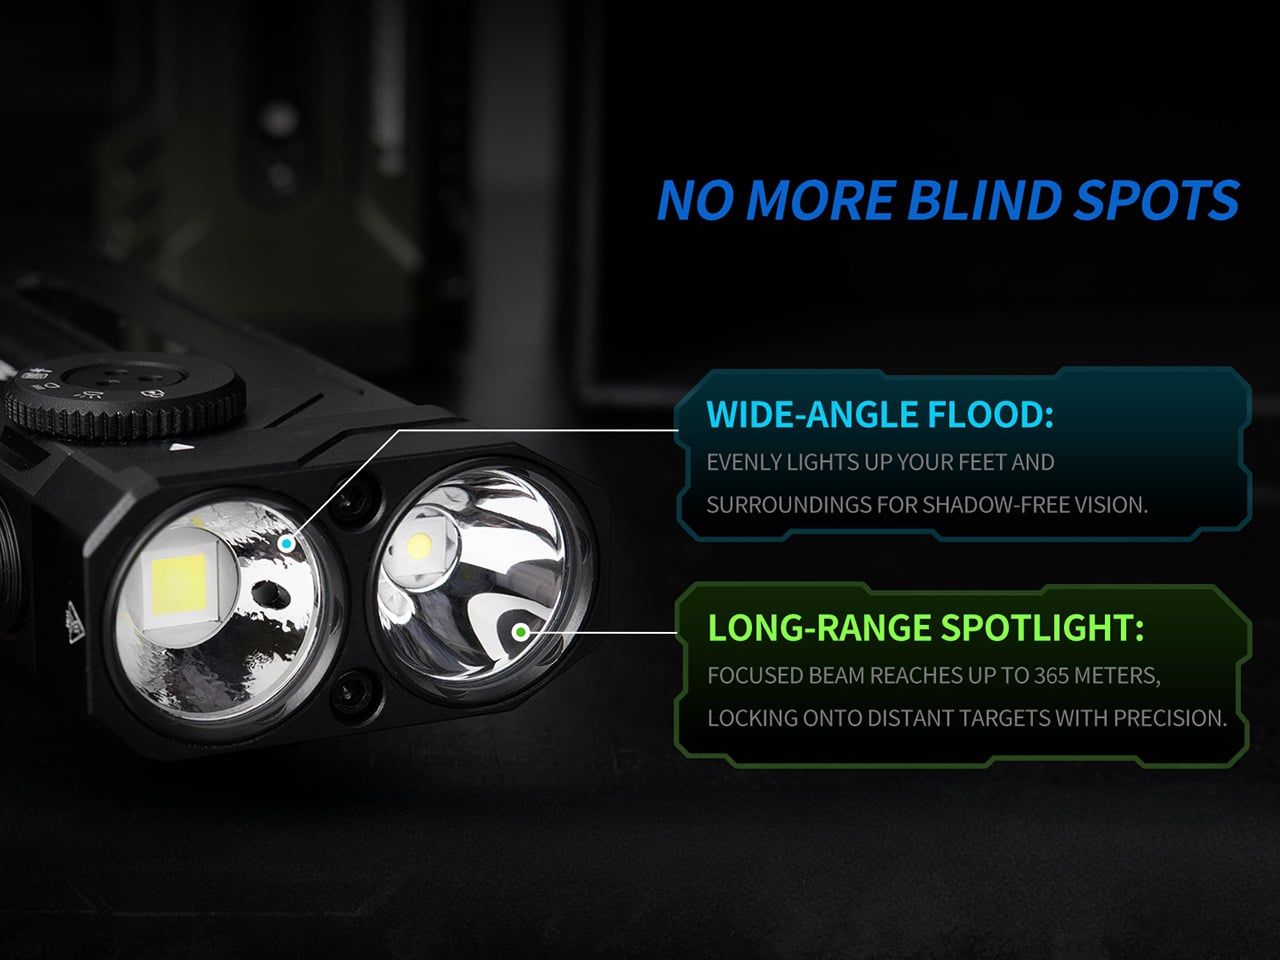
Jetbeam gave each beam its own proper optics instead of cramming compromised emitters into a too-small head. The flood side uses a 7070 LED with a wide, shallow reflector, maxing out at 3,300 lumens (briefly, before stepping down to 1,500 then 1,000 as heat builds). It is a wall of light that illuminates everything within 10 meters with zero shadows, exactly what you want for close work or navigating a dark campsite. The throw channel uses a Luminus SFT-42R with a smooth, focused reflector, hitting 2,480 lumens and reaching 365 meters with a 33,375-candela hotspot. That is search-and-rescue level throw from a light you can slip into a jacket pocket. Running both channels simultaneously gives you a beam profile with bright center punch and complete peripheral coverage, which is how dual-beam lights should work but rarely do because most manufacturers cheap out on one emitter or the other.
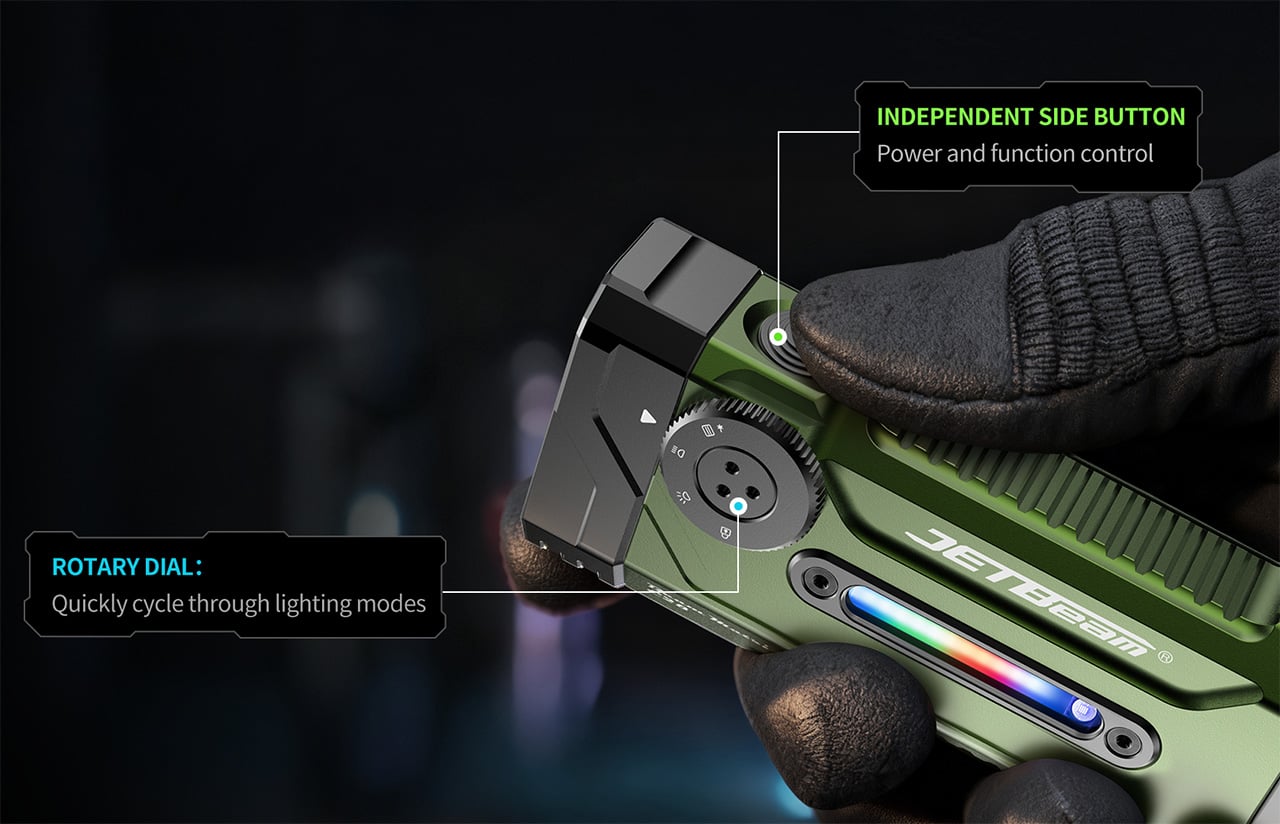
A rotary dial handles mode switching, which immediately sets this apart from the “click seventeen times to find strobe” nonsense that plagues most multi-mode lights. Rotate to flood, throw, dual-beam, UV, laser, or RGB, then tap the side button to turn on or cycle brightness. It takes maybe ten minutes to learn and then becomes completely intuitive. You can operate it one-handed even with gloves because the dial has positive detents and the button is chunky and easy to find by feel. Jetbeam clearly spent time thinking about how people actually use lights in the field instead of just designing a UI that looks good on paper.
The UV emitter sits on one side at 365 nm, which is proper ultraviolet (not the 395 nm purple wash that cheap lights use). This wavelength makes currency security features glow, reveals pet stains on carpets, highlights HVAC leak-detection dye, and generally makes invisible contaminants visible. If you work in automotive, HVAC, or forensics, this is a tool you already carry separately. If you travel frequently and care about hotel cleanliness, same deal. For everyone else, it is a fun party trick that might come in handy twice a year. The 520 nm green laser sits opposite, useful for presentations, pointing out distant landmarks, or entertaining pets. It is low-powered enough to be safe but bright enough to be visible across a parking lot at night. The RGB strip runs along the side with nine different modes: solid colors, breathing patterns, meteor effects, rainbow flow. Red light preserves night vision when you are reading maps. Multicolor modes create ambient lighting at camp or act as fill light for photos. Solid white functions as a secondary task light. Some people will use this constantly; others will turn it on once, say “neat,” and forget it exists.
Aerospace-grade aluminum with HA III hard anodizing means the body can take scratches, drops, and general abuse without looking like it fell off a truck. The machining cuts along the flat sides double as heat fins and grip texture, which is functional design instead of just aesthetics. IPX8 waterproofing handles 2 meters of submersion, and the USB-C port hides behind a sealed rubber cover. The magnetic tail holds firm on steel surfaces even when the light is pumping out heat on high mode, making hands-free work actually practical. A removable clip mounts in either direction for cap-brim carry, backpack straps, or belt attachment, and the base plate is compatible with GoPro-style action camera mounts, so you can stick this on bike handlebars, helmets, or quick-release brackets.
The power bank function turns 7,000 mAh of onboard capacity into emergency phone charging via USB-C. You can fully charge most phones at least once, which makes the E28 useful during power outages or long days away from outlets. It is not replacing a dedicated battery bank, but as something that lives in your car or go-bag anyway, having that backup option adds real value. The RGB strip shows battery status for five seconds on power-up, cycling through colors to indicate remaining charge, which is smarter than trying to guess voltage by how bright the beam looks.
Jetbeam ships the E28 with two 3,500 mAh 18650 cells, a USB-C cable, lanyard, mounting clip, hardware, and a hex wrench, so you can use it immediately without buying accessories. Pricing lands at $87.45 with 2 color options to choose from – a tactical green, and a classic grey, which feels reasonable for a light that consolidates a flood beam, throw beam, UV source, laser pointer, and power bank into one 251-gram package. If you already carry multiple single-purpose tools, the E28 is the Swiss Army knife consolidation you did not know you needed. If your lighting needs are simple, a $25 single-beam EDC or even your phone’s flashlight will serve you fine. But for anyone who regularly finds themselves thinking “I wish I had X tool right now,” Jetbeam built exactly that.
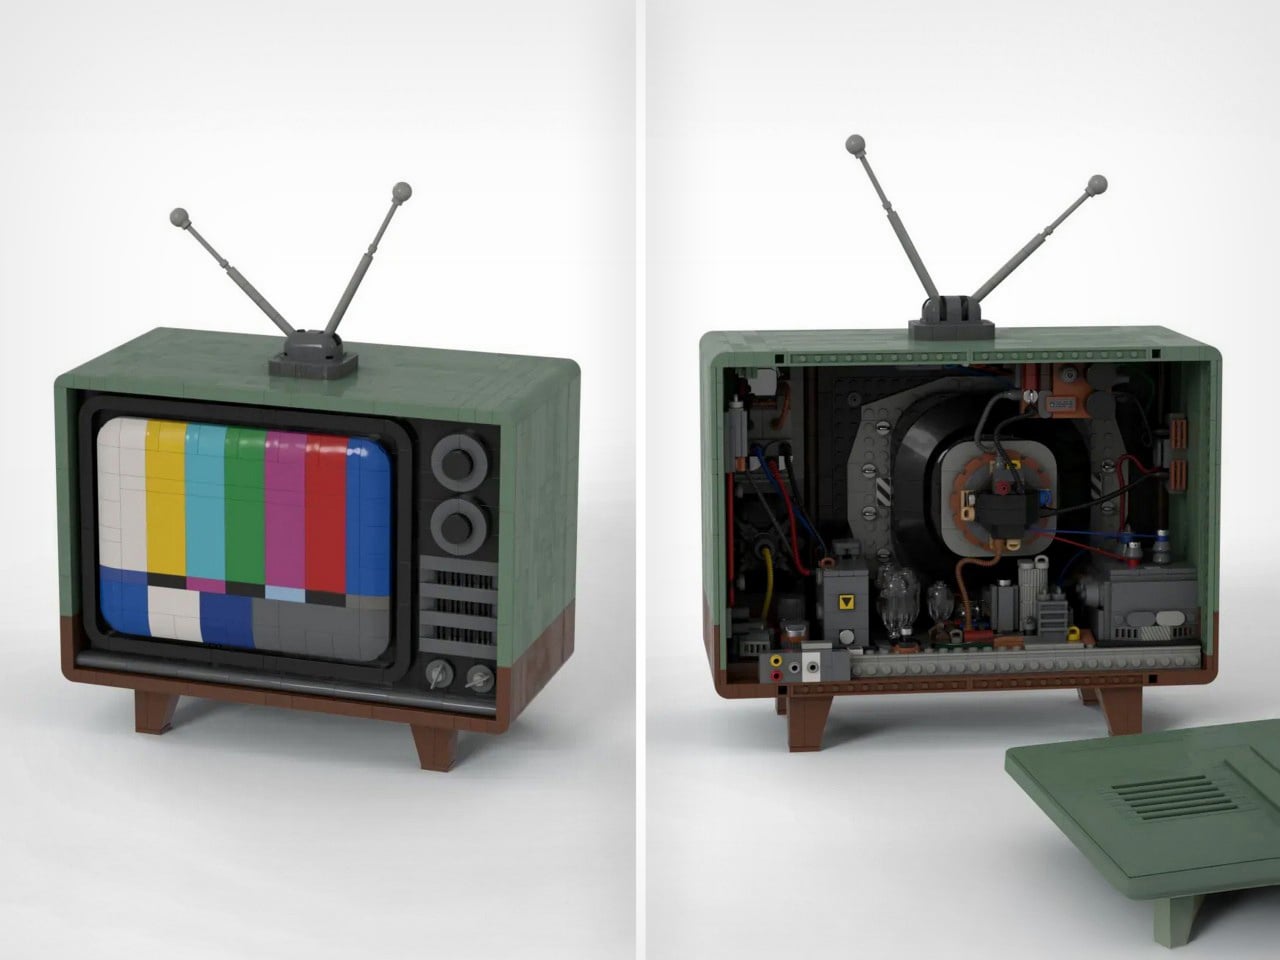
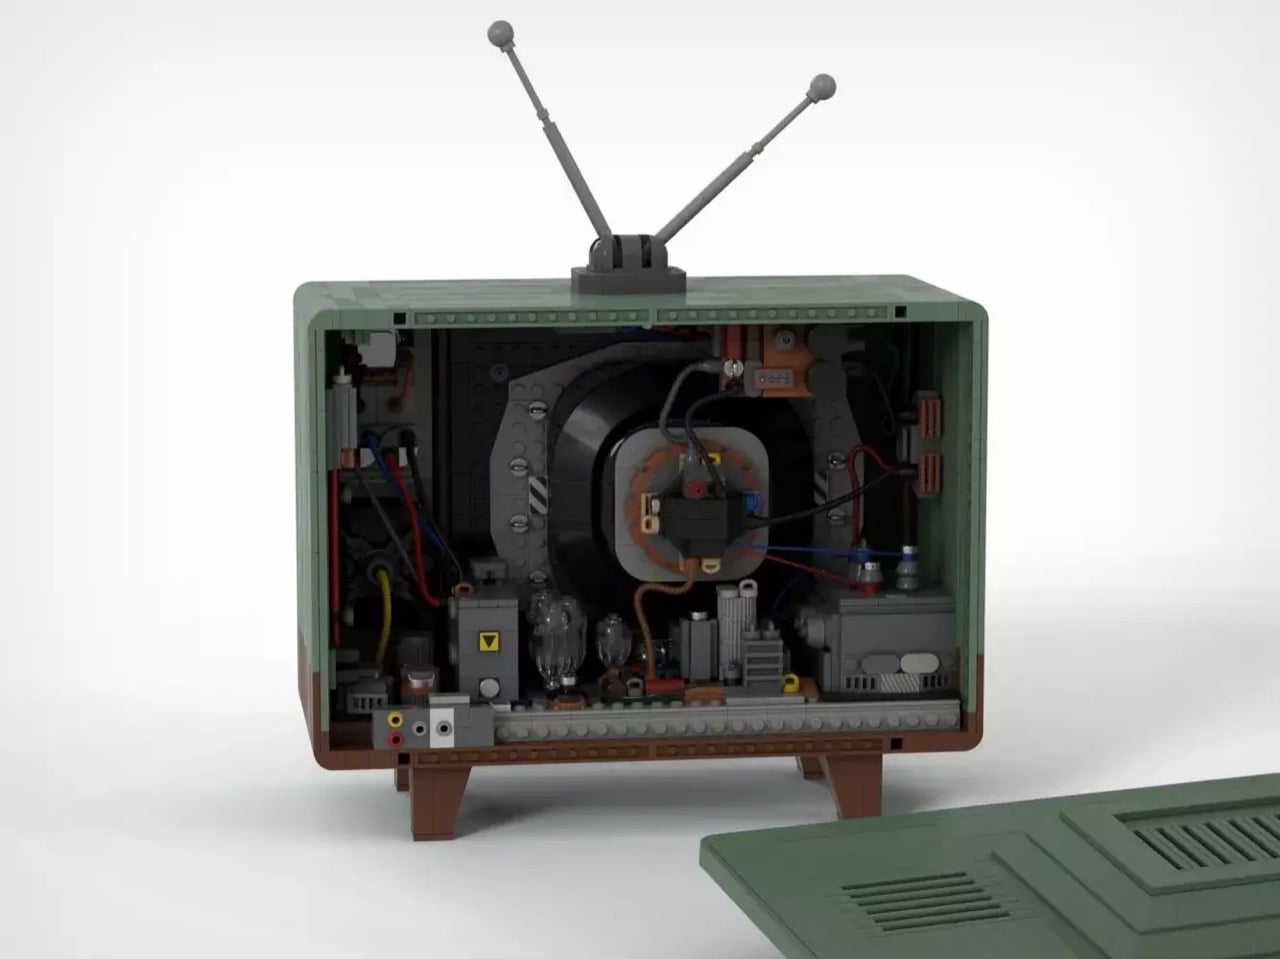
Before flat screens and streaming services, television sets were hulking pieces of furniture that commanded respect and curiosity in equal measure. FMDavid’s LEGO Ideas submission celebrates these beloved artifacts with a build that goes far beyond surface level nostalgia, diving deep into the mechanical heart of what made these cathode ray tube televisions actually work.
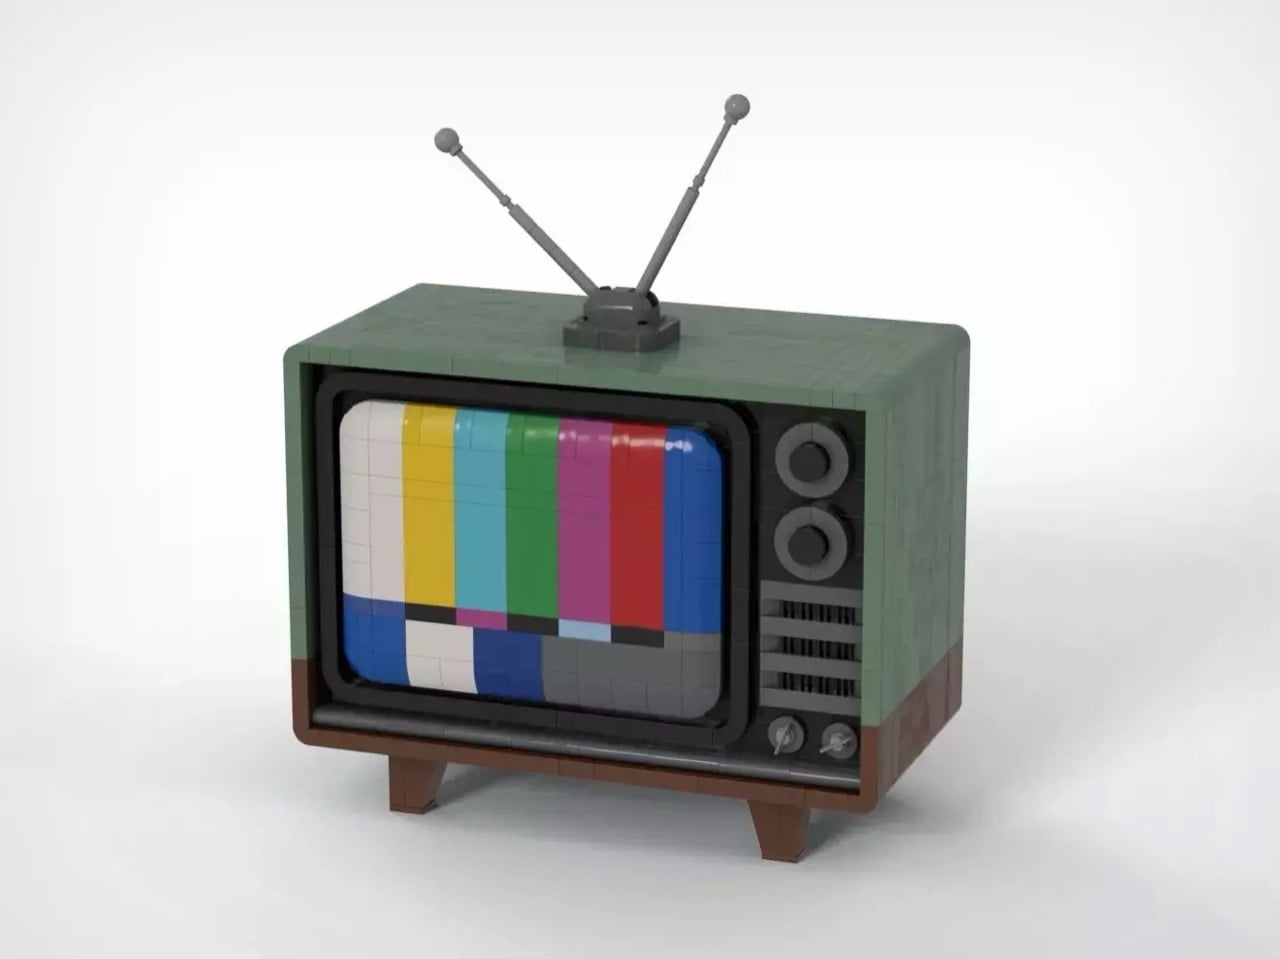
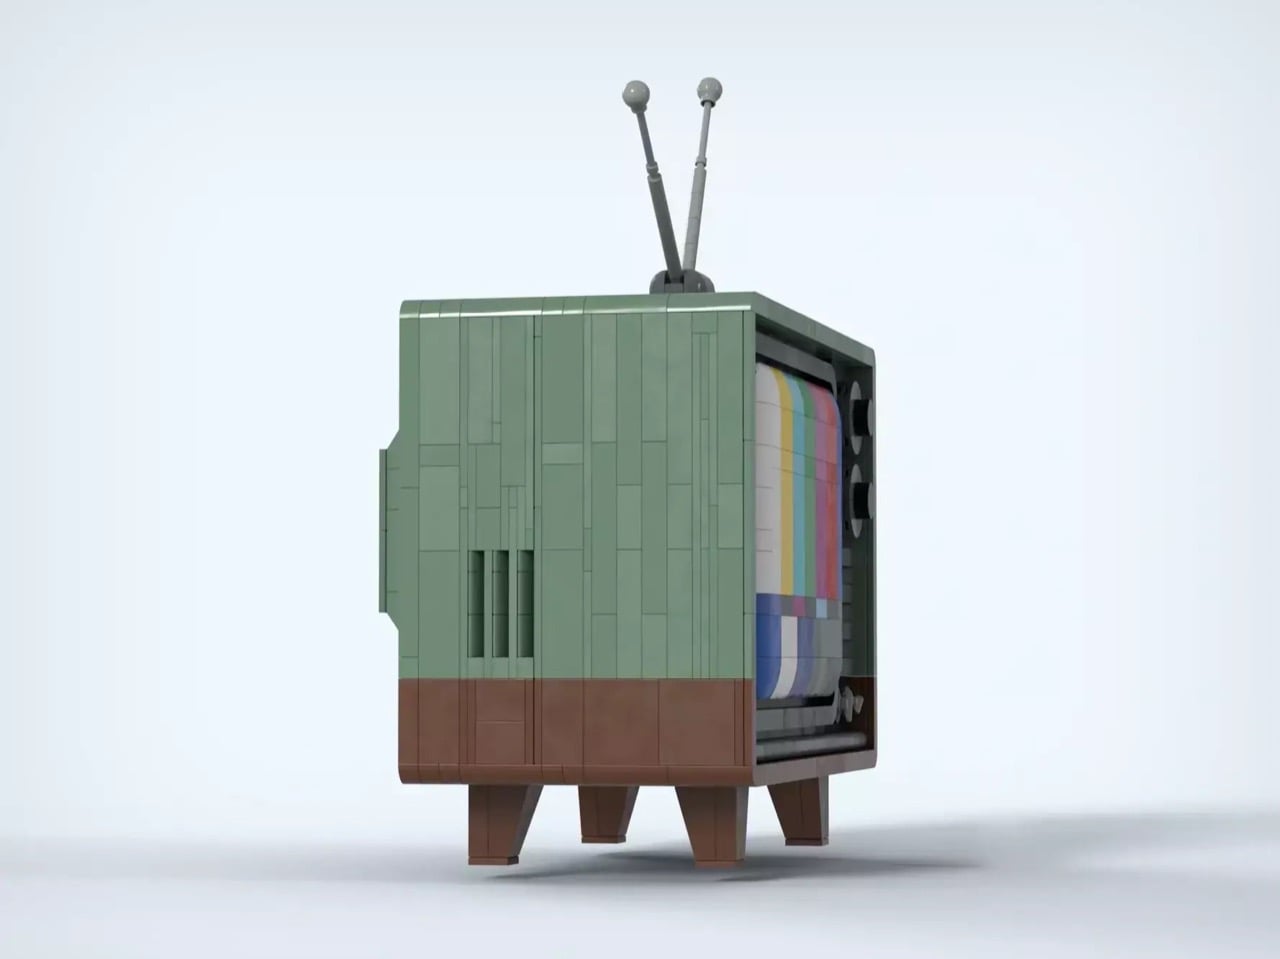
The exterior immediately transports viewers back several decades with its mint green housing, classic rabbit ear antenna, and the unmistakable SMPTE color bars displayed on its gently curved screen. Remove the back panel, however, and the true engineering achievement reveals itself. Every major component of a vintage television has been faithfully recreated in brick form, from the deflection coils wrapped around the CRT neck to the colorful wiring snaking between vacuum tubes and capacitors along the chassis floor.
Designer: FMDavid
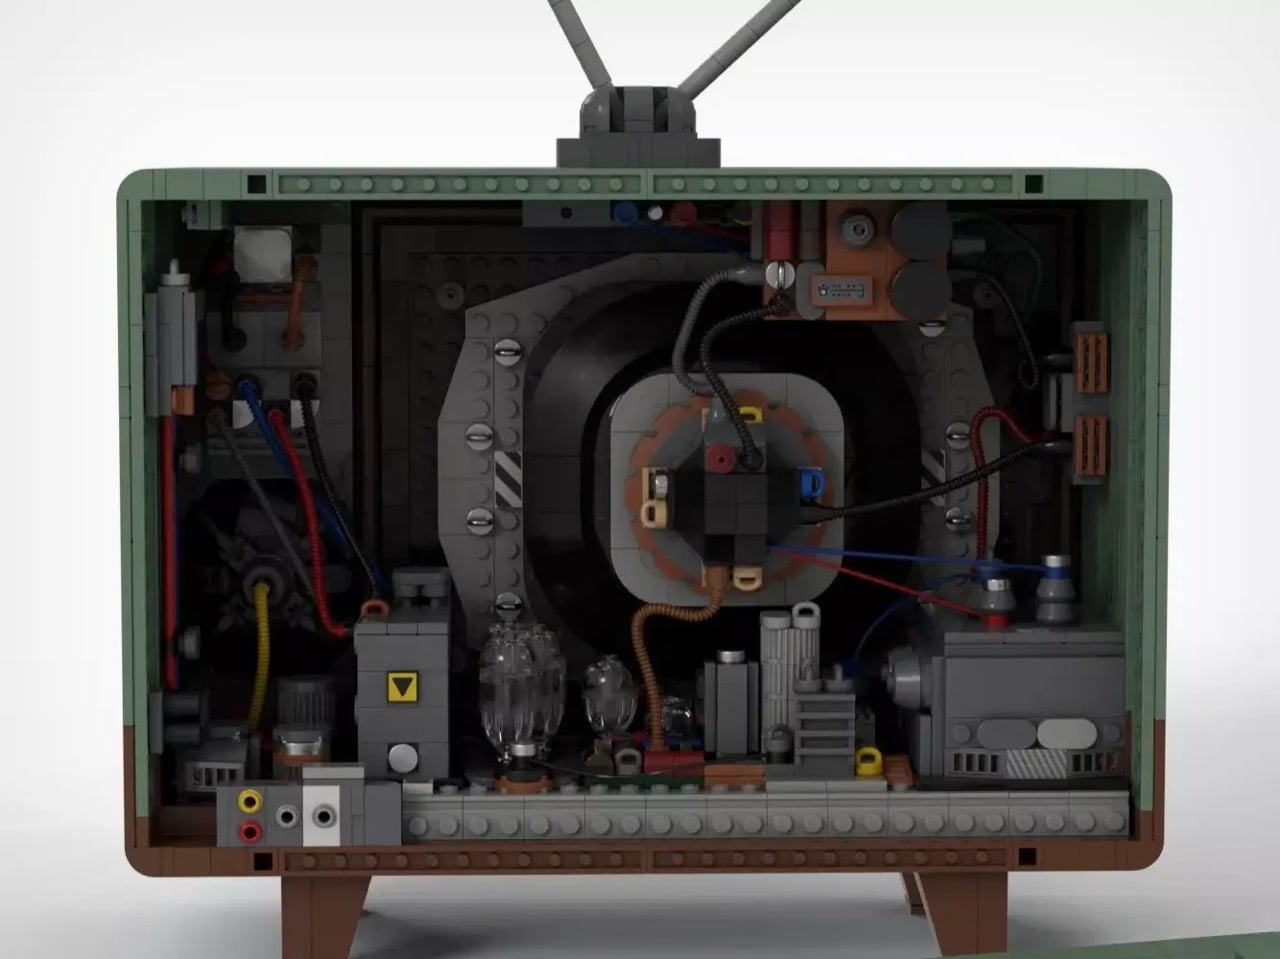
And that’s what’s so fascinating about this build – the inner guts. Most retro TV builds in LEGO form stop at the cabinet and screen. Slap on some rabbit ears, throw in a color bar pattern, call it a day. FMDavid apparently decided that approach was for amateurs. The real story here happens when you pop off that back panel and discover what amounts to a miniature engineering degree compressed into approximately 200 square studs of space. The cathode ray tube dominates the interior volume exactly as it would in an actual 1960s Zenith or RCA, which tells me this builder actually studied reference material instead of just vibing on childhood memories. Those deflection coils wrapping around the tube neck aren’t decorative. They’re positioned where they’d actually sit in a functioning set, using what appears to be copper-colored flexible elements or possibly custom printed tiles to simulate the electromagnetic coils that would bend electron beams across phosphor screens at 15,734 times per second.
This build works as both display piece and educational tool. The SMPTE color bars on screen are a nice touch that any broadcast engineer would immediately recognize. Those bars weren’t just pretty patterns. They were precision test signals containing specific luminance and chrominance values that let technicians calibrate everything from color temperature to sync pulse timing. The curved screen profile captures that subtle convex bulge of real CRT glass, which existed because a flat surface would implode under atmospheric pressure once you evacuated the tube interior to near-vacuum conditions. Physics demanded that curve, and FMDavid respected it.
The exterior styling nails the mid-century aesthetic with that sage green cabinet color and brown wooden legs angled outward in classic Danish modern furniture tradition. Those aren’t just legs, they’re cultural signifiers of an era when televisions were statement furniture pieces that families planned their living rooms around. The two control knobs on the right panel would’ve been your channel selector and volume control, back when changing channels meant physically walking across the room and turning a mechanical detent switch through twelve discrete positions. No endless scrolling through 500 cable channels, just ABC, NBC, CBS, and maybe PBS if you were lucky.
The component density here feels right for a television set from the tube era without overwhelming the interior space. Real TV sets from the 1960s packed dozens of components into their cabinets, handling everything from IF amplification to horizontal output to audio processing. FMDavid’s arranged the internal elements so you can actually see the relationship between the major systems. The vacuum tubes reminiscent of the old-timey technology, the transformers with their ribbed heat sinks sit where you’d expect them, probably using modified tile or plate stacks to create those distinctive cooling fins that prevented components from cooking themselves to death during long viewing sessions. Those cylinders at the bottom represent capacitors, which in real sets would filter high voltage DC and store energy for the horizontal deflection circuit. Get a capacitor failure in a vintage TV and you’d lose either your picture width or your vertical hold, sending the image rolling endlessly up the screen. Heck, there’s even the RCA output on the back, with the yellow and red for left and right audio channels, and a white for presumably the video.
The build currently sits at 1,136 supporters on LEGO Ideas, which means it needs another 8,864 votes to hit the 10,000 threshold for official review. That’s how the Ideas platform works. You need 10,000 people to vote for your concept within a limited timeframe, then LEGO’s internal review board evaluates it for commercial viability, piece count economics, licensing considerations, and market fit. FMDavid’s got 418 days remaining to gather those supporters. If you want to see this hit production shelves, head over to the LEGO Ideas website, create a free account if you haven’t already, and cast your vote. No money required, just a few clicks to tell LEGO this deserves manufacturing consideration alongside other fan-designed sets.