Did you know that over 70% of designers report using multiple tools in their workflow? The world of design is not just about creativity; it’s also about efficiency and innovation. From industrial design and 3D modeling to interface design, graphic design, and even AI-powered designing, an array of applications exists to cater to every niche within the creative industry.
Here’s a look at some of the best design tools available today—each one a powerful ally in your quest for creative excellence—while providing insights into how they can elevate your projects from ordinary to extraordinary. Whether you’re a seasoned professional or an aspiring creator, this list should have something in it for everybody across the creative gamut.
Figma – Best for Interface Design

Figma has made a name for itself as one of the top tools for UI and UX designers, thanks to its real-time collaboration capabilities. The company that was notably ‘almost’ acquired by Adobe managed to carve out a spectacular niche within the digital creative industry in very little time. With cloud-based operation, Figma allows teams to work simultaneously on projects, offering features like component libraries, responsive design tools, and easy prototyping. Its web-based approach eliminates the need for downloads, which makes it ideal for team-based workflows.
Figma is commonly used in UI/UX design, with its free tier making it accessible to freelancers and small teams. Professional paid plans start at $15 per seat per month, unlocking additional features like team libraries and enhanced sharing capabilities. With its user-friendly design and robust functionality, Figma has become the go-to platform for designers focused on creating intuitive user interfaces and user experiences.
Why We Picked It?
Figma’s ease of use, and integration of incredibly powerful tools right into a web browser make it absolutely perfect for most individuals as well as large teams. The app feels extremely familiar once you open it, if you’re used to a general Adobe-style workflow. It takes next to no time mastering the inner workings, and the internet is FILLED with tutorials to help you unleash your creative vision.
What We Like
- Real-time collaboration, ideal for team workflows
- Web-based, no download required
What We Dislike
- Limited offline functionality
- Some advanced features are locked behind the paid plan
Canva – Best Web-App-based 2D Software

If Figma was for interfaces and workflows, Canva is for everything else 2D. A popular name in the creative industry, Canva has become one of the most widely used design tools for social media, presentations, and marketing materials. With a vast library of templates, fonts, and elements, Canva simplifies graphic design for those without formal training. Its drag-and-drop functionality is especially appealing for marketers and small business owners who need professional visuals quickly.
While Canva offers a free version, the Pro plan at $15 per month unlocks additional features like premium assets and brand kits, as well as Canva’s AI features. Canva’s ease of use and accessibility make it a go-to for digital marketing and content creation across industries.
Why We Picked It?
Canva’s device-agnostic approach to design makes it an incredibly easy and powerful tool for anyone. You can start working on a project on your phone, and then fine-tune the same project on your laptop or desktop. The app gives you access to hundreds of thousands of assets (some of them behind a paywall), and even supports working and exporting in popular sizes and formats.
What We Like
- Huge library of templates and assets, great for non-designers
- Drag-and-drop interface that’s easy to learn
What We Dislike
- Limited flexibility for advanced graphic design projects
- Pro version needed to unlock many premium assets and features
Spline – Best Web-App-based 3D Software

The 3D counterpart to Canva’s popularity, Spline is a relatively new entry in the 3D design space, offering designers the flexibility to create interactive 3D designs directly in their browsers. With a straightforward user interface and features like parametric modeling, lighting, animation, and even GenAI tools, Spline is user-friendly and accessible even for beginners.
Spline’s web-based nature makes it ideal for quick prototyping and presentations, especially for web designers aiming to add interactive 3D elements to entire websites (their Instagram is a hotspot for creativity). Spline offers a free version with limited features, while the Starter plan, at $12 per month, provides enhanced capabilities. Spline’s accessibility and ease of use are game-changers for those looking to experiment with 3D designs, games, and websites without complex software or even a line of code.
Why We Picked It?
3D modeling on a web browser was unheard of a couple of years ago. The most you could do was preview a model – but build, edit, AND render on a browser?? I’d like to say Spline was one of the first to really pioneer the idea. Their browser-based app won’t replace your traditional 3D modeling setup… but Spline is slowly getting there. Besides, it makes things so much easier for interactive web designers and game designers that it feels like magic!
What We Like
- Web-based, making it accessible from anywhere
- Easy-to-use interface for quick 3D modeling and interactivity
- Powerful GenAI features
What We Dislike
- Limited features compared to more advanced 3D modeling software
- Still developing in terms of advanced capabilities and tools
Vizcom – Best AI-powered Visualization Tool

Vizcom leverages AI to turn sketches into highly realistic renderings within seconds, making it invaluable for concept artists and product designers. By using machine learning, Vizcom enhances quick sketches with photorealistic details, significantly speeding up the concept-to-presentation process.
Perfect for early-stage design visualizations, Vizcom allows artists to experiment with various styles and materials without the need for extensive manual rendering. Vizcom offers a free basic plan, while premium plans start at $49 per month, making it a great AI-assisted tool for rapid visualization and ideation.
Why We Picked It?
Sure, there are a lot of GenAI tools out there – but none as good as Vizcom when it comes to applying GenAI directly on your sketches. Visit Vizcom’s Instagram page to get a sense of how good it is and you’ll struggle to find a tool that even matches half its capability. It will render your sketches, turn them into basic 3D, and give you the ability to ideate alongside the AI, showing the true future of industrial design.
What We Like
- AI-powered visualization generates high-quality renderings quickly
- Affordable for individuals and small teams
What We Dislike
- Primarily focused on concept and visualization, limited for detailed modeling
- Requires an internet connection, which can be a drawback in remote or low-bandwidth settings.
- Quality of output may vary depending on the complexity of the sketch
Gravity Sketch – Best Metaverse 3D Software

Gravity Sketch brings 3D modeling to VR (with an iPad app too), offering an immersive experience that’s particularly suited for designing within the metaverse and virtual environments. Users can draw in 3D space, walking around their creations and manipulating shapes in real time. This VR-first approach offers a unique level of creativity and interactivity that conventional 3D software can’t match.
Gravity Sketch is used by automotive and industrial designers who benefit from seeing their designs at scale. The software is notably free for individual users (something that Gravity Sketch announced in 2021) making it accessible for students and casual users experimenting with VR design, with a dynamic paid structure for teams and enterprises.
Why We Picked It?
Gravity Sketch was the first ever mainstream 3D modeling software for the metaverse, and to this day remains the gold standard when it comes to building in 3D, while immersed in 3D. You can create designs by waving your hands in mid-air, making curves, adjusting surfaces, and moving objects/layers around. This truly feels like what the future of industrial and automotive design should be!
What We Like
- Immersive VR-based 3D modeling experience
- Ideal for creating designs within the metaverse and virtual spaces
- Used to be paid for individuals, but is now free
What We Dislike
- Requires VR hardware, limiting accessibility
- iPad app isn’t as immersive as the metaverse experience
Procreate – Best Sketching App for iPad

Procreate has made waves in the digital art community for its intuitive sketching tools on iPad. It offers a wide range of brushes, layering options, and even animation capabilities, making it versatile for illustrators, digital artists, and animators. With the Apple Pencil, Procreate brings a natural drawing experience to the digital canvas, letting you even sketch directly on 3D models!
Priced at a one-time fee of $12.99, Procreate is affordable and extremely powerful for creatives looking to sketch, paint, or animate on the go. It’s widely used for illustration, concept art, and character design, making it indispensable for artists who prefer tablet-based workflows.
Why We Picked It?
Hands down the best sketching app for the iPad. Procreate’s brilliantly simple interface, its abundance of tools and features, and its ability to handle everything from sketching and animation make it a must-have if you own an iPad. You could sketch with your finger or a capacitive stylus, but we recommend the Apple Pencil for its pressure and tilt sensitivity features. The one-time fee has great value because Procreate keeps adding new capabilities and features every few years without charging extra.
What We Like
- Natural drawing experience on iPad with Apple Pencil
- One-time payment, no ongoing subscription required
What We Dislike
- Available only on iPad, limiting cross-platform use
- Lacks some advanced features of desktop design software
Blender – Best Free 3D Software

Blender is a widely popular, open-source 3D software with extensive capabilities for modeling, sculpting, and animation. Known for being free yet feature-rich, Blender is a favorite among independent artists, animators, and hobbyists. It offers tools for everything from basic 3D object creation to complex animation, making it incredibly versatile.
One of Blender’s standout features is its robust community support, which keeps the software updated and provides a wealth of tutorials. This makes Blender ideal for creatives looking to learn 3D modeling without an upfront financial commitment. As a completely free tool, Blender is used not only in personal projects but also in professional production pipelines, especially in indie game development and VFX for films.
Why We Picked It?
There’s nothing Blender can’t do. The open-source software lets you model and render anything, whether you’re an industrial designer, 3D artist, animator, special-effects artist, or even an engineer working on simulations. Blender’s advanced settings let you customize the UI based on the kind of workflow you have, and you can even download plugins that make it even more fine-tuned to your needs. The software was and always will be free, so if there’s one 3D software I recommend you keep in your back pocket – it’s this one.
What We Like
- Completely free and open-source with extensive community support
- Powerful toolset for modeling, sculpting, animation, VFX, compositing, and even video editing—all in one program
- Strong community provides extensive tutorials, plugins, and support, making it easier for beginners to get started and for advanced users to expand capabilities
What We Dislike
- User interface can be overwhelming for new users
- Lacks built-in collaboration tools
SketchUp – Best 3D Software for Architecture + Interiors

SketchUp has long been popular among architects and interior designers, offering intuitive 3D modeling that balances functionality with ease of use. Known for its push-pull tool and simple interface, SketchUp is ideal for creating detailed architectural models and visualizations quickly. The software was created by @Last Software and was acquired by Google in 2006. SketchUp finally got sold to Trimble Inc. in 2012.
While SketchUp offers a free web-only version for non-commercial use, the Pro plan at $49.99 per month gives you a dedicated app for Desktop, iPad, as well as web-based 3D modelers. Its user-friendly approach and accessible pricing make SketchUp an industry favorite for architecture and interior design projects.
Why We Picked It?
SketchUp was the first ever 3D design software I truly worked with. This was in the year 2008-09, just before I went to design college, and when SketchUp was owned by Google. The app was ridiculously intuitive to use, and I even designed houses and 3D scenes with zero prior knowledge. Although SketchUp has changed owners, it still remains a favorite in the architecture and interior design industry (you should check out Thilina Liyanage‘s work – all made on SketchUp).
What We Like
- Intuitive and user-friendly, ideal for architecture and interior design
- Free version available with essential modeling tools
What We Dislike
- Lacks advanced rendering and parametric modeling tools
- Pro version can be expensive for those needing full functionality
- The 3D Warehouse has been disabled for non-web use, cutting off an entire repository of assets for users

Autodesk is known for its powerful lineup of 3D design software, most notably Fusion and Revit. Fusion (previously known as Fusion 360) is a standout for CAD, CAM, and CAE, providing a full set of tools for product design and manufacturing. Its cloud-based nature enables real-time collaboration, making it ideal for engineering and industrial design teams that need seamless workflows and advanced simulation tools.
Revit, on the other hand, is a favorite among architects and construction professionals for its Building Information Modeling (BIM) capabilities. Revit allows for the creation of highly detailed building models with built-in structural and MEP (Mechanical, Electrical, and Plumbing) systems, facilitating a streamlined design process from conception through construction. It’s the go-to choice for architecture firms that need precise, collaborative tools for large-scale building projects.
Autodesk’s software is available through individual licenses or comprehensive subscription plans. Fusion costs $85 per month or $680 oer year, while Revit’s subscription starts at $365 per month or $2,910 per year, with discounts for bundled purchases. For educational purposes, all of Autodesk’s software remain free to use – both for students as well as teachers. The variety in Autodesk’s offerings makes it a powerful choice for industries spanning product design, architecture, and manufacturing, cementing its reputation as an industry standard for 3D modeling and BIM.
Why We Picked It?
Autodesk is the most commonly uttered name in the design and engineering circuit. With all its apps and software, be it Fusion, Revit, AutoCAD, 3DS Max, Maya, Arnold, Inventor, and a whole host of others, Autodesk has a strong grip on its industry and user base.
Fusion 360 is recommended for its all-in-one CAD, CAM, and CAE tools, ideal for iterative product design and remote collaboration via cloud-based features. Revit excels in architecture and construction with advanced BIM capabilities, supporting detailed, data-rich models that improve project precision and multi-disciplinary collaboration, making both tools invaluable for comprehensive, professional-grade design workflows.
What We Like
- Comprehensive toolset for CAD, CAM, CAE, and BIM (Fusion 360 and Revit)
- Cloud-based collaboration and data sharing
- Free for Students and Educators
What We Dislike
- Expensive subscription plans, especially for Revit

Adobe’s suite is a mainstay in the design world, with Photoshop, Illustrator, and InDesign leading the way for image editing, vector art, and layout design, respectively. Each of these apps provides a deep feature set, making Adobe essential for graphic designers, photographers, and digital artists. Photoshop’s advanced image editing, Illustrator’s vector manipulation, and InDesign’s layout capabilities make it versatile across creative industries. The company has also stayed ahead of the AI curve, launching multiple AI features within its popular software as well as on its Adobe Firefly web app.
Adobe’s Creative Cloud subscription costs $59.99 per month for access to the full suite, though individual apps are also available starting at $9.99 per month. Adobe Spark and Adobe XD add unique tools for social graphics and UI/UX design, cementing Adobe’s role as a comprehensive toolkit for digital and print projects alike.
Adobe has also moved into 3D design with Adobe Substance, expanding its offerings for those working in material texturing and 3D asset creation. This suite provides designers with everything from basic editing to advanced 3D tools, truly making Adobe a one-stop shop for creatives.
Why We Picked It?
There’s really no escaping Adobe. As hard as you try, Adobe always remains the industry standard for graphic and creative work, although they’re steadily expanding into most domains. Adobe Audition is a VERY capable digital audio workstation, Premiere Pro is the gold standard for video and VFX, Illustrator is the best for illustrators, InDesign for publication designers, and Photoshop – oh, where would we be without it! As an editor, I use Photoshop probably more than any other design app/software, and its intuitive layout (that hasn’t changed in decades) plus GenAI features make it the best photo-editing software out there. For a price, though.
What We Like
- Industry-standard suite covering a wide range of design needs
- Comprehensive toolset for everything from graphic design to 3D rendering
- Incredible AI features integrated right into the software
What We Dislike
- High monthly subscription costs, especially for full Creative Cloud access
- Canceling your subscription can be a monumental task with extra fees
KeyShot – Best for 3D Rendering and Visualization

KeyShot, developed by Luxion, remains a top choice for 3D rendering and visualization, recently enhancing its platform with a comprehensive “Product Design-to-Market” suite. Known for its fast, photorealistic rendering and simple drag-and-drop interface, KeyShot enables designers to create high-quality visuals and animations from 3D models with ease. Its real-time rendering engine provides instant feedback, making it invaluable for quick design iterations and client presentations.
With the recent bifurcation into KeyShot Studio, KeyShot Hub, and KeyShot Dock, the software now extends beyond rendering to support a complete, collaborative workflow. KeyShot Studio delivers the powerful rendering capabilities users rely on, while KeyShot Hub enables streamlined asset management and sharing across teams. KeyShot Dock bridges the gap between design and marketing, making it easier for teams to transition finalized assets into promotional materials.
KeyShot is widely used in product design, automotive, and marketing, where lifelike visuals are crucial. Pricing for KeyShot Studio starts at $99 a month, with add-on plugins providing advanced features like Network Rendering and VR support. These new additions solidify KeyShot Studio as an essential tool for turning 3D models into stunning, market-ready visuals while enabling efficient, team-oriented workflows across the design-to-market process. KeyShot Hub and KeyShot Dock have pricing-on-request models.
Why We Picked It?
88% of Industrial Designers prefer KeyShot over any other rendering software. It’s intuitive, fast, and provides stellar results with minimal effort, unlike other software that requires a lot of technical know-how or pre-rendering setup. Although KeyShot isn’t a ‘design’ software, its Product Design-to-Market Suite is slowly and surely making it an integral part of the industrial design and visualization process. KeyShot Studio, or the rendering app, remains an industry favorite by a strong margin, being used by leading brands like Volvo, Nikon, Motorola, and Under Armour. The KeyShot Hub supplements the rendering program, allowing you to access assets to use alongside your designs.
What We Like
- Real-time rendering with high-quality visuals and animations
- New Design-to-Market suite enhances workflow with Studio, Hub, and Dock
What We Dislike
- Pricey, especially for the Pro and enterprise-level versions
- Primarily focused on rendering, not modeling or asset creation
The post Best Design Apps for the Creative Industry first appeared on Yanko Design.


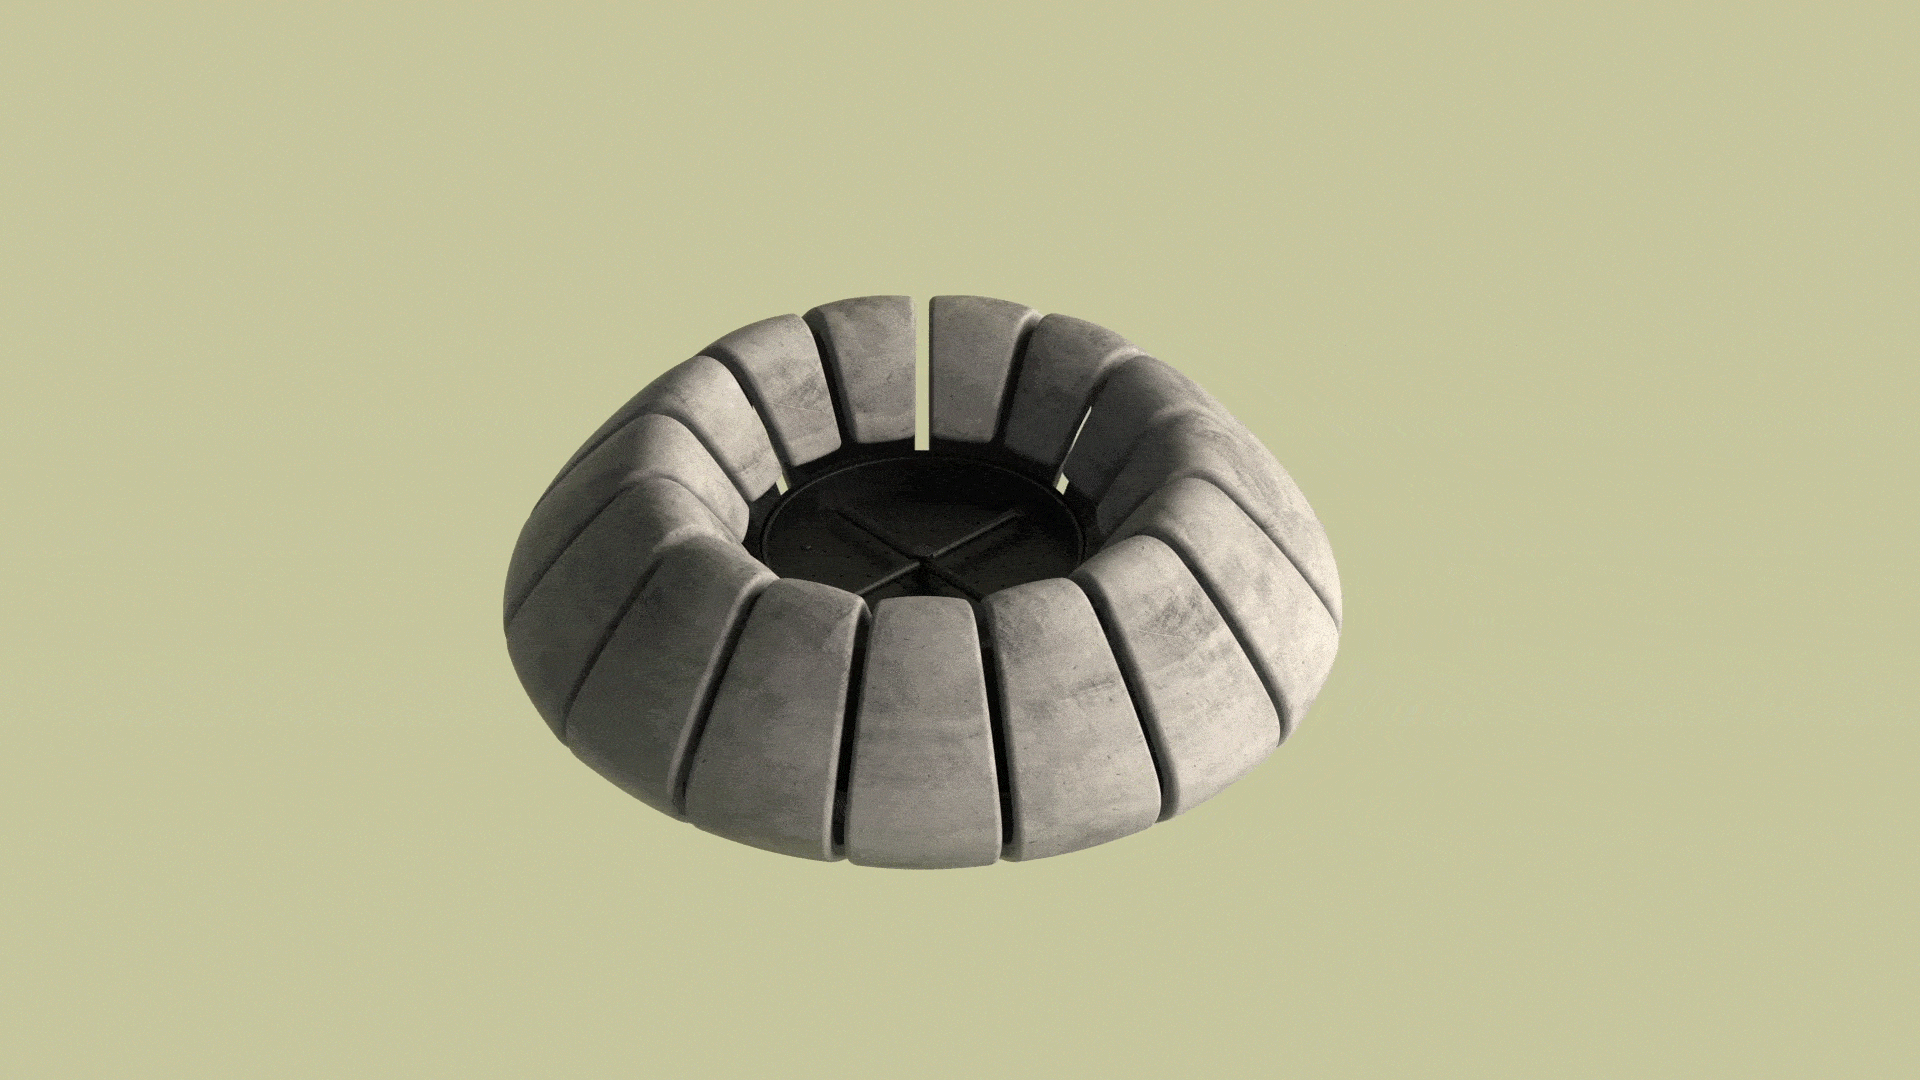
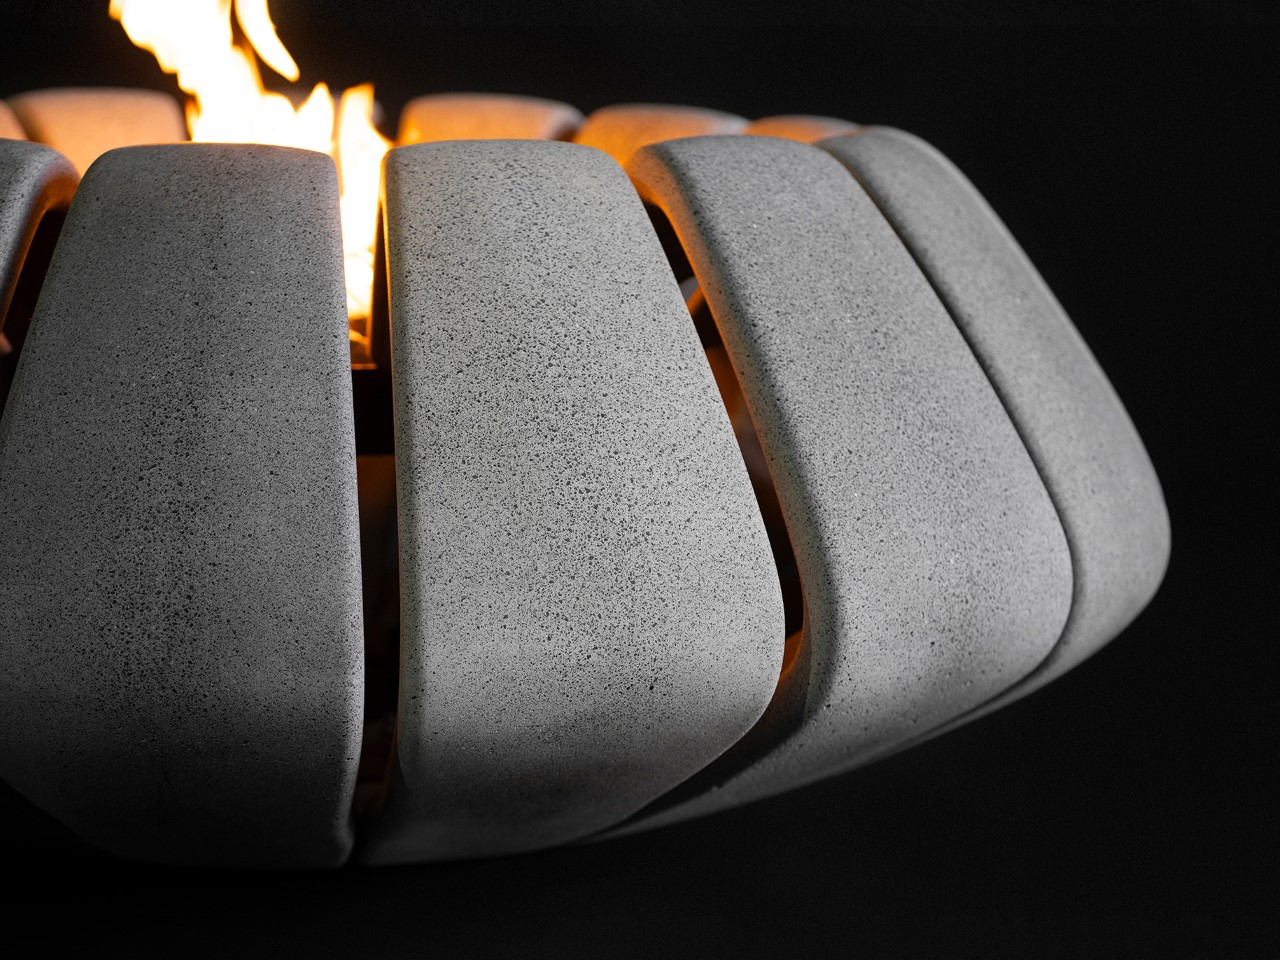
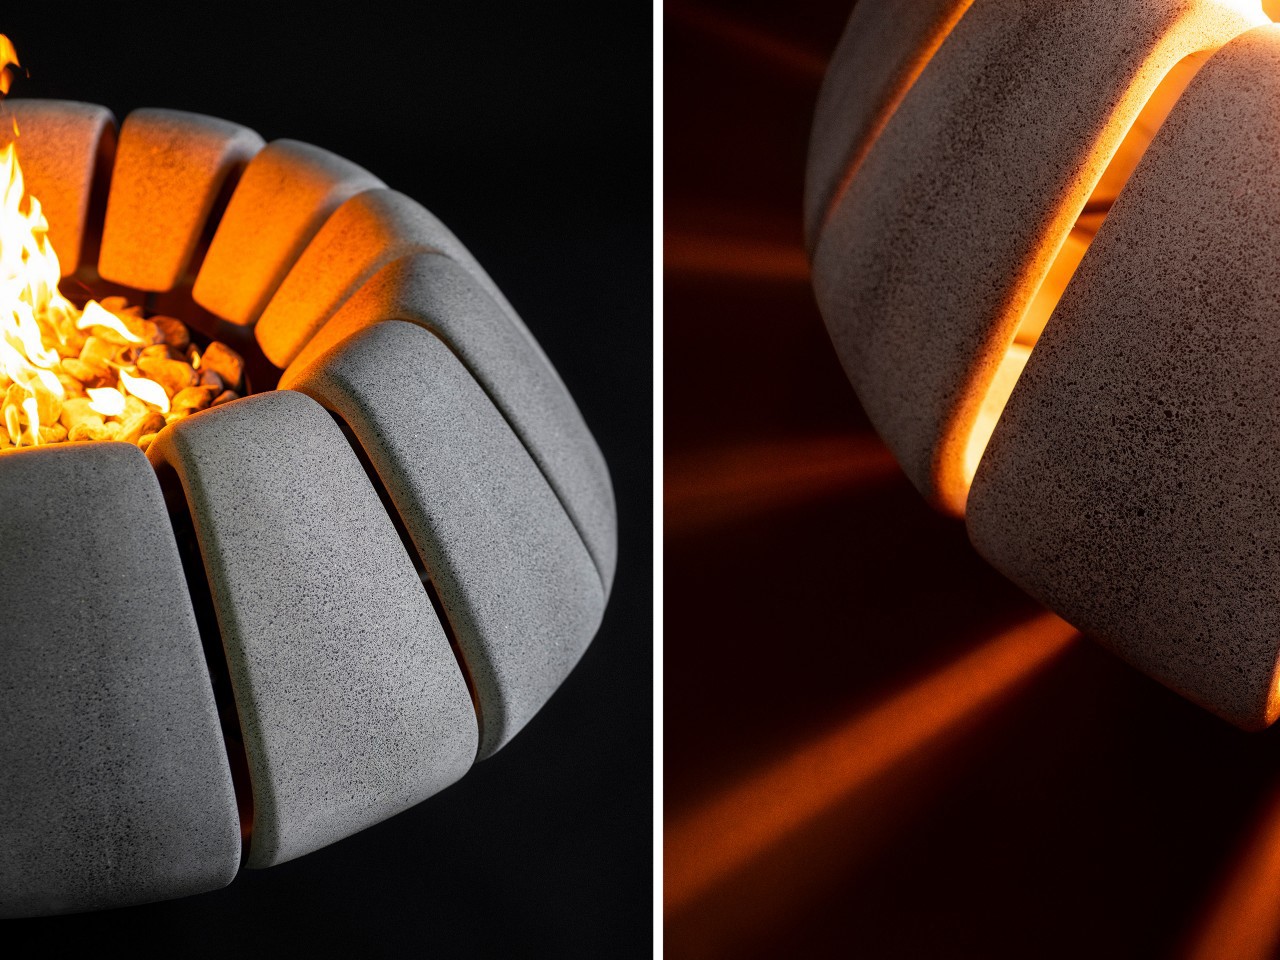
 FlexHT Carbon Nanotube Film—a technology more often found in aerospace. Carbon nanotubes get their name from the tube-shaped graphene cylinders suspended within the material. Known for its high-strength and incredible energy efficiency, CNT is a perfect choice for the blanket. It heats evenly, heats rapidly, and still remains much more flexible (and safe) than say a copper-wire heating element.