Antigravity A1 Review: Reimagining What a Drone Feels Like to Fly

PROS:


  • Unique immersive experience with vision goggles

  • 8K 360 capture with post-flight reframing

  • Intuitive one-hand grip controller and automated modes lower the skill barrier

CONS:


  • Several pieces to carry and manage: drone, goggles, and controller

  • First-time setup and learning curve can feel overwhelming

  • Visual observer requirements in places like the U.S. limit solo flying

RATINGS:

AESTHETICS
ERGONOMICS
PERFORMANCE
SUSTAINABILITY / REPAIRABILITY
VALUE FOR MONEY

EDITOR'S QUOTE:

Antigravity A1 turns flying a drone into a new point of view, and once you are inside it, the experience feels hard to put a price on.

Antigravity is Insta360’s bold experiment in what happens when a 360‑camera company stops thinking only about the camera and starts redesigning the entire act of flying. It is an independent drone brand, incubated by Insta360, built on the same obsession with immersive imaging and playful storytelling, but free to rethink the aircraft, the controls, and the viewing experience as one coherent object. Instead of asking how to strap a 360 camera onto a drone, Antigravity asks how to make the whole system feel like a natural extension of your point of view.

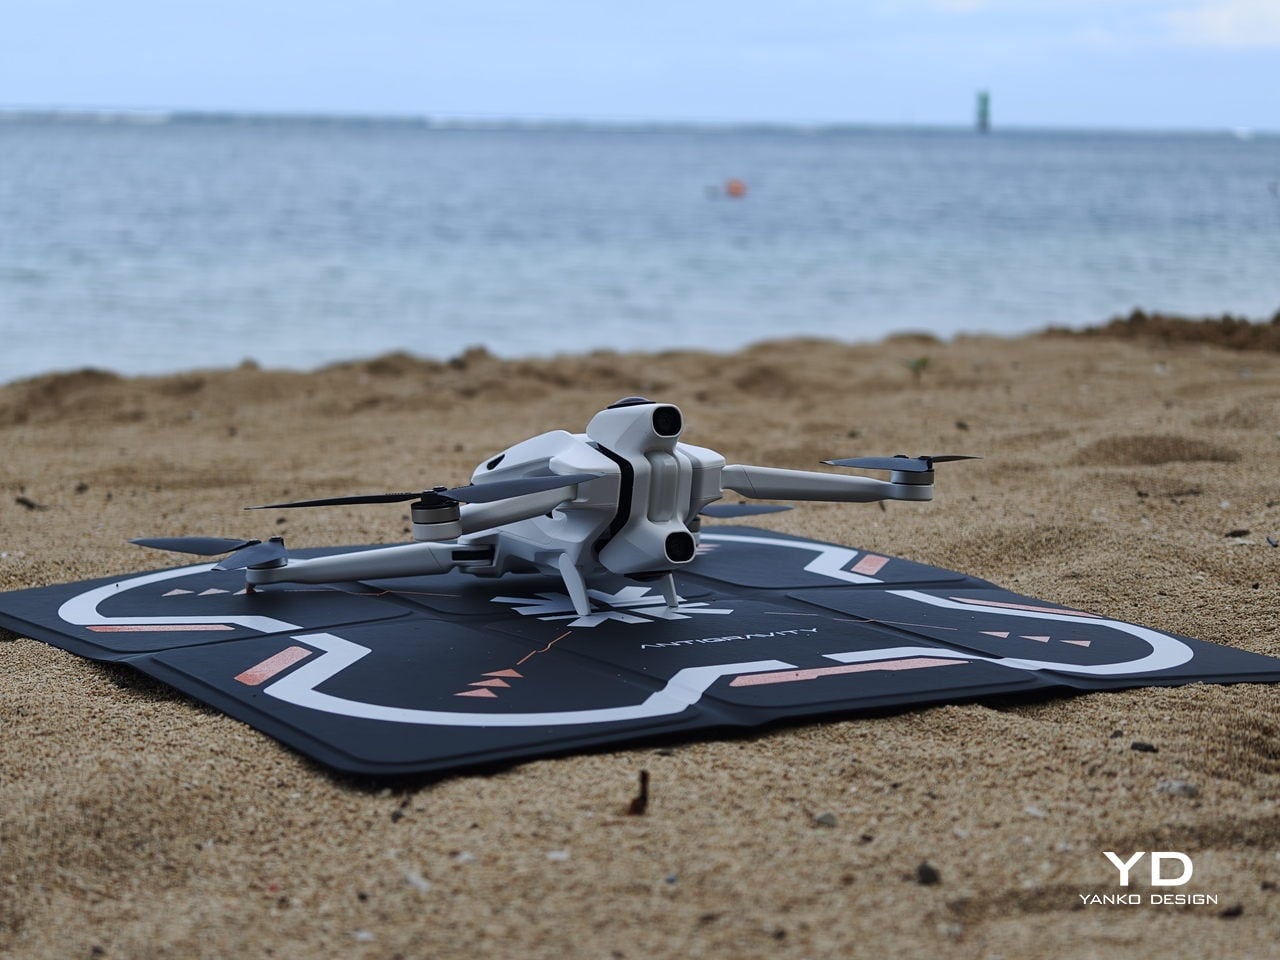
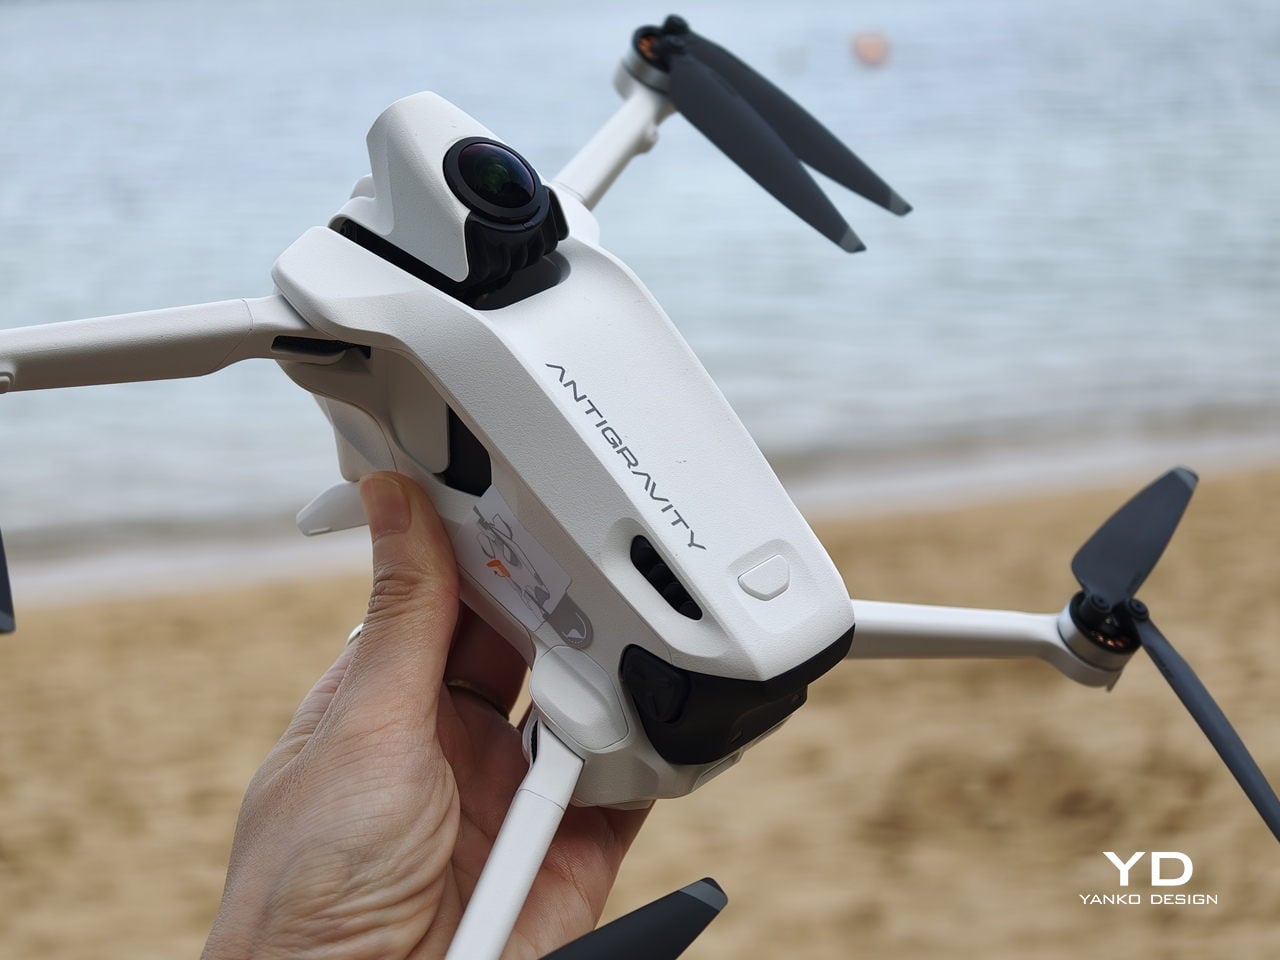
Antigravity A1 is the first expression of that idea. It is a compact 8K 360 drone that arrives as a complete kit, with Vision goggles and a single‑hand Grip controller that you steer with subtle tilts and gestures. You do not fly it by staring at a phone and juggling twin sticks. You put on the goggles, step into a 360‑degree bubble of imagery, and guide the drone by moving your hand in the direction you want to travel. What was the experience with Antigravity A1 like? We tested it to bring you that answer.

Designer: Antigravity

Aesthetics

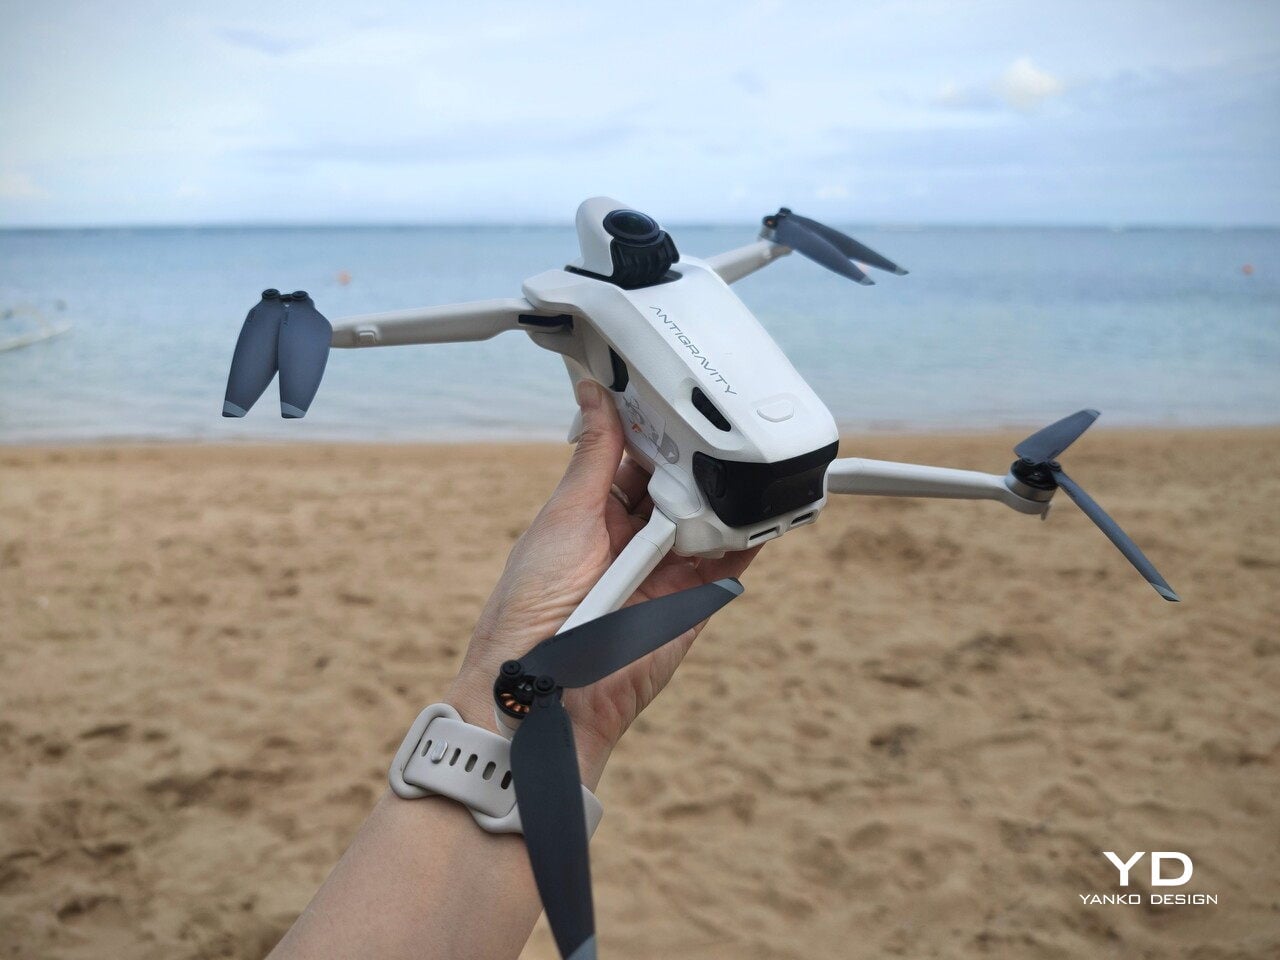
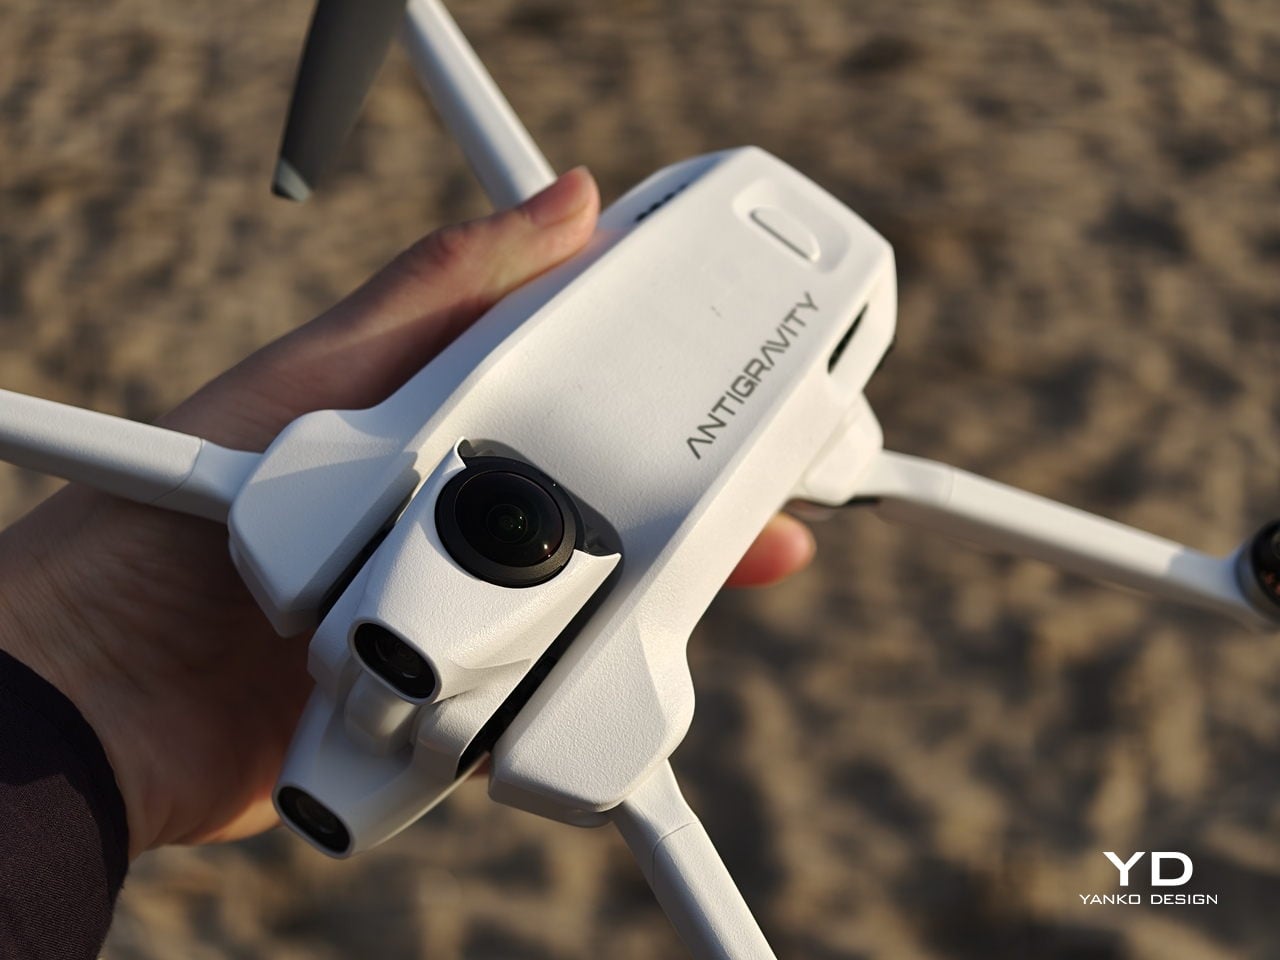
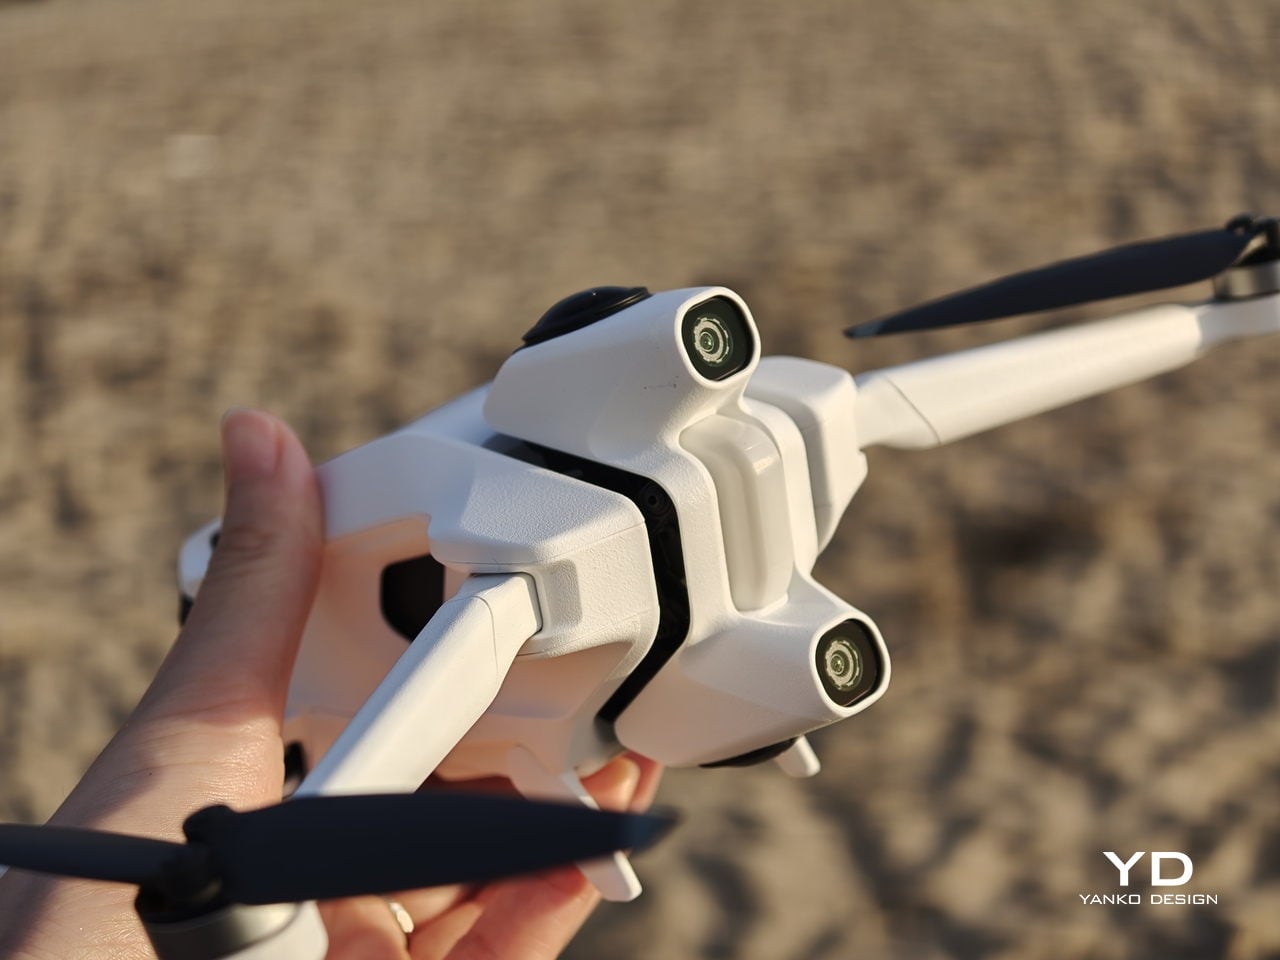
Antigravity A1 presents itself more as a system than a single object. There is the compact drone with its dual cameras, the Vision goggles, and the one‑hand Grip controller. Visually, the aircraft itself is quite understated. Aside from the two opposing lenses and the leg that shields the lower camera on the ground, it looks like a neat, functional quadcopter. The drama is reserved for what the system does, not how the airframe shouts for attention.

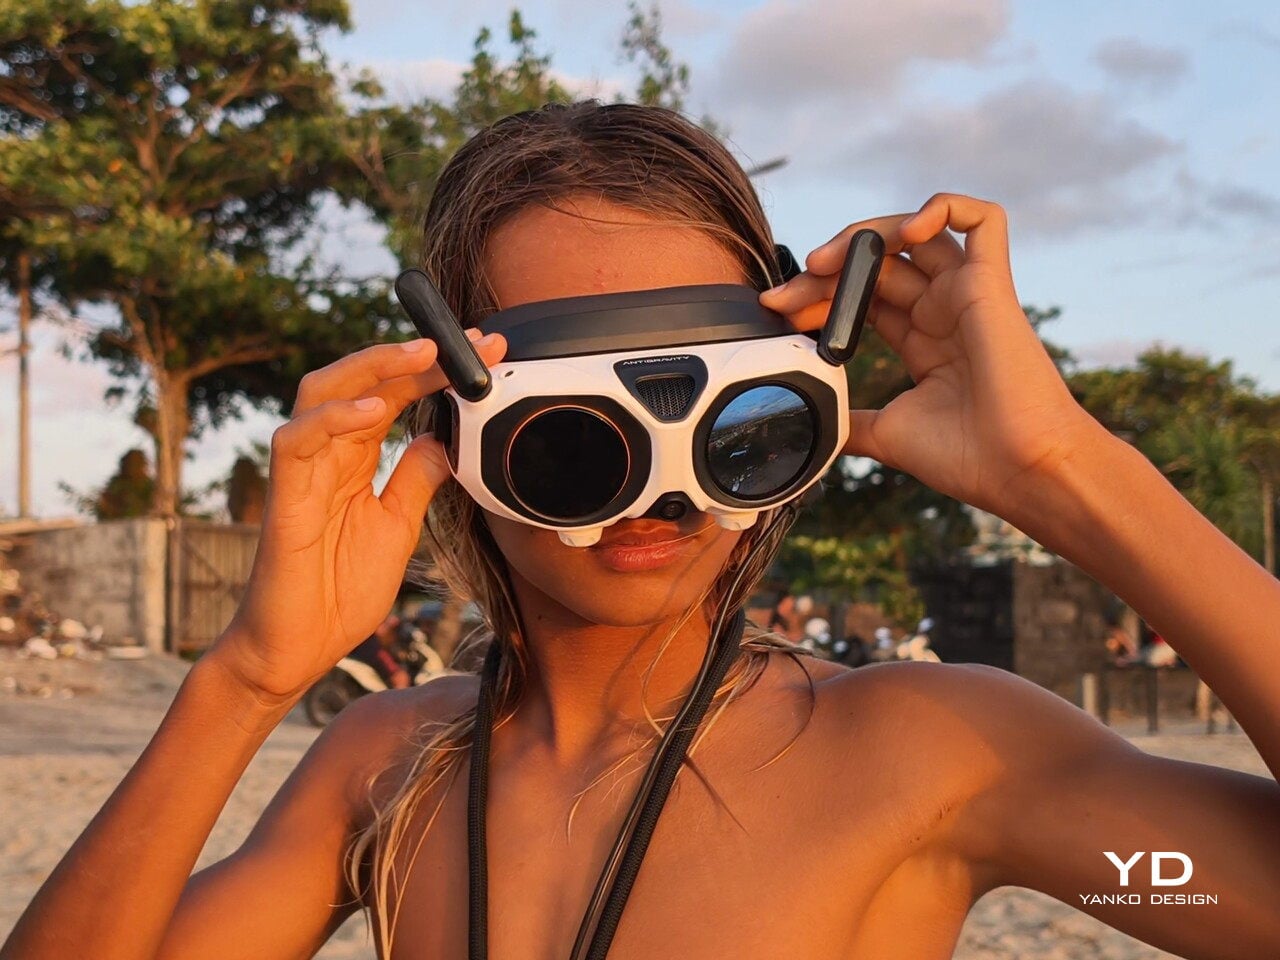
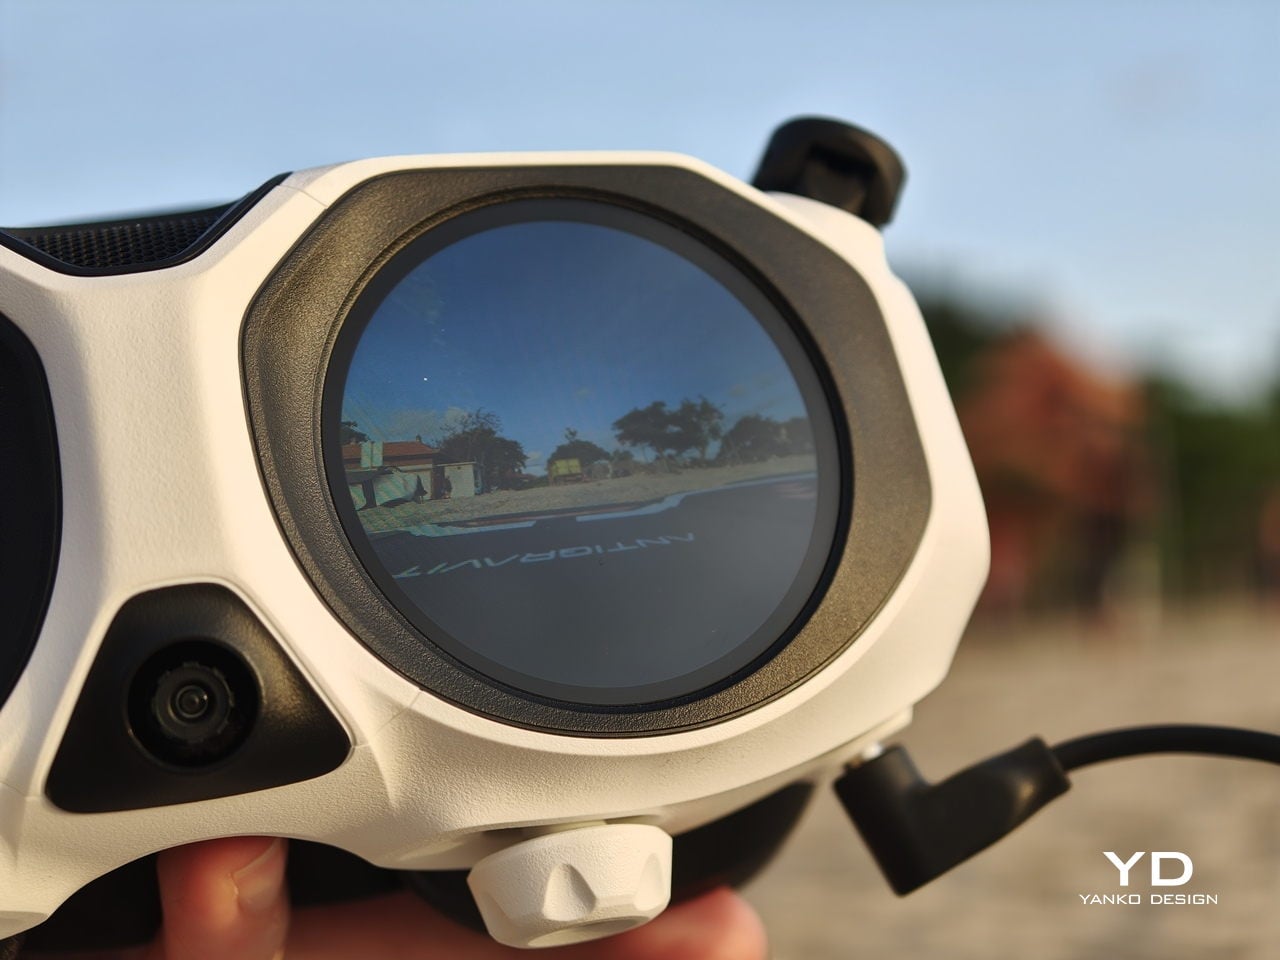
The Vision goggles lean into an almost character-like, even bug-like look, especially when you fold up the black antennas on each side that resemble insect feelers. The front shell is white with two large, dark circular eyes, giving the whole front a slightly cartoonish face. In between and just above those eyes sits an inverted triangle-shaped grille with a subtle Antigravity logo, adding a small technical accent without breaking the simplicity.  The fabric strap and thick face padding sit behind this front mask. Wearing the goggles does look strange at first, but in a strangely cool way.


The Grip motion controller has a white plastic shell with buttons and a dial that uses color and icon cues to hint at their functions. On the back, a black trigger-style pull bar sits where your index finger naturally rests. There are additional buttons on each side. The mix of white body, black accents, and clearly marked controls makes the Grip look approachable rather than intimidating, which suits a controller that is meant to translate simple hand movements into flight.

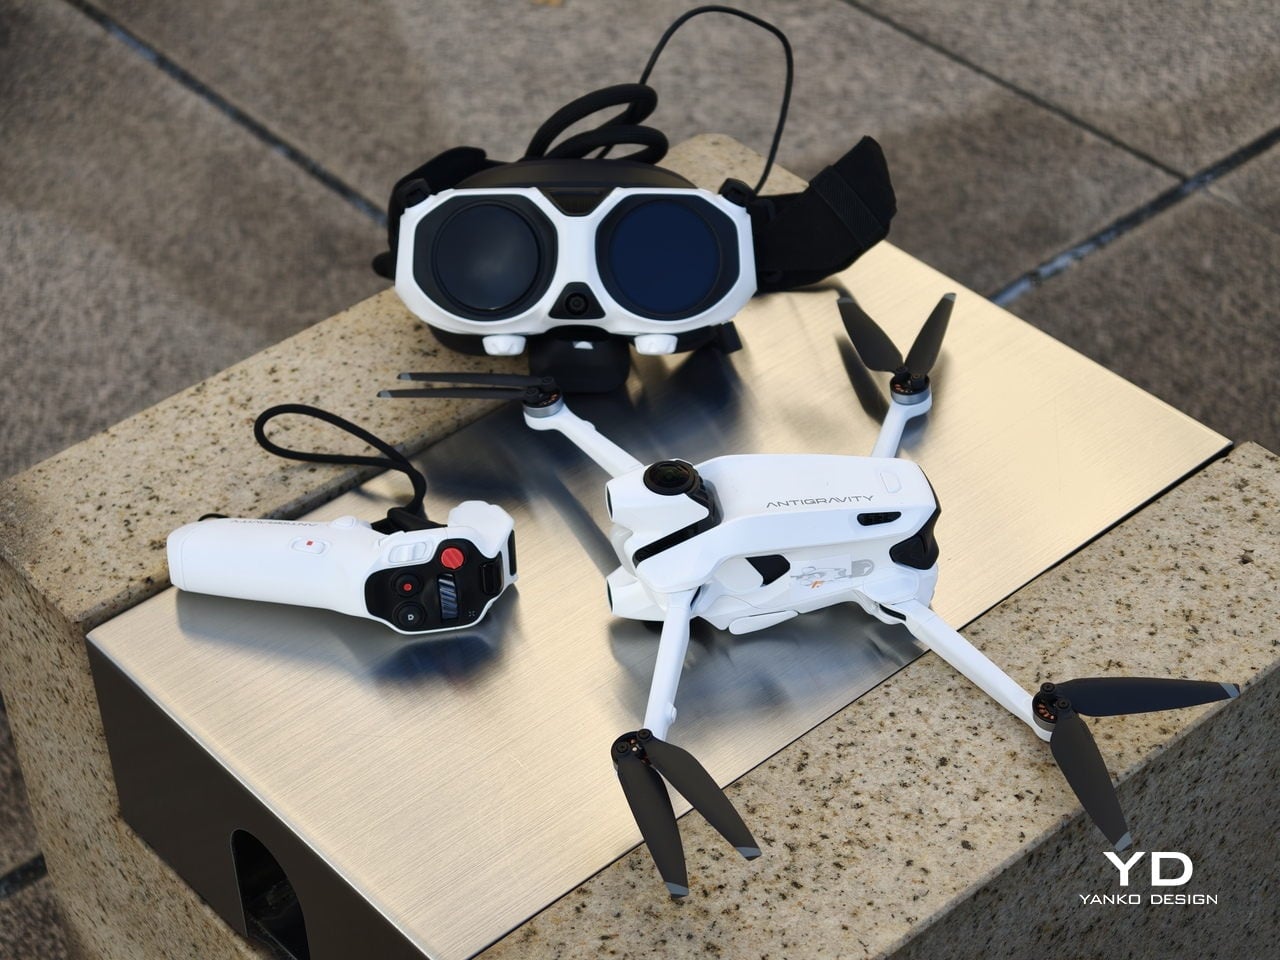
Overall, the drone, goggles, and controller share a cohesive design language. They all use the same soft white shell, black accents, and gently rounded forms. The whole kit feels like a single, intentional system rather than three unrelated gadgets.

Ergonomics

The Vision goggles are where comfort really matters, and Antigravity has clearly spent time on fit. The goggles weigh 340 grams, yet the padding and strap geometry distribute that weight in a way that avoids obvious pressure points, even during longer sessions. The side that meets your face feels soft and accommodating, so the hardware never feels harsh. Once the 360-degree image appears, the headset fades faster than you might expect, which is exactly what you want from an immersive device. Optional corrective inserts mean many glasses wearers can enjoy a sharp view without wrestling frames under the band, which makes the experience more inclusive and less fussy.

Power for the goggles lives in a separate battery pack that you can wear on a lanyard around your neck. At 175 grams, it is not heavy, but over time, it can feel slightly cumbersome to have it hanging there, especially when you are moving around. Antigravity sells a 1.2 metre (3.9 foot) USB-C to DC power cable that lets you route the battery to a trouser pocket or bag instead, which makes the whole setup feel less dangly and more integrated.

You adjust the head strap with velcro, which works, but it is not perfect. A small buckle or hinge mechanism would make it much easier to put the goggles on or take them off while wearing a hat, without having to readjust the strap length every time. It is a minor detail, yet it shows how close the design already is. You start wishing for refinements, not fixes.

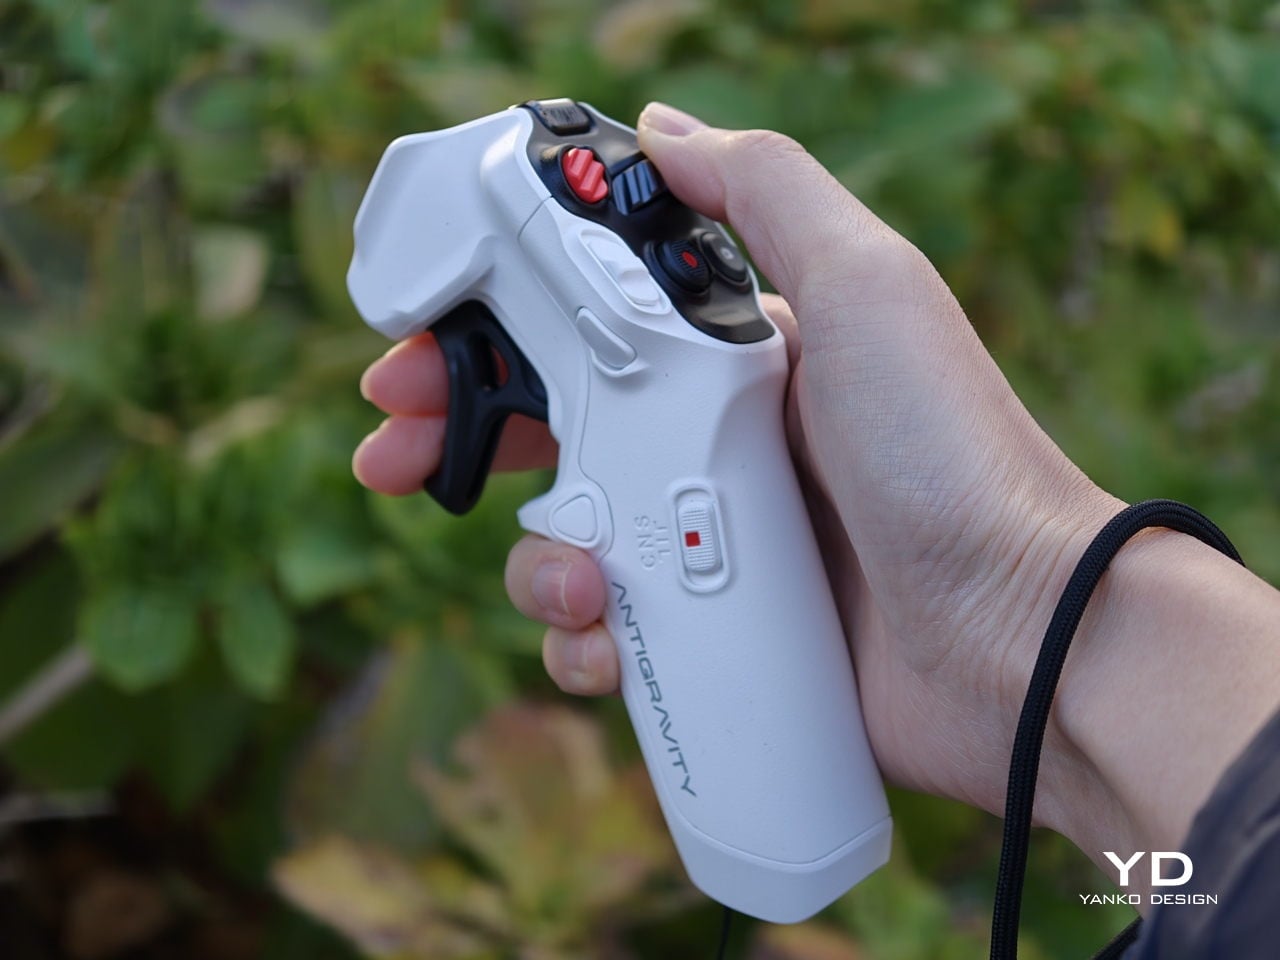
The Grip controller is where Antigravity’s ergonomic thinking really shows. It rests comfortably in one hand, with a form that supports a natural, slightly relaxed grip rather than a tense, clawed hold. For my hand, it is just a tiny bit on the large side, enough to notice but not enough to break the experience. This is very much nitpicking, and it actually underlines how well resolved the controller already is. When you are down to debating a few millimetres of girth, it means the fundamentals of comfort and control are in a very good place.

Performance

My experience with Antigravity A1 actually started at IFA in Berlin in early September. Outside the exhibition halls, I slipped on the Vision goggles while an Antigravity staff member flew the drone. As the A1 lifted and the IFA venue unfolded beneath me in every direction, my legs actually shivered a little, even though I like heights. Being wrapped in a live 360-degree view felt less like watching a screen and more like I was flying. That first taste was magical, which made me both excited and nervous to test the A1 myself later. I had almost crashed a friend’s drone years ago and had not flown since, so my piloting skills were close to none.

That magic comes with a setup phase that feels more like preparing a small system than turning on a single gadget. The first time you connect the drone, pair the Vision goggles, update firmware, and learn the grip controls, it can feel overwhelming. There are menus on the drone, options in the goggles, and status lights to decode, and they all compete for your attention at once. After a few sessions, it settles into a rhythm, but that initial ramp is something you feel before you ever lift off on your own.

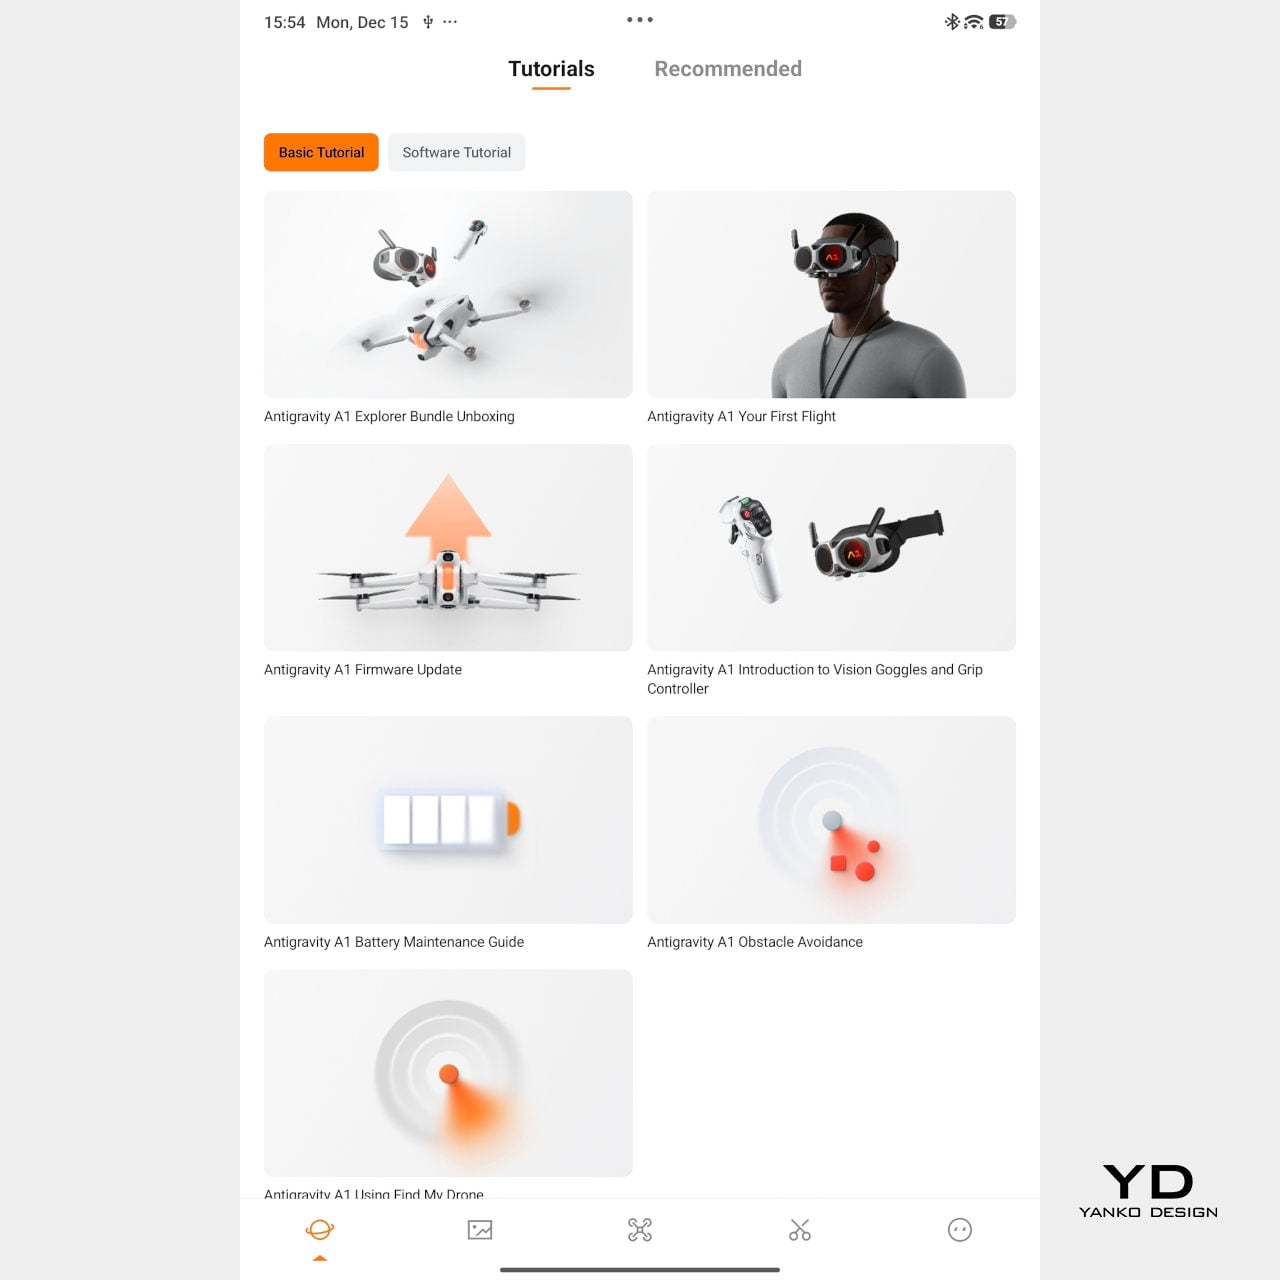
Mobile app – Tutorial

Packing the Antigravity A1 means finding room for the drone, the goggles and their separate battery, and the grip controller, often in a dedicated case or carefully arranged backpack. This nudges the whole experience away from “throw it in your bag just in case” and toward “plan a proper flying session.” The result is that the A1 feels more like a deliberate outing than a casual accessory.

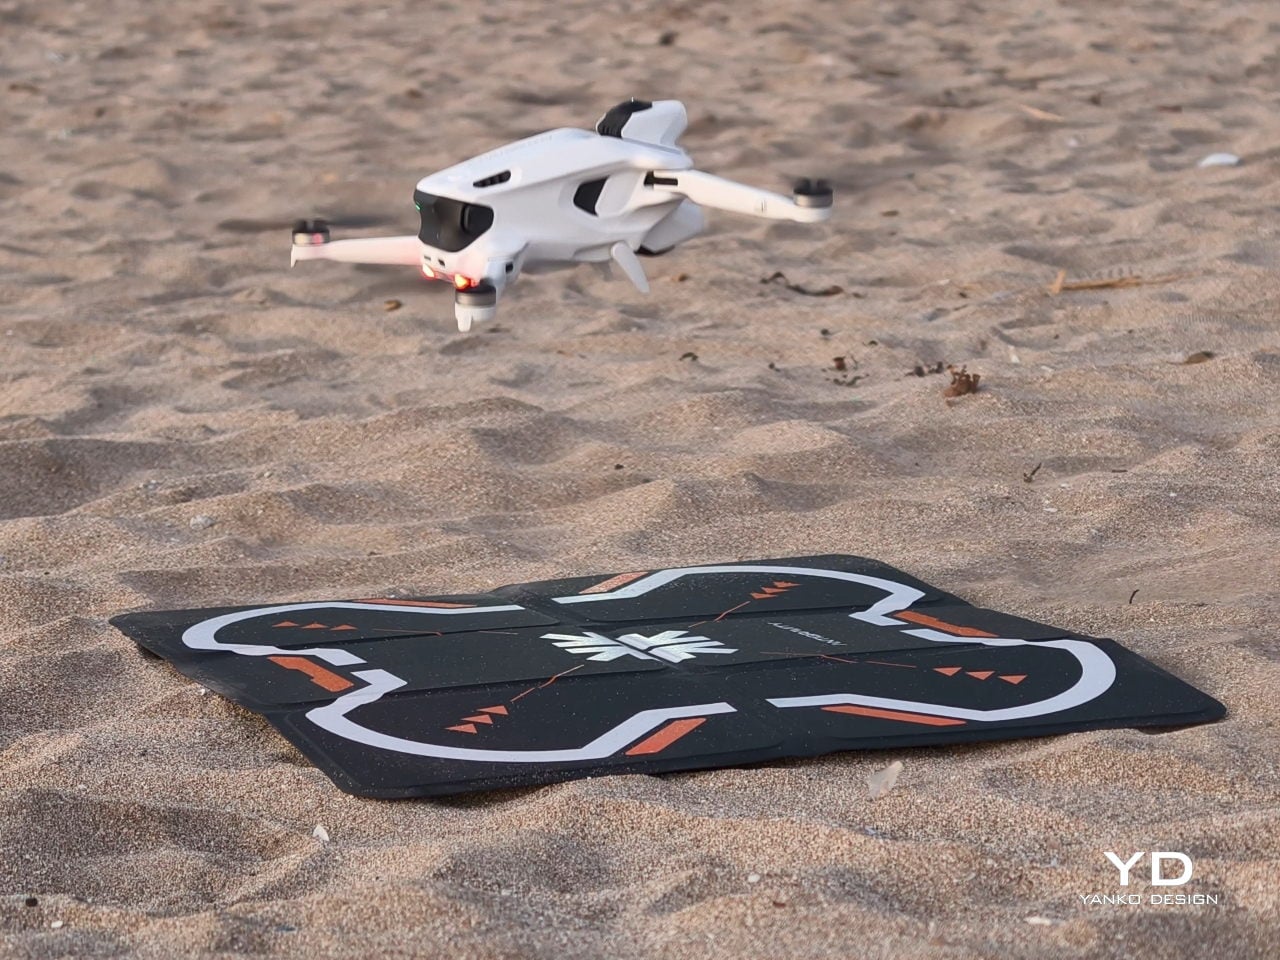
On paper, the A1 looks quite sensible. With the standard battery, it weighs 249 g, staying just under the 250 g threshold that works nicely with regulations in many places, and it offers up to about 24 minutes of flight time in ideal conditions. Pop in the high-capacity battery, and the weight goes over 250 g, but Antigravity quotes up to around 39 minutes in the air. In reality, you get a solid single session per pack and will want spares if you plan to film seriously.

Flight behaviour is also adjustable. There are three flight modes, Cinematic, Normal, and Sport, so you can match how the drone responds to the scene you are flying in. Together with Free Motion and FPV, that gives the A1 enough range to feel relaxed and floaty when you want it, or more direct and energetic when the shot calls for it.
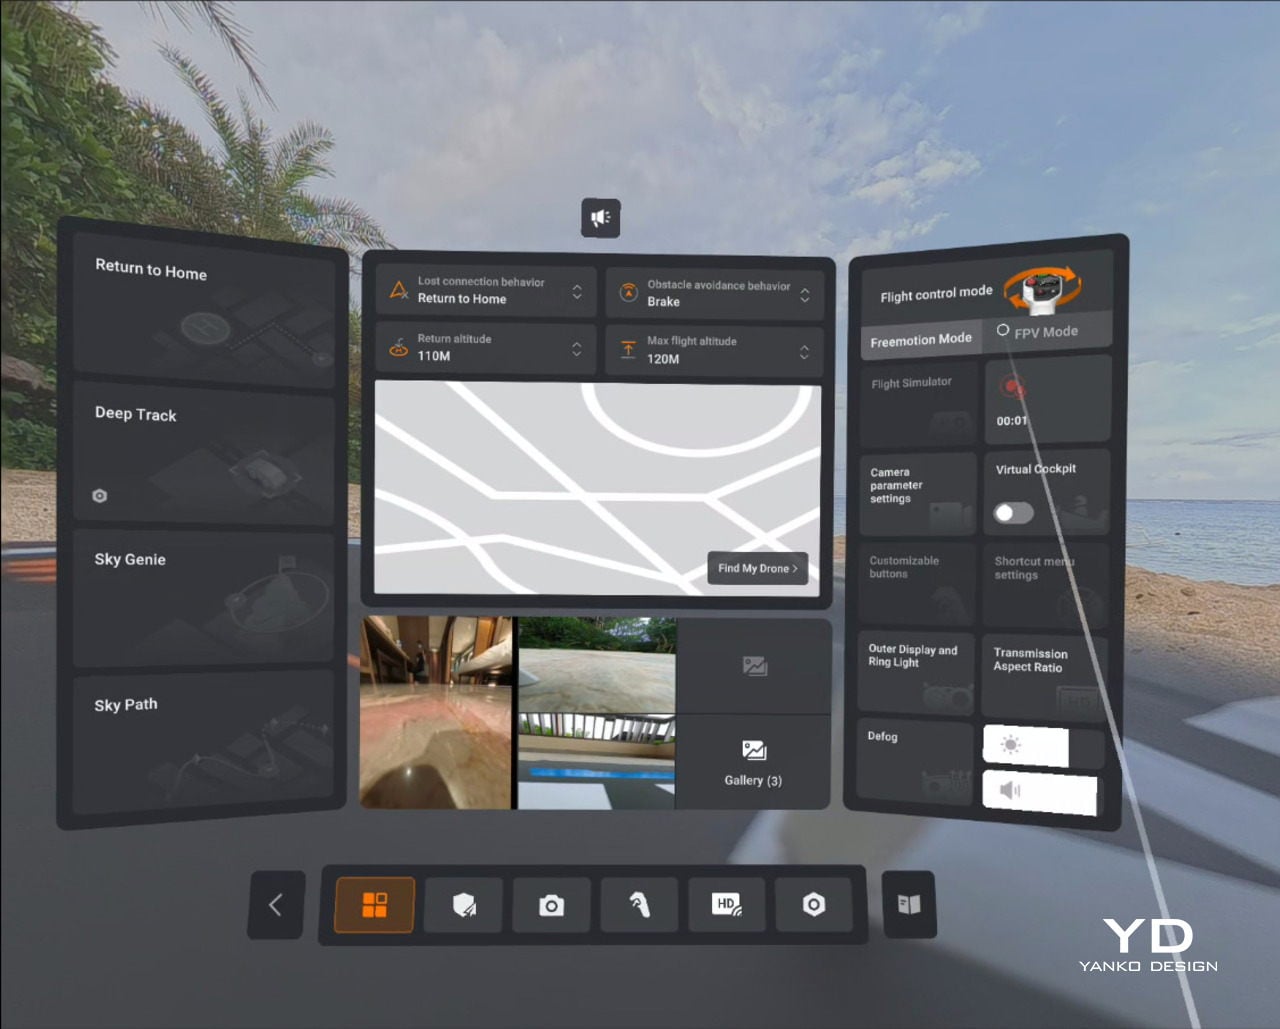
Vision goggles menu

On top of those basics, Antigravity adds automated tools like Sky Genie, Deep Track, and Sky Path. Sky Genie runs preprogrammed patterns that give you smooth, cinematic moves with minimal effort. Deep Track follows a chosen subject automatically, so you can focus more on timing than stick precision. Sky Path lets you record waypoints and have the A1 repeat the route on its own, which is handy for repeated takes or for nervous pilots.

Safety and workflow sit quietly in the background, which is exactly where they should be. Obstacle sensors on the top and bottom help protect the drone when you are close to structures or changes in elevation, and one click Return to Home acts as a psychological parachute. Knowing you can call the drone back with a single command does a lot to calm the nerves, especially if your last memory of drones involves a near crash.

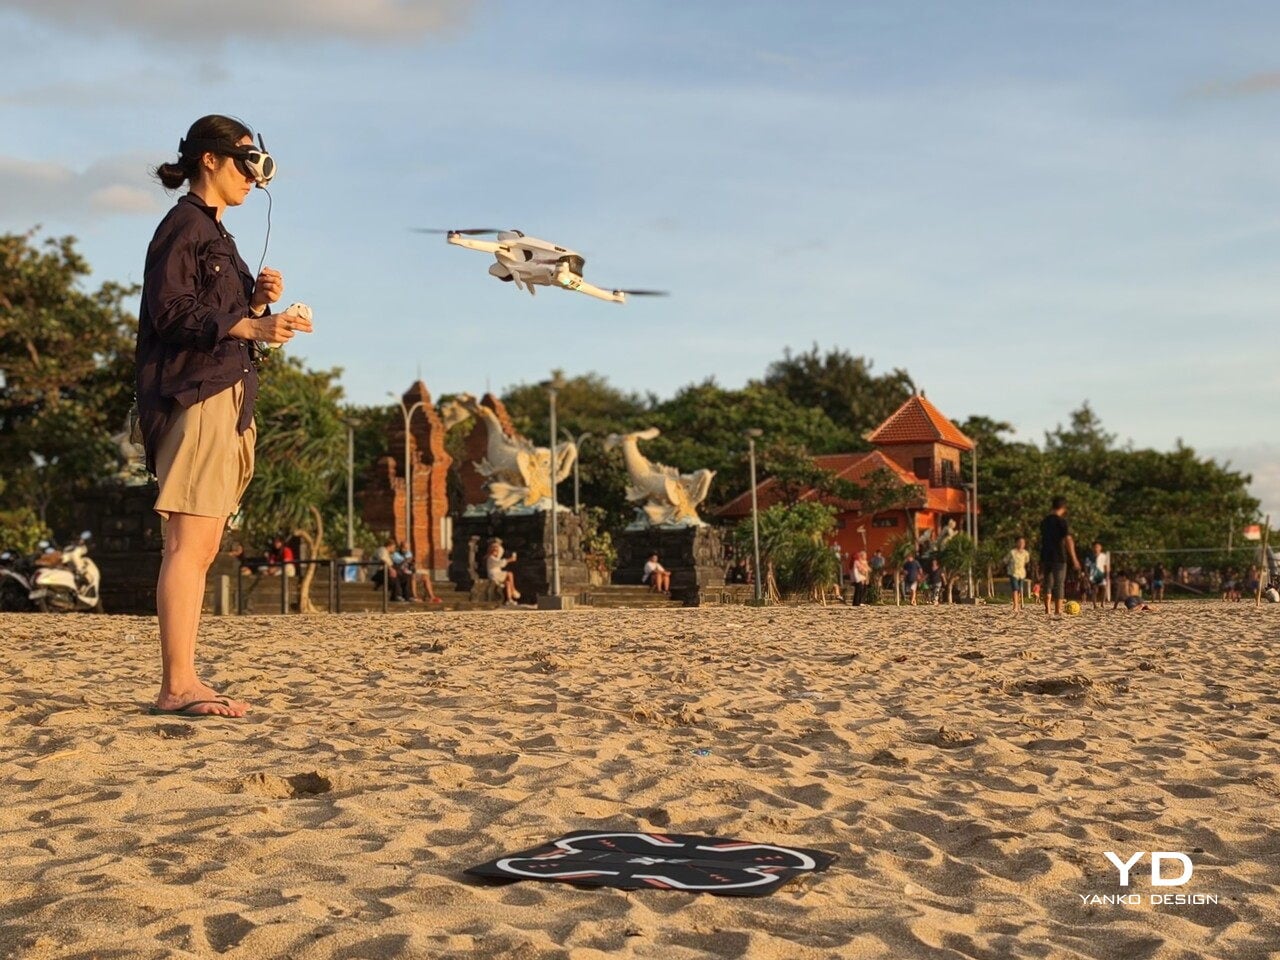
In the United States, FAA rules treat goggle-only flying as beyond visual line of sight, so you are meant to have a visual observer watching the drone while you are wearing the headset. That nudges the A1 away from solo, spur-of-the-moment flights and toward planned sessions with someone beside you acting as spotter.

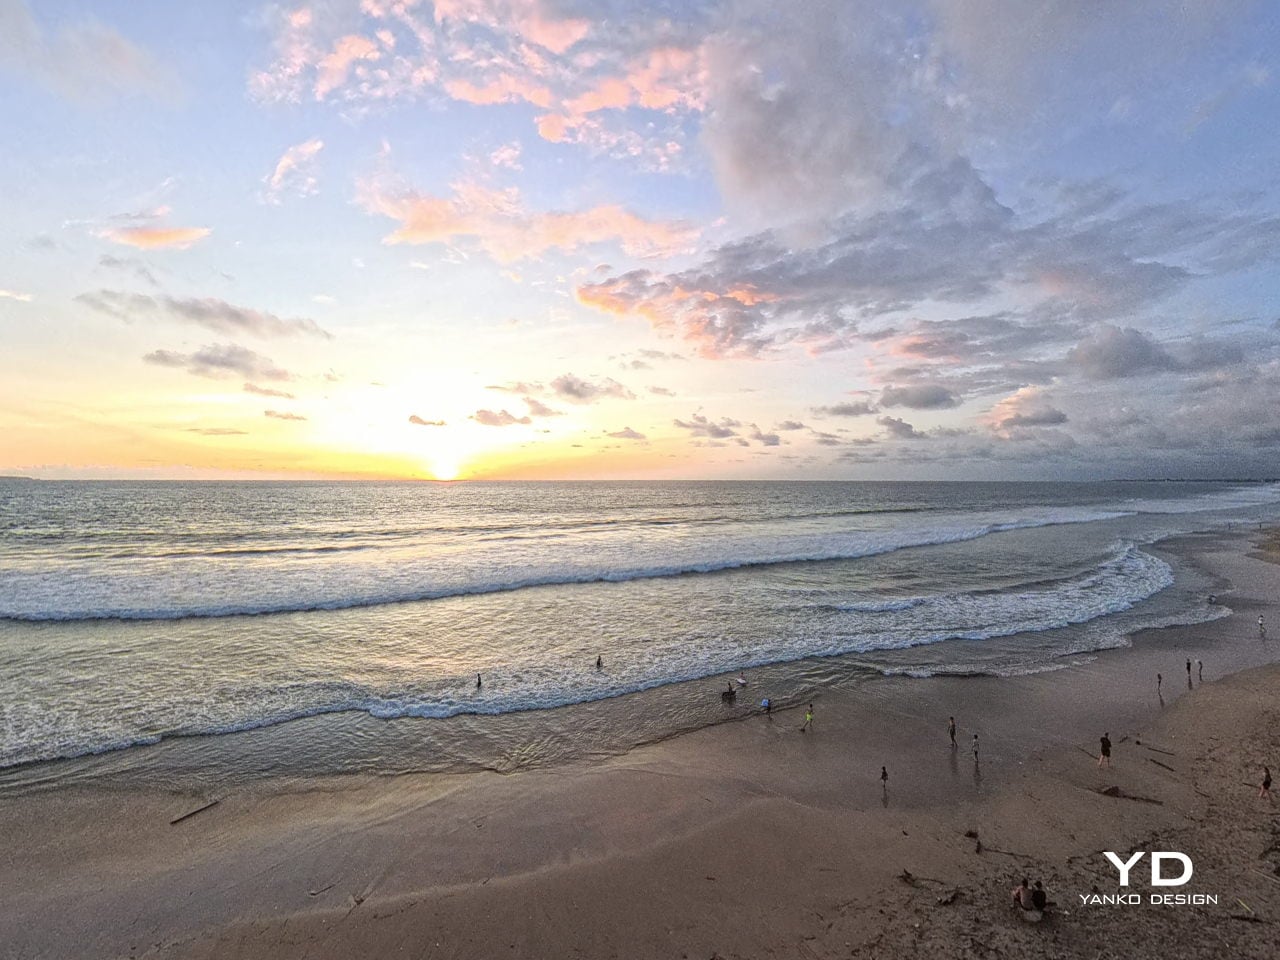
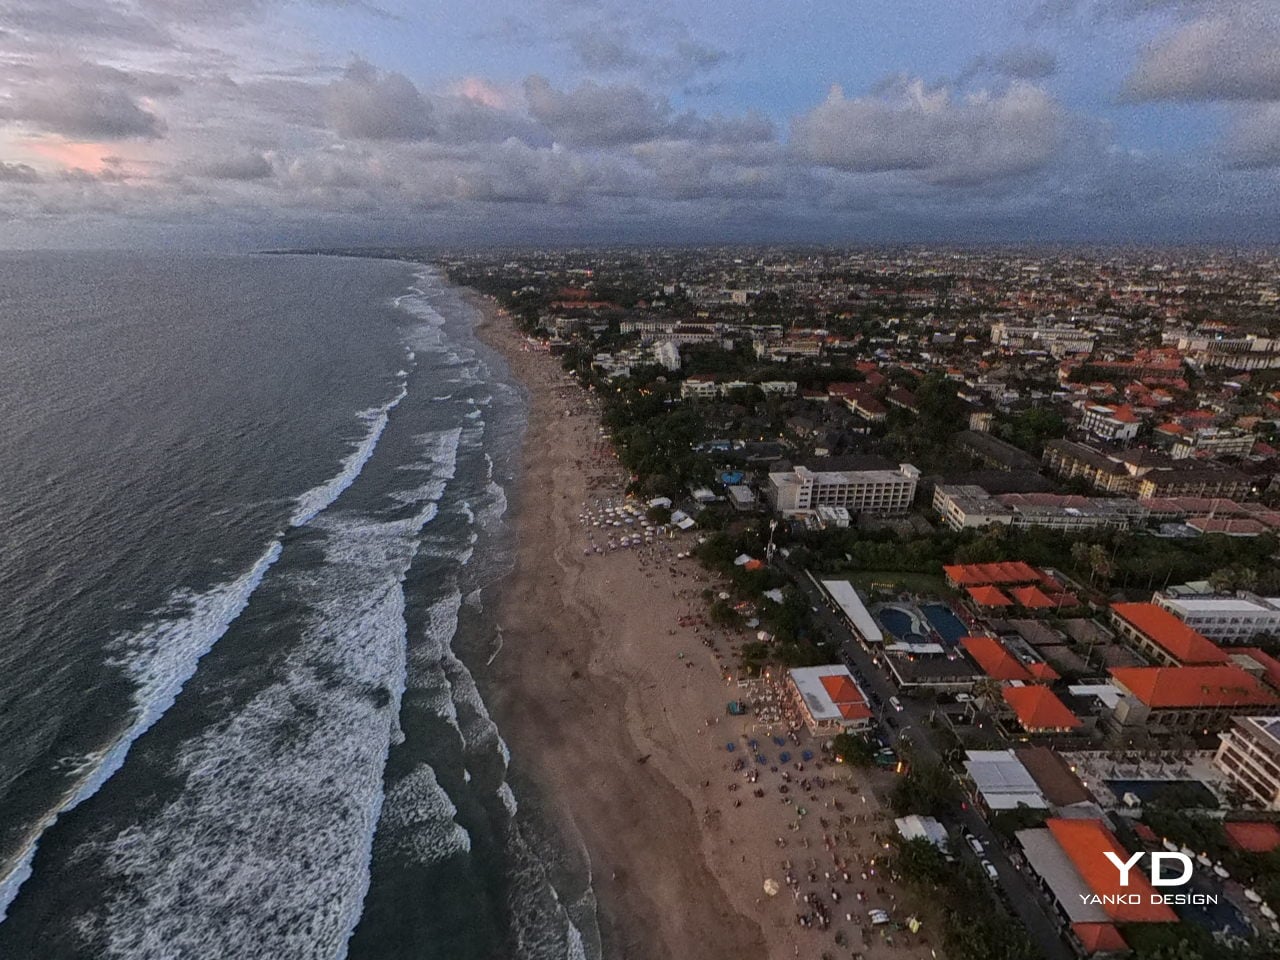
On the imaging side, the A1 records up to 8K 360-degree video, with lower resolutions unlocking higher frame rates when you want smoother motion. Footage can be stored on internal memory or a microSD card, and you can offload it either by removing the card or plugging in via USB-C, so it slips neatly into most existing editing habits.

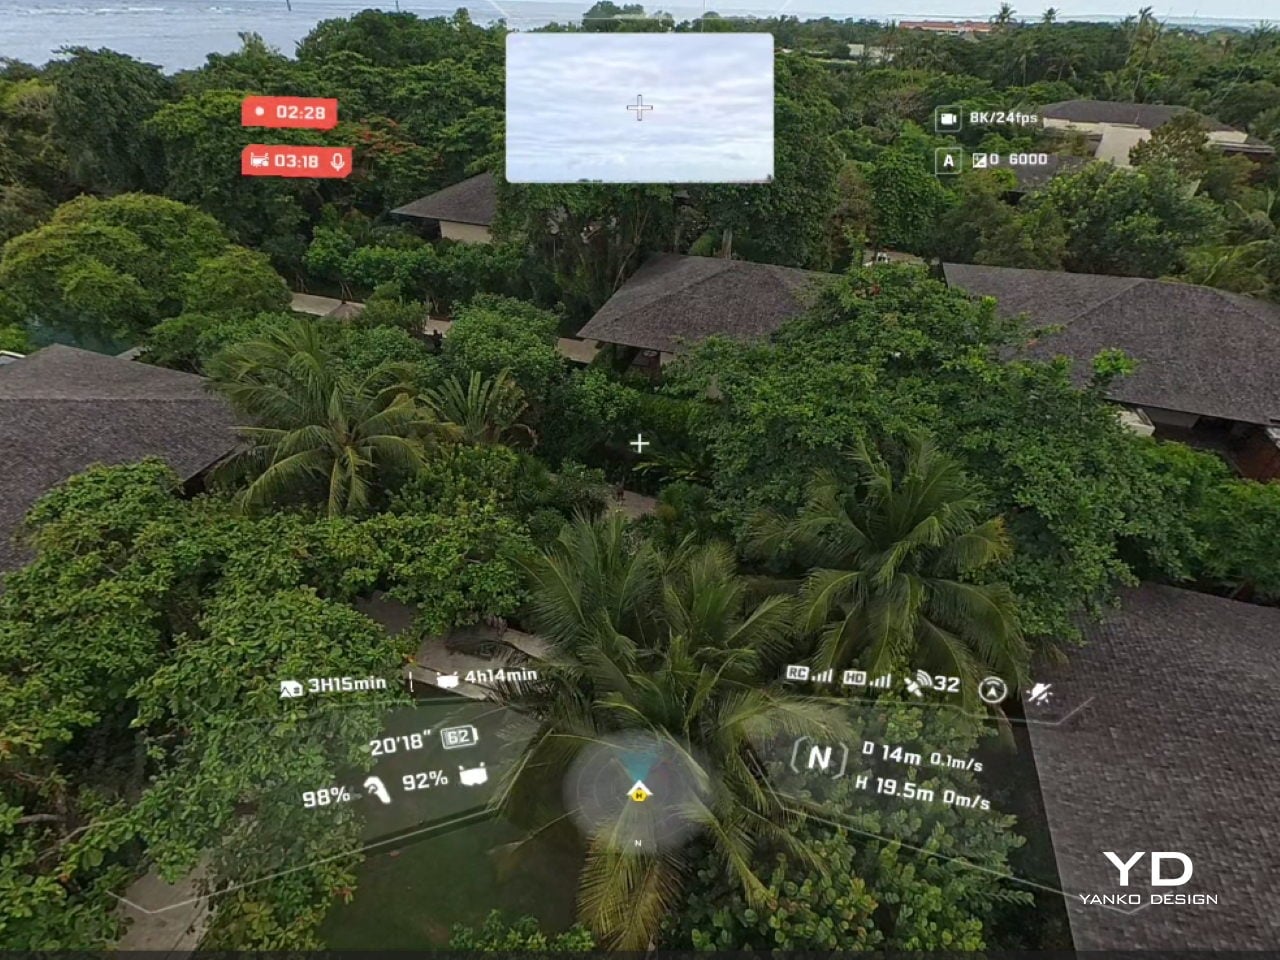
Vision goggle screen recording

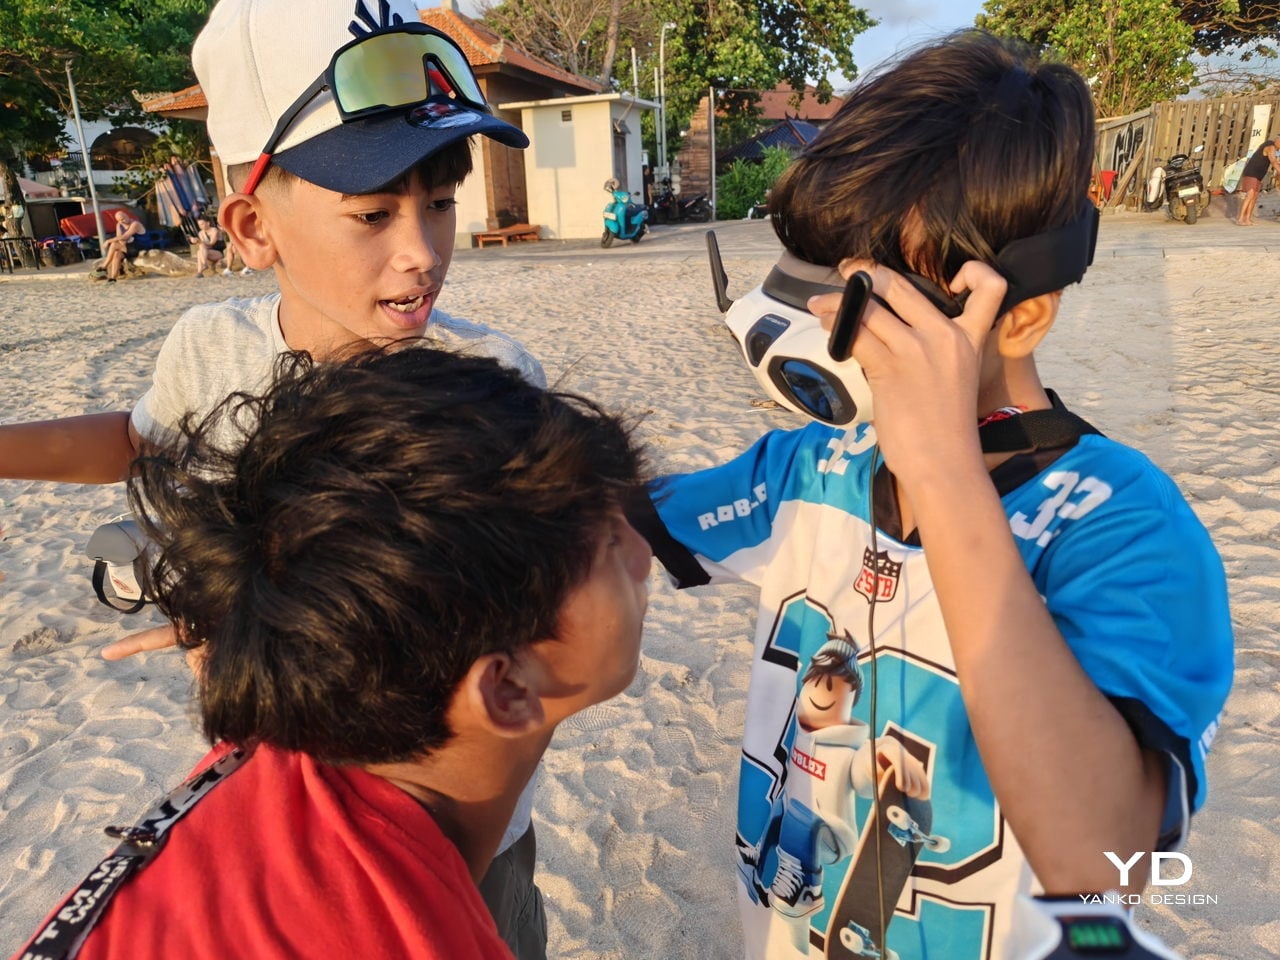
The real leap, though, comes from the goggles. They are the thing that truly sets A1 apart from almost every other consumer drone. Instead of glancing down at a phone, you step into an immersive 360-degree view that tracks your head and surrounds your vision. The drone feels less like a gadget in the sky and more like the spot your eyes and body are occupying. A double-tap on the side button flips you into passthrough view, so you can check your surroundings without pulling the headset off, and a tiny outer display mirrors a miniature version of the live feed for people nearby.

That small detail turned out to be important in Bali, where a group of local kids noticed the goggles and the moving image, wandered over, and suddenly found themselves taking turns “flying” above their own neighbourhood. Their gasps, laughter, and stunned silence were as memorable as the footage itself.
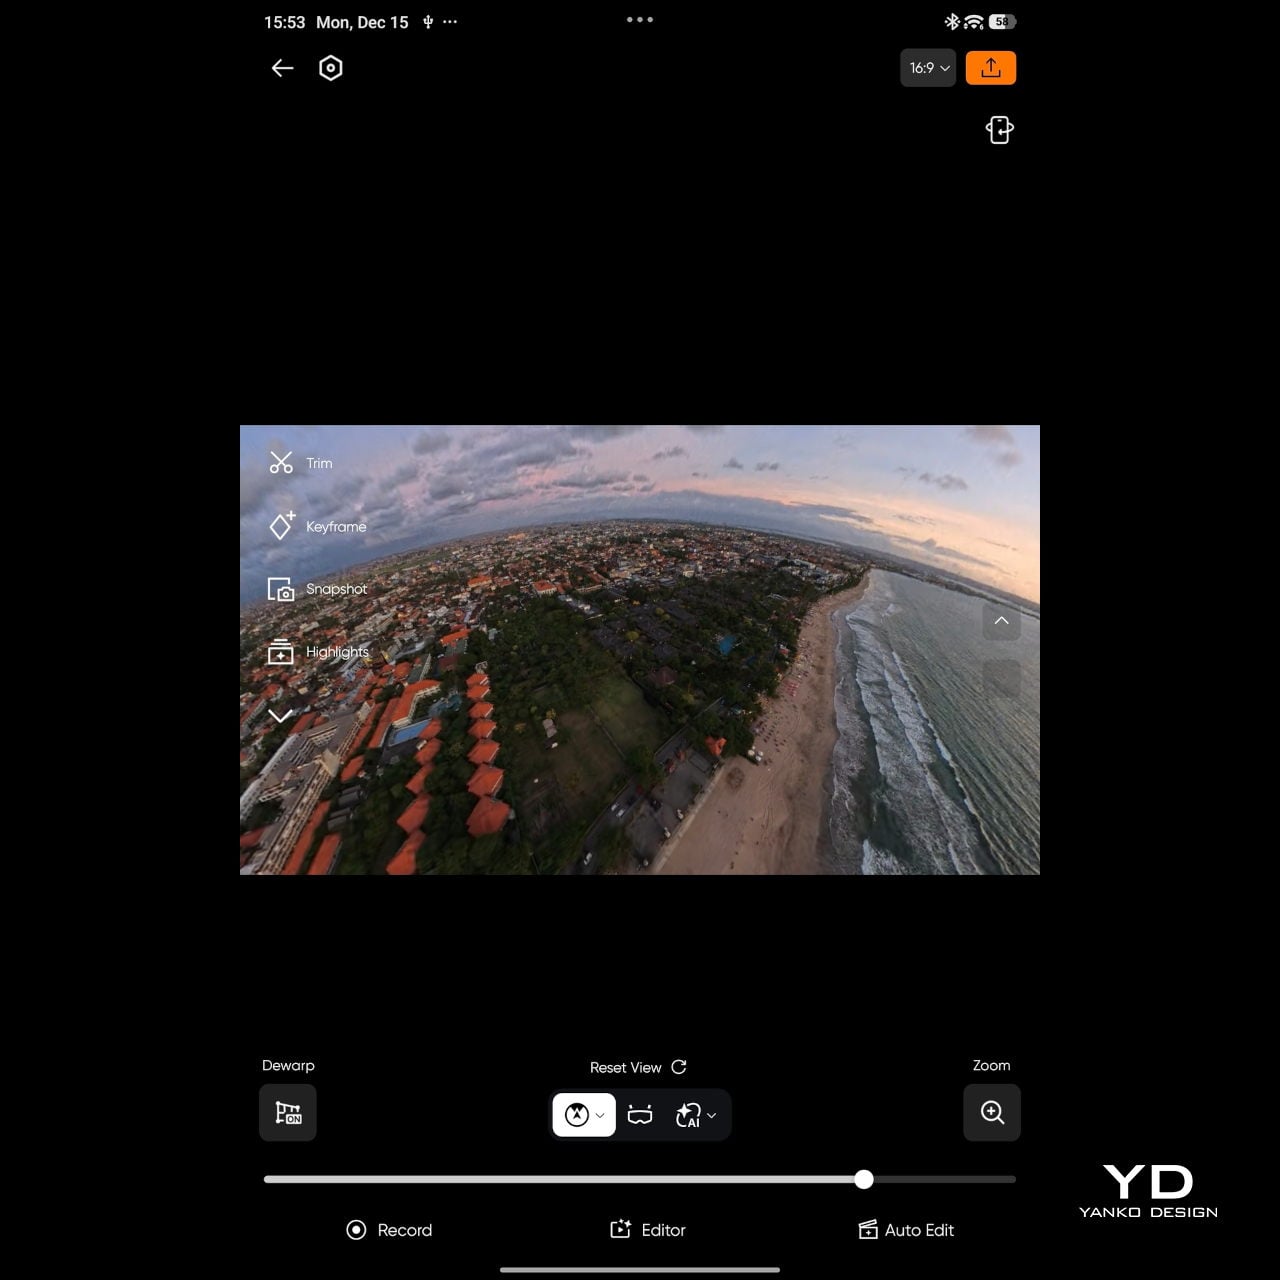
Mobile app

The magic continues even after you land. Because the A1 captures everything in 360 degrees, you can decide on your framing after the flight, which feels a bit like getting a second chance at every shot. Antigravity provides both mobile and desktop apps for this, so you can scrub through the sphere, mark angles, and carve out regular flat videos without having to nail every move in real time.
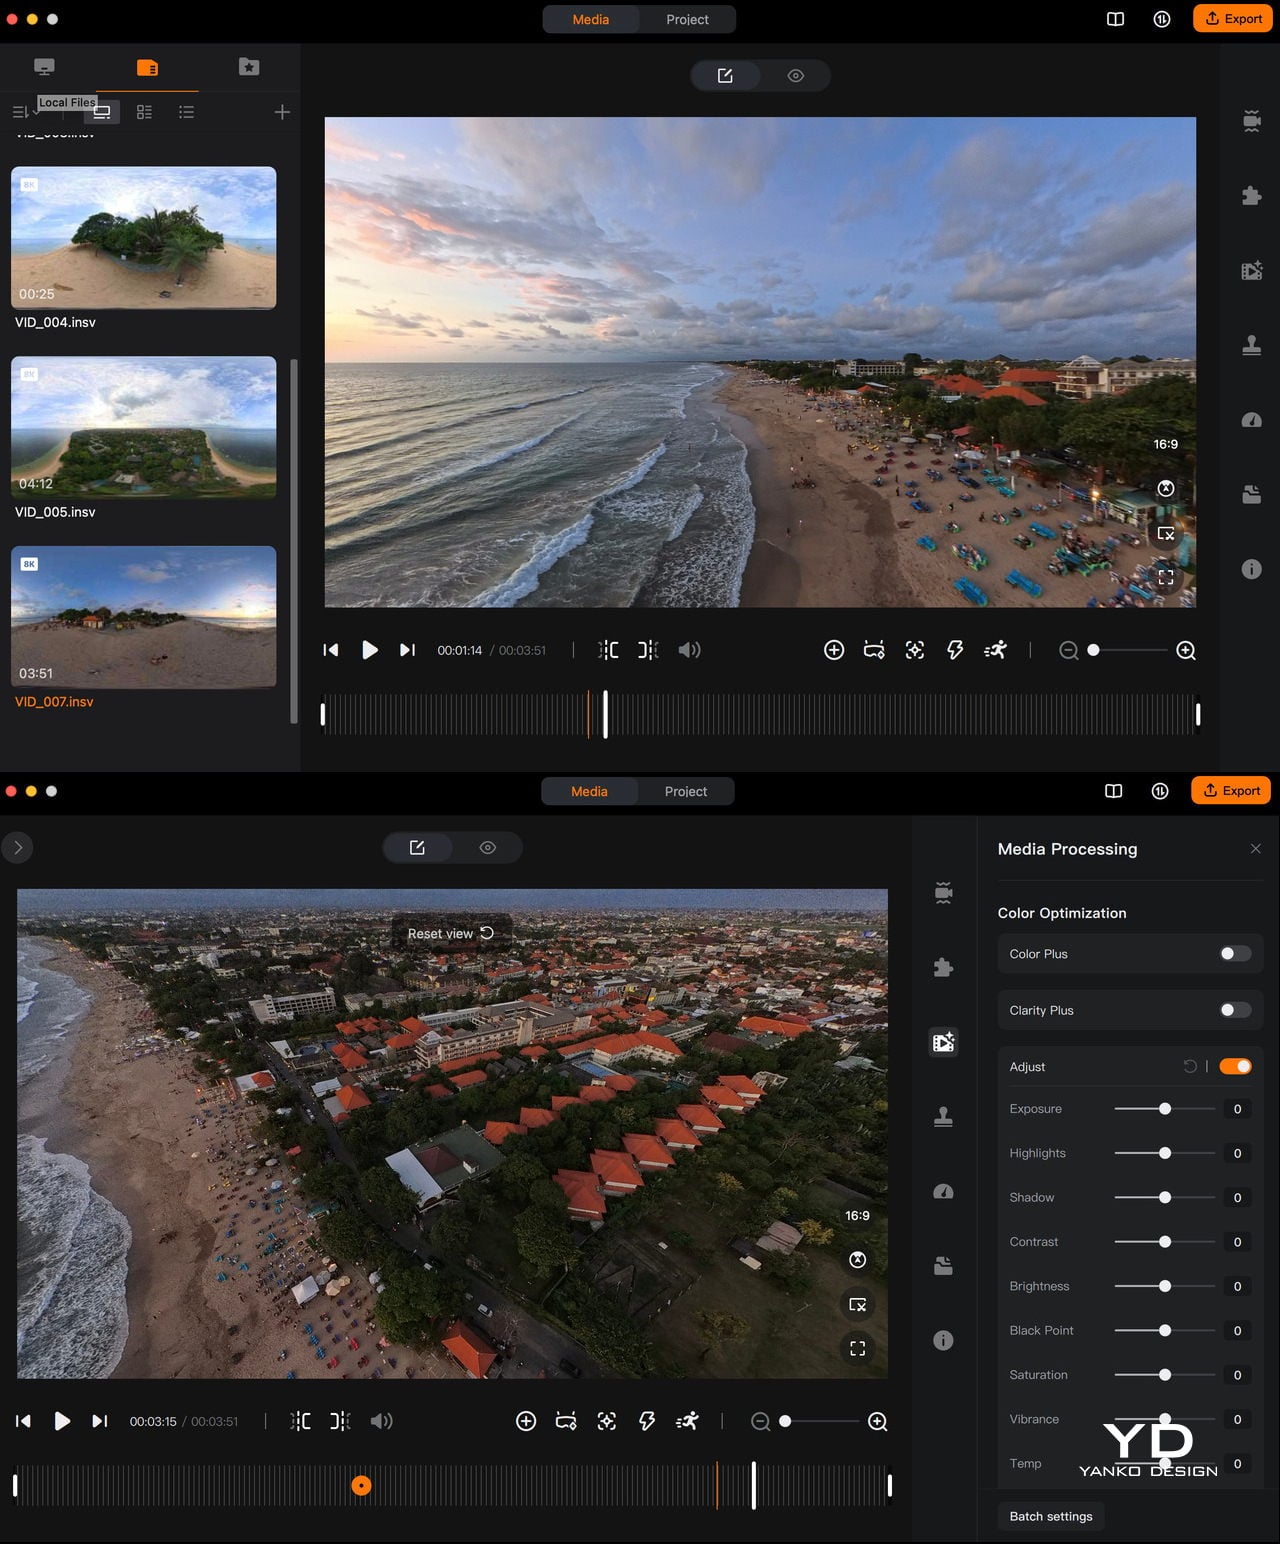
Desktop app

If you have used the Insta360 app, the Antigravity app will feel instantly familiar, with similar timelines, keyframes, and swipe-to-pan gestures. Even if you have not, it is straightforward to learn, helped by clear icons and responsive previews. There is also an AI auto-edit mode that can assemble quick cuts for you, which is handy when you just want something shareable without sinking an evening into manual reframing.

In the end, A1’s performance is not just about how long it stays in the air or how many modes it offers. Those pieces matter, and they are solid, but what you remember is the feeling of lifting off inside the goggles and the ease with which you can hand that experience to someone else. It still behaves like a well-mannered compact drone on the spec sheet, yet in use it edges closer to a shared flying machine, one that turns a patch of ground into a small, temporary viewing platform in the sky.

Sustainability

Antigravity does not make any big sustainability claims with the A1. There is no mention of recycled materials or lower-impact manufacturing, and the packaging and hardware feel very much in line with a typical consumer drone. This is not a product that sells itself on being green, and the company does not pretend otherwise. 

What you do get is some support for repairing rather than replacing. The A1 ships with spare propellers in the box, which encourages you to swap out damaged blades instead of treating minor knocks as the end of the drone. Antigravity also sells replacement lenses, so a scratched front element does not automatically become a total write-off. It is a small step, but it nudges the A1 slightly toward a longer, more fixable life rather than a purely disposable gadget.

Value

The standard Antigravity A1 bundle starts at 1599 USD, with Explorer and Infinity bundles stepping up battery count and accessories for longer, more serious flying. It is undeniably an expensive system, especially compared to regular camera drones that only give you a phone view.

At the same time, what you are really paying for is the experience of being inside the flight and reframing your shots after the fact. That sense of presence and flexibility is hard to put a number on, and for me, it nudges the A1 from “costly gadget” toward something closer to a priceless experience machine, if you know you will actually use it.

Verdict

Antigravity A1 is not the simplest drone in terms of equipment. You are managing goggles, a grip controller, multiple batteries, and in some places, you also need a visual observer if regulations require it. On top of that, the price sits firmly in premium territory. In return, you get a very different kind of flying. At first, setup and piloting can feel overwhelming, but it becomes natural surprisingly quickly, and there are plenty of automated features to help you keep the drone under control and capture cool shots. Combined with 360-degree capture and post-flight reframing in the Antigravity app, it feels less like operating hardware and more like stepping into a movable viewpoint.

If you just want straightforward aerial clips, the A1 is probably more than you need. If you care about immersive perspective and shared experiences, the mix of kit, software, and feeling it delivers starts to justify the cost. It is fussy, ambitious, and occasionally awkward, yet when you are inside that live 360-degree view, it really does reimagine what a drone can feel like to fly.

The post Antigravity A1 Review: Reimagining What a Drone Feels Like to Fly first appeared on Yanko Design.

Apple’s OLED Display Macs: The Future of Visual Excellence

Apple’s OLED Display Macs: The Future of Visual Excellence

Apple is preparing to make a significant leap in its Mac lineup by integrating OLED display technology, a move that promises to elevate display quality, energy efficiency, and overall user experience. Reports indicate that this transition will encompass the iMac, MacBook Pro, and MacBook Air, with staggered releases extending into the next decade. This strategic […]

The post Apple’s OLED Display Macs: The Future of Visual Excellence appeared first on Geeky Gadgets.

Posted in Uncategorized

How to set up an iPad for a child

Creating a child-friendly iPad takes a few extra steps, but Apple’s tools make the process relatively straightforward. From creating a child’s Apple ID to adjusting Screen Time and privacy settings, you can shape how your child uses the device and protect them from inappropriate content. The process varies slightly depending on whether the iPad is new or already in use, but the principles are the same: set up a managed account, connect it to Family Sharing and fine-tune the controls that keep your child’s digital space safe.

Every kid using an iPad should have their own Apple ID. This allows you to manage their account through Family Sharing and gives them access to features like iCloud, the App Store and Messages under your supervision. Apple requires parents to create accounts for children under 13, which can be done directly from your own device.

Open the Settings app on your iPhone or iPad, tap your name at the top and select Family. Tap Add Member, then Create Child Account, and follow the onscreen prompts. You’ll need to provide your child’s name and birth date, along with parental consent using your own Apple ID password. Once created, the account is automatically added to your Family Sharing group.

If your kid already has an account, you can invite them to join your Family Sharing setup instead. On the iPad, go to Settings > Family > Add Member, then select Invite People to send a request to their existing Apple ID email address. When they accept, you’ll be able to manage parental controls from your own device.

Family Sharing brings all your family’s Apple devices together under one umbrella. It lets you share subscriptions, purchases and iCloud storage, while giving you oversight of your child’s activity. The Ask to Buy feature, for example, requires your approval before your child can download apps or make in-app purchases, helping to avoid surprise charges.

To enable Family Sharing on your iPad, go to Settings > [your name] > Family, then tap Add Member if your child isn’t already added. You can manage shared purchases, location sharing and Screen Time settings from here. Linking devices through Family Sharing also makes it easier to locate a lost iPad and maintain consistent restrictions across all your family’s devices. For broader setup advice, see Engadget’s guide on how to set up a phone or tablet for a child.

Once your child’s account is linked, you can use Screen Time to manage how the iPad is used. Screen Time is found under Settings > Screen Time, and it lets you set time limits, restrict certain apps, and monitor usage reports.

When first opening Screen Time on your child’s iPad, tap This is My Child’s iPad. You’ll be prompted to create a unique Screen Time passcode. This passcode is different from the iPad’s unlock code and prevents your child from changing settings without permission, so make sure you remember it. From here, you can configure several key features.

Downtime allows you to block all but essential apps and calls during certain hours, such as bedtime or homework time. App Limits sets daily time limits for categories such as games, entertainment or social networking. You can also set Communication Limits to control who your child can contact throughout the day and during Downtime, which is useful for if you only want them to message family members or trusted friends. The Always Allowed section lets you choose essential apps, such as Messages or educational tools, that remain accessible at all times.

You can adjust these settings from your own device if your child is part of your Family Sharing group. Screen Time reports provide detailed insight into how the iPad is used, so you can see which apps are used the most and make adjustments as needed.

Content and Privacy Restrictions offer finer control over what your kid can and cannot do with their iPad. To enable them, go to Settings > Screen Time > Content & Privacy Restrictions, and toggle them on.

Within this menu, you can manage App Store purchases and downloads, disabling in-app purchases or preventing your child from installing or deleting apps. You can also filter explicit content in Apple Music, TV, and Books, and apply web restrictions in Safari to limit adult content. Under Web Content, choose Limit Adult Websites or specify certain sites that are allowed or blocked.

Privacy controls extend beyond content. You can manage location services, camera and microphone access and other sensitive permissions. For example, turning off location sharing in certain apps can help safeguard your child’s privacy. You can also prevent changes to accounts, passcodes and cellular settings, ensuring that restrictions remain consistent.

Beyond Screen Time, Apple includes additional tools to make iPads safer for children. In Safari, you can enable SafeSearch to filter explicit results in search engines. Restrict AirDrop under Settings > General > AirDrop to limit sharing to Contacts Only or turn it off completely, reducing the potential for exposure to unsolicited files.

Messages includes a Communication Safety feature that uses on-device machine learning to detect sensitive images. When enabled, the iPad will blur images that contain nudity and offer guidance before the child can view them. You’ll find this under Settings > Screen Time > Communication Safety. It works entirely on the device and doesn’t send data to Apple, preserving privacy while offering extra protection.

If your child uses Game Center, you can limit multiplayer games, profile visibility and the ability to add friends. These small adjustments can prevent unwanted social interactions or exposure to inappropriate content in online games.

For younger children or toddlers, Guided Access can keep them focused on a single app and prevent them from accidentally navigating elsewhere. To enable it, open Settings > Accessibility > Guided Access, then toggle it on and set a passcode.

Once it’s active, open the app you want your child to use and triple-click the top button (or the Home button on older models). Guided Access locks the iPad to that app until you end the session with your passcode. You can disable hardware buttons or touch input areas to avoid navigating elsewhere in the app or accessing playback controls. This feature is ideal when you want your child to watch a video or use an educational app without interruption.

After initial setup, it’s important to revisit these settings occasionally. Children’s needs change as they grow, and Apple regularly adds new parental features with each iPadOS update. Keep the iPad updated by going to Settings > General > Software Update, and review restrictions periodically to ensure they still fit your child’s age and usage patterns.

Setting up an iPad for your child isn’t just about managing screen time or blocking certain apps. It’s about creating a space that encourages safe exploration while maintaining healthy boundaries. With Apple’s parental tools, you can find the right balance between freedom and supervision, making the iPad a secure and educational part of your child’s digital world.

This article originally appeared on Engadget at https://www.engadget.com/mobile/tablets/how-to-set-up-an-ipad-for-a-child-160001671.html?src=rss

NVIDIA Nitrogen AI Open Source Gaming AI Without Game-Specific Tuning

NVIDIA Nitrogen AI Open Source Gaming AI Without Game-Specific Tuning

What if an AI could master any video game without ever having played it before? NVIDIA’s latest innovation, Nitrogen, has turned this once-unimaginable concept into reality. AI Grid breaks down how this new generalist AI agent is redefining the boundaries of artificial intelligence. Unlike traditional models that rely on exhaustive training for specific tasks, Nitrogen […]

The post NVIDIA Nitrogen AI Open Source Gaming AI Without Game-Specific Tuning appeared first on Geeky Gadgets.

Posted in Uncategorized

This Sculptural Bench Captures Sardinia’s Sea in Recycled Resin

You know that moment when you’re standing at the edge of the ocean, watching waves roll in with that hypnotic rhythm that makes everything else fade away? Designer Andrea Ponti wanted to bottle that feeling, and honestly, I think he nailed it with Cresta, a sculptural bench that looks like it was pulled straight from the Mediterranean and frozen in time.

Cresta, which means “crest” in Italian, is more than just a place to sit. It’s a love letter to Sardinia’s coastline, where Ponti grew up surrounded by the kind of natural beauty that gets under your skin and never really leaves. The bench captures that raw, untamed energy of water in motion, translating it into something you can actually touch and experience in your own space. And the best part? It’s made entirely from recycled plastics, proving once again that sustainability and stunning design don’t have to be mutually exclusive.

Designer: Ponti Design Studio

Let’s talk about what makes this piece so visually striking. The color alone is enough to stop you in your tracks. Cresta features a gradient that flows from deep ocean blue at the base to crystal-clear transparency at the top, mimicking the way sunlight filters through water. It’s the kind of detail that makes you want to walk around the piece from every angle, watching how the light plays through the material and creates new patterns depending on where you’re standing.

The texture adds another layer of intrigue. Those fine vertical lines running through the resin give it a tactile quality that invites you to reach out and touch it. From certain angles, it almost looks like the surface is rippling, as if the bench is caught in a perpetual state of movement. It’s a clever trick that keeps the piece feeling alive rather than static.

What really sets Cresta apart is its structure. The bench is composed of two distinct elements that work together to create its distinctive character. The top section is designed for comfort, providing seating for two people. But it’s the bottom that steals the show. That wave-like base isn’t just visually dramatic, it’s the heart of the design, giving Cresta its sculptural identity and making it feel less like furniture and more like a piece of contemporary art that happens to be functional.

Now, about that sustainability angle. Ponti and his team at Ponti Design Studio didn’t just slap some eco-friendly marketing on this project and call it a day. They carefully curated a blend of recycled plastics, including PMMA (acrylic), PET (the stuff in water bottles), PC (polycarbonate), and PS (polystyrene). These materials would otherwise end up in landfills or, ironically, polluting the very oceans that inspired this piece. By transforming waste into something beautiful and functional, Cresta makes a quiet but powerful statement about what’s possible when we rethink our relationship with discarded materials.

This approach feels particularly relevant right now. We’re all drowning in conversations about plastic waste and environmental responsibility, and sometimes it can feel overwhelming and abstract. But when you see something like Cresta, it suddenly clicks. Recycled materials don’t have to look recycled. They don’t have to sacrifice beauty or craftsmanship. In fact, they can become something that people actively want in their homes and public spaces.

The bench would be right at home in a contemporary gallery, a modern office lobby, or even a stylish outdoor space where it could echo the natural environment it celebrates. Its clean aesthetic and sculptural form give it versatility, while that unmistakable wave-inspired silhouette ensures it never fades into the background. What I find most compelling about Cresta is how it manages to be both minimal and dramatic at the same time. There’s nothing extraneous about the design. Every curve, every gradient shift, every textured line serves the larger vision. Yet the overall effect is bold and memorable, the kind of piece that makes people stop and ask questions.

In a world where so much furniture blends together into beige sameness, Cresta stands out as something genuinely different. It’s a reminder that good design can tell a story, honor a place, and push us toward better environmental choices, all while looking absolutely stunning. Andrea Ponti took his memories of Sardinian seas and transformed them into something tangible, something that lets the rest of us experience a little bit of that coastal magic, no plane ticket required.

The post This Sculptural Bench Captures Sardinia’s Sea in Recycled Resin first appeared on Yanko Design.

Samsung Galaxy Z Fold 8 Leaks: Two Pro Upgrades Apple Isn’t Ready For

Samsung Galaxy Z Fold 8 Leaks: Two Pro Upgrades Apple Isn’t Ready For

Samsung is once again redefining the foldable smartphone landscape with the Galaxy Z Fold 8. This latest model introduces notable advancements in both camera technology and design versatility, further solidifying Samsung’s leadership in the foldable market. As Apple prepares to unveil its first foldable iPhone, the Galaxy Z Fold 8’s innovations could set a new […]

The post Samsung Galaxy Z Fold 8 Leaks: Two Pro Upgrades Apple Isn’t Ready For appeared first on Geeky Gadgets.

Posted in Uncategorized

Pro-Russian hacker group claims responsibility for DDoS attack on French postal service

A pro-Russian hacker group has come forward as the perpetrator of a DDoS attack on the French national postal service La Poste that took place on December 22, according to Reuters. The distributed denial-of-service attack took central computer systems at La Poste entirely offline and caused major disruptions in package deliveries just days before Christmas.

Reuters reported that the cyberattack on La Poste was still not fully resolved as of Wednesday morning. While regular letters were not affected, postal workers were unable to track packages and online payments through La Banque Postale, the service's banking division, were also disrupted.

The group, known as Noname057, has taken responsibility for or been accused of cyberattacks across the globe. Though attacks have occurred in over a dozen nations, the group has mostly targeted Ukraine as well as Ukraine-friendly nations.

Europol, the EU's law enforcement agency, launched an extensive operation against the group this summer. The US Justice Department has also been involved in actions against the hacker group.

This article originally appeared on Engadget at https://www.engadget.com/cybersecurity/pro-russian-hacker-group-claims-responsibility-for-ddos-attack-on-french-postal-service-140015323.html?src=rss

Toyota’s Prius Prime saved me gas money but probably not the environment

I’ve always wondered what it would be like to own a plug-in hybrid, and recently, fate handed me that opportunity. On a recent trip to Vancouver, I rented a 2024 Toyota Prius Prime for nearly two months — the ideal scenario to try out North America’s most popular PHEV.

Previously, the words "Prius" and "sexy" were rarely used in the same sentence. However, I think the wedge-shaped Prius Prime introduced for 2023 is much sexier than its frumpy predecessors. The sleek shape also pierces the wind better to improve efficiency. It’s lower to the ground than before, though, which can make entry tough for taller or older people.

I was comfortable in the Prius Prime once seated, even though the materials and options aren’t quite as luxurious as other PHEVs sold in the US. On two 10-hour highway drives from Vancouver up to northern Canada I never felt sore (or cold) in the well-bolstered, heated seats. However, visibility wasn’t the greatest due to the low seating position and thick front pillars that occasionally blocked my view of traffic.

Driving Toyota’s Prius Prime showed me the perks (and problems) with plug-in hybrids
Steve Dent for Engadget

With its wraparound dash and 8-inch touchscreen, the interior is reasonably high-tech but not to the standard of some EVs I’ve tried recently. It came with wireless CarPlay and Android Auto support that gave me seamless streaming entertainment on long highway stretches. The driver safety features (lanekeeping, adaptive cruise, automatic braking and more) also boosted my confidence in Vancouver’s gnarly traffic. The Prius Prime doesn’t offer true one-pedal implementation, but it has a mode that’s close to that.

With a two-liter 150 HP gas motor and 161 HP electric motor (net 220 HP combined), the 2024 (fifth generation) Prius Prime has a whopping 100 more horsepower than the previous model. The electric drivetrain is supplied by a 13.6kWh battery (10.9kWH usable) that takes four hours to charge at 240 volts, or double that with 120-volt household electricity. That means you can juice it fully overnight, but it doesn’t have DC fast-charging for speedy power-ups on longer trips. The EPA electric range is 44 miles, 19 more than the fourth-gen Prius.

It accelerated surprisingly well (from 0 to 60mph in 6.7 seconds) and was agile, but had a fair amount of body roll since it’s not designed for the race track. Still, considering the Prius’s reputation as a staid hippie econobox, the new model was downright sporty. I enjoyed driving in the all-electric mode much more than the hybrid mode, though — it was quieter and smoother, with lower noise levels and vibration.

So, how far was I able to drive on that electric motor alone? On the highway at about 65 MPH, I eked out 30 miles and just over 40 miles in the city. On one trip, I drove from the city center to a suburb 30 miles away and made it there and partially back on a full charge. On another voyage, I was able to drive back and forth between the east- and west-most points of Vancouver (13 miles) — a typical commute for many city-dwellers — with about a quarter charge to spare.

Driving Toyota’s Prius Prime showed me the perks (and problems) with plug-in hybrids
Steve Dent for Engadget

With consistent charging, my fuel consumption over a two week period (averaging 25 miles per day) was about a quarter of a tank or around $7.50. In terms of electricity, I used nearly 70.5kWh during that time at $.085/kWh, for a total of $6. All told, I spent $13.50 for gas and electricity over 350 miles of mixed driving, so the Prius Prime was clearly cheap to operate.

For longer trips, it’s still as inexpensive as it gets for a gasoline-powered vehicle, thanks to the efficient ICE motor and hybrid system that’s among the best in the industry. With a full battery charge and tank, I set out on a 547-mile drive and travelled 470 miles before stopping for gas, with a quarter tank to spare. That fill-up cost around $25.

The timing for my test of this car was ideal. In October, I spotted a European study concluding that PHEVs aren’t as economical as expected over a large sample size. Engadget’s article about that stirred up some passion among owners and potential buyers, so I wanted to compare my experience with points in the study.

First, let’s see if a PHEV is worth the extra money compared to a regular hybrid. My calculations are for the average US buyer and don’t take state or federal clean air rebates into account.

When I chose to rent a "compact" car, Avis assigned me a mid-range Prius Prime XSE — a model that lists at $37,320 but typically sells for $34,590, according to Edmunds. That suited me well as it only lacked a few features of the high-end XSE Premium, notably the larger 13.2-inch infotainment display and solar roof option. A fully equipped 2026 XSE Premium model with those features costs $41,665.

Driving Toyota’s Prius Prime showed me the perks (and problems) with plug-in hybrids
Steve Dent for Engadget

Since Toyota also makes a regular hybrid Prius, that vehicle offers an ideal comparison. The equivalent Prius XTE model has a list price of $31,995 in a similar configuration, making it $5,325 cheaper than the Prius Prime XSE.

The average US driver covers 13,662 miles per year and gasoline currently has a median $3 per gallon price. Over that distance, a non-PHEV Prius driver could expect to burn 273 gallons at 50 MPG (EPA combined) in a year, spending $819 on fuel.

A Prius Prime driver, on the other hand, would use 70 to 85 percent less fuel by current EPA or WLPT estimates. If we generously take the high end of those numbers at 85 percent, that cuts fuel costs to $160. That would require using about 2,500 kWh of electricity, though, so at an average US price of $0.18/kWh, that amounts to $450, for a total of $610 (gas plus electricity). That means you’d save just $209 in a year, or $2,090.00 over 10 years — not enough to justify the extra price. (Fuel and electricity prices, usage and other factors vary by region and can have a big impact on those figures.)

It could be even worse than that, according to a European automotive thinktank called Transport & Environment (T&E). After gathering real-world OBFCM data from 800,000 vehicles, they determined that PHEVs only run in all-electric mode 27 percent of the time, rather than 84 percent as estimated by Europe’s WLPT standard. As a result, plug-in hybrids in Europe emit five times more emissions and cost users €500 ($586) more per year than previously thought. Those figures are likely similar in the US.

Driving Toyota’s Prius Prime showed me the perks (and problems) with plug-in hybrids
Steve Dent for Engadget

How could regulators be so wrong about this key data? The first, obvious reason is that they underestimated how often people charge their vehicles. With their relatively short range, plug-in hybrids often need a full charge to get through the day in electric-only mode — but many people aren’t doing that.

Why? One reason may be a lack of easy charger access away from home. I found them to be difficult to find and use, often requiring a sign-up or app rather than just letting me tap a credit card (I’m looking at you, ChargePoint, Flo and Switch Energy). It can also be more expensive than just buying gasoline, since many companies charge triple or more the market rate for electricity. Another factor is that drivers of company or fleet PHEVs charge their vehicles less often than private owners.

There's one additional and especially pernicious reason: The ICE engine often kicks in when PHEVs are supposedly running in all-electric mode, particularly with heavier sedans or SUVs. That’s because the electric motors alone aren’t powerful enough for maneuvers like passing.

Larger batteries can boost all-electric usage, but only to a point. Beyond 45 miles of range, emissions actually increase. The reason is simple: "Long-range PHEVs are the heaviest in the dataset, averaging 28 percent more mass and 33 percent more engine power than the group just below," T&E wrote.

Driving Toyota’s Prius Prime showed me the perks (and problems) with plug-in hybrids
Steve Dent for Engadget

Overall, I enjoyed my time with the Prius Prime and found it to be fun, practical and cheap to drive. It’s the most economical PHEV because it has excellent electric range and enough power that the ICE engine rarely needs to kick in. At the same time, it offers the highest EPA mileage rating of any non-EV sold in North America. If I were in the market for a new vehicle, the Prius Prime would be high on my list.

However, I also learned that PHEVs aren’t reducing emissions or saving buyers as much as regulators and manufacturers have promised. Governments are to blame for much of that, as they overestimated all-electric use in PHEVs and failed to support the charging infrastructure needed to make them practical.

Responsibility also falls to automakers and buyers. Consumers want SUVs, but manufacturers aren’t making the electric motors in PHEVs powerful enough to run all the time in EV mode or offering fast DC charging. At the same time, drivers are failing to charge their vehicles consistently. Until those issues are solved, in my experience plug-in hybrids are a poor substitute for EVs in terms of emissions and a less economical choice than regular hybrids.

This article originally appeared on Engadget at https://www.engadget.com/transportation/toyotas-prius-prime-saved-me-gas-money-but-probably-not-the-environment-133027378.html?src=rss

How to redeem game codes on the Nintendo Switch 2

Digital game codes remain one of the simplest ways to add new titles to a Nintendo library. The Nintendo Switch 2 handles code redemption in a familiar way, building on the same process used on the original Switch. You can redeem a download code directly from the eShop on the console, or through a browser on a phone or desktop. Both routes link the purchase to the same Nintendo Account so the redeemed title appears on any compatible device tied to that account. The process is quick once you know where to look. Here is how to redeem game codes on Switch 2 through the console and online.

A Nintendo Account is required and the Switch 2 must be connected to the internet for on-device redemption. Most codes contain sixteen characters made up of letters and numbers. The characters are displayed on a physical card, on a receipt or in a confirmation email from a retailer. The characters should be entered exactly as supplied. Each code can only be redeemed once and becomes linked to the Nintendo Account used during the process.

Redeeming a code through the Switch 2 itself is the most direct approach because the download begins as soon as the code is accepted.

Start on the Switch 2 home screen and open the Nintendo eShop icon. The console will prompt you to choose the user profile that should receive the content. Each user profile has a separate eShop purchase history, so pick the correct one before moving on.

Once the eShop loads, look for the Redeem Code option in the main menu. On the Switch 2, this appears in the left navigation panel alongside the store’s standard browsing categories. Select Redeem Code to open a screen with an input field and the on-screen keyboard.

Enter the sixteen-character code carefully. Codes may contain similar-looking characters particularly when numbers and letters appear in the same sequence. After entering the full set of characters select OK to move forward. The system checks the code and shows a confirmation page with the game or content tied to it.

If the code is valid, select Redeem to finish the process. The game will appear on the home screen as soon as the redemption is complete. A progress bar shows the download status until the installation finishes. If the game includes a Switch and Switch 2 version, the system will prompt you to choose which version to download.

If the game does not begin downloading head to the All Software view or the Download Management screen to confirm the status. The redeemed title should be visible with either a queued or active download.

Nintendo also supports online redemption through its digital store, which is useful if you are away from the console or prefer to type the code on a full keyboard. The redeemed title will still appear in your account’s purchase history and can be downloaded later from the Switch 2.

Open a browser on a phone, tablet or computer and go to the Nintendo Account login page. Sign in using the account linked to your Switch 2. Once logged in navigate to the code redemption page for the Nintendo eShop. This page contains a text box where you can paste or type the code.

Enter the code exactly as provided and select Next. A confirmation screen appears with the game details. Select Redeem to finalize the action. The content is now tied to your account and ready to download on your console.

If the console is in sleep mode and has auto downloads enabled, the game may start downloading immediately. Otherwise open the eShop on the Switch 2 later and check the Download Management section for your queued title.

Every redeemed game becomes part of your Nintendo Account’s digital library. This applies across devices tied to the same account, which means that games purchased on a Switch or a browser will still appear when you sign in on a Switch 2. If the game supports cloud backup through Nintendo Switch Online, save data will sync once the game is installed.

Some games offer separate versions for the original Switch and Switch 2. When this applies, you’ll be asked to pick which version you want to download. The choice does not usually affect your ownership but it determines which software build is installed on the device.

If a code fails, Nintendo advises checking that the characters are entered correctly and confirming that you are using a download code rather than a control number, which often appears on the same card. Codes for DLC downloads require the base game on the destination console. Region restrictions also apply so the code must match the region of your Nintendo Account’s eShop.

The Switch 2 keeps the familiar eShop structure that users have relied on since the original console. Keeping this process consistent simplifies the transition for families with multiple consoles and reduces the friction of carrying existing purchases forward. Nintendo Accounts continue to serve as the backbone for digital ownership which makes it easy to claim a code on one device and access the game on another.

The updated interface on the Switch 2 adds clarity to navigation but code redemption still works the same way on both platforms. This continuity ensures that retailers can distribute standard sixteen-character download codes and users can rely on simple steps to activate them.

This article originally appeared on Engadget at https://www.engadget.com/gaming/nintendo/how-to-redeem-game-codes-on-the-nintendo-switch-2-130059847.html?src=rss