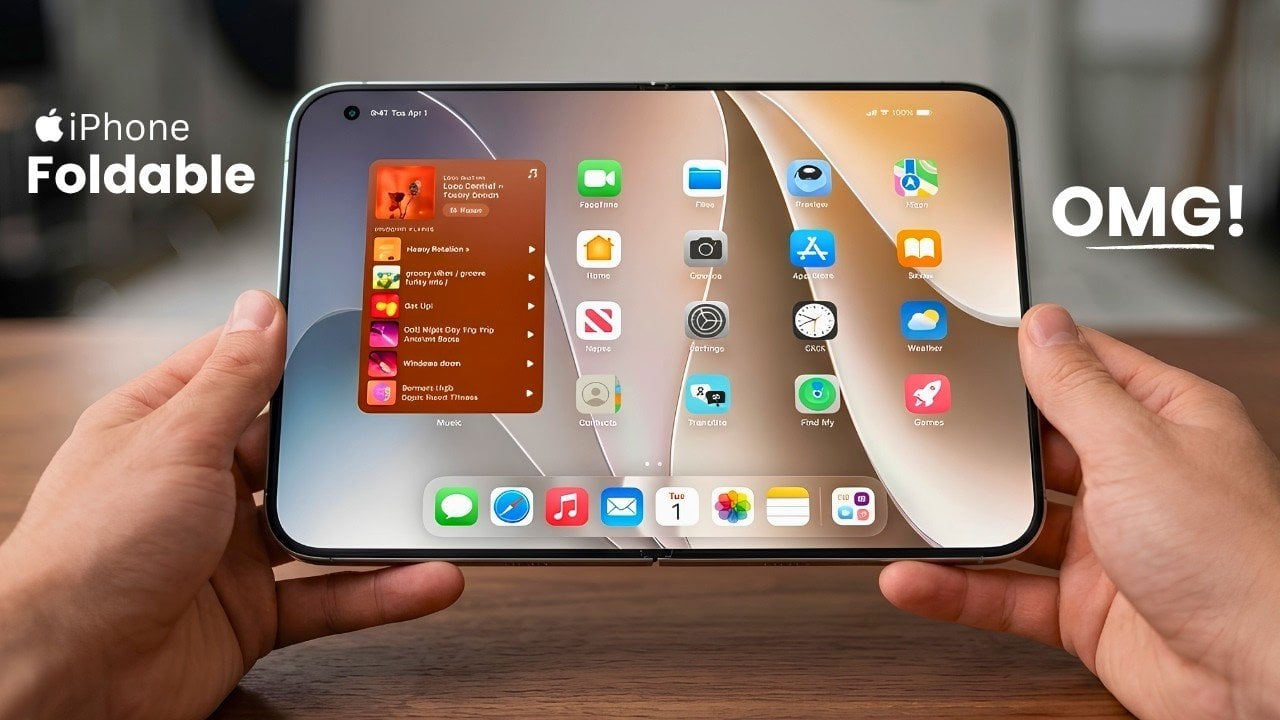
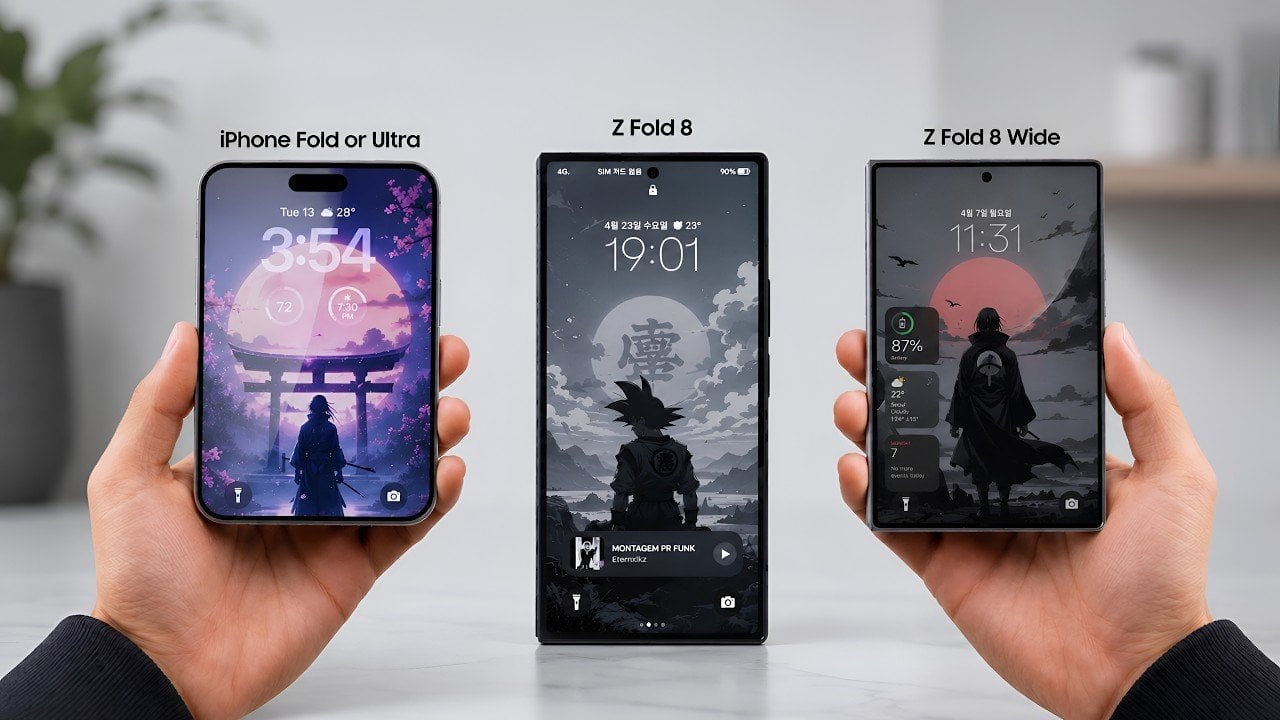
January’s PS Plus Monthly Games include Need for Speed Unbound and Disney Epic Mickey: Rebrushed

Sony has revealed the first batch of PlayStation Plus Monthly Games for 2026. There are three titles to play this month, all of which drop on January 6. As always, you’ll retain access to these games as long as your subscription remains active.

First up, there's Need For Speed Unbound. This is a racing game that came out at the tail-end of 2022 and was the first entry in the franchise for several years before that. It has a unique visual style, thanks to cel-shaded graphics, with all kinds of vehicles to choose from. There are street racing challenges, weekly qualifiers and a minigame that has you outrunning the cops. The rapper A$AP Rocky also plays a prominent role in the narrative. It'll only available for PS5.

Disney Epic Mickey: Rebrushed is a recently-released remake of a 2010 Wii game, but there's no Wiimote waggle here. This is just a great platformer with plenty of fan service for long-time Disney fans. Warren Spector, the lead designer of Deus Ex, was heavily involved in the making of this one. It'll be playable on both PS4 and PS5.

Core Keeper is a remarkable indie that has been floating around in early access for several years. The mining sim is now finished and offers an emphasis on crafting, base-building and, of course, exploration. While the game is playable solo, it's primarily intended as a multiplayer experience for up to eight people.

As the year ends, so does access to December's PS Plus Monthly titles. Subscribers have until January 5 to download Lego Horizon Adventures, Killing Floor 3, The Outlast Trials, Synduality Echo of Ada and Neon White.

This article originally appeared on Engadget at https://www.engadget.com/gaming/playstation/januarys-ps-plus-monthly-games-include-need-for-speed-unbound-and-disney-epic-mickey-rebrushed-182335673.html?src=rss

This Desktop Board Fixes the Problem Phones Created

We’ve all been there. You sit down to check your calendar, and thirty minutes later you’re three layers deep in Instagram stories wondering where your morning went. Our phones were supposed to make us more productive, but somewhere along the way, they became the world’s most sophisticated distraction machines. Enter Focus, a desktop board from Vestel Design Center that’s reimagining how we interact with our digital lives without falling down the social media rabbit hole.

At first glance, Focus looks like a minimalist piece of desk art, which honestly might be the smartest design choice they could have made. The device combines an E Ink display panel with a magnetic tool board and built-in speaker, creating what they’re calling a “multifunctional hub.” But what it really is? A thoughtful intervention between you and your phone’s never-ending notification nightmare.

Designer: Vestel Design Center

The E Ink panel is the star of the show here. If you’ve ever used a Kindle, you know that magical paper-like quality that’s easy on the eyes and visible in basically any lighting. Focus takes that same technology and turns it into your personal command center. It syncs with your phone to display your tasks, calendar events, and selected notifications. The key word being “selected.” You get to choose what makes it through, which means your cousin’s hot takes and algorithm-fed content suggestions stay firmly where they belong: on your phone, not in your line of sight while you’re trying to work.

But here’s where it gets interesting. Focus isn’t just about filtering information. It integrates with your smart home ecosystem, letting you control lights, adjust your thermostat, or manage security without reaching for your phone. Think about how many times you unlock your phone for one simple task and end up scrolling for fifteen minutes. This board cuts out that middle step entirely. Need to dim the lights for a video call? Done. Want to check if you locked the front door? Right there on the screen. All without breaking your workflow or tempting yourself with whatever’s happening on Twitter.

The design itself shows real restraint, which feels refreshing in a world where tech products often scream for attention. The illuminated base ensures the E Ink display stays visible even in darker rooms, solving one of the technology’s traditional limitations. And when you’re not actively using it, the panel switches to display mode, showing artwork or other visuals. It becomes part of your space rather than just another gadget cluttering your desk.

The magnetic tool board section adds a physical element that’s surprisingly practical. There’s something satisfying about having a designated spot for your glasses, pen, or phone that’s both functional and looks intentional. It’s the kind of detail that suggests the designers actually thought about how people work, not just how to cram more features into a product.

What makes Focus particularly relevant right now is its underlying philosophy. We’re all dealing with attention fatigue, that exhausting sense that our brains are being pulled in seventeen directions at once. The constant ping of notifications has trained us to be reactive rather than intentional about how we spend our time. This board is essentially saying, “What if your technology helped you stay on track instead of constantly derailing you?”

Of course, the success of something like Focus depends entirely on execution. The interface needs to be genuinely intuitive, the smart home integration reliable, and the filtering system actually useful rather than frustrating. But the concept addresses a real problem that a lot of us are struggling with: how to benefit from technology without letting it dominate our attention.

Tech companies have been competing for every second of our focus so there’s something almost radical about a device designed to give us less, not more. Focus isn’t trying to replace your phone or become another screen demanding your attention. It’s positioning itself as the thoughtful middleman, the calm voice in the chaos, the tool that helps you engage with technology on your terms.

The post This Desktop Board Fixes the Problem Phones Created first appeared on Yanko Design.

Why the iPhone Fold is Apple’s REAL 2026 Powerhouse

Why the iPhone Fold is Apple’s REAL 2026 Powerhouse

The concept of a foldable iPhone has generated significant interest among tech enthusiasts and industry analysts. Although Apple has not officially confirmed its development, persistent leaks and fan-created renders have fueled widespread speculation. If realized, the iPhone Fold could mark a pivotal moment in smartphone design, blending innovation with Apple’s signature approach to technology. Here’s […]

The post Why the iPhone Fold is Apple’s REAL 2026 Powerhouse appeared first on Geeky Gadgets.

Posted in Uncategorized

Google Stitch & Gemini 3 : Speed up Real App Prototypes with Smart Planning

Google Stitch & Gemini 3 : Speed up Real App Prototypes with Smart Planning

What if you could turn a simple idea into a fully functional app prototype in minutes? That’s no longer a distant dream, thanks to Google’s AI-powered design platform, Stitch, which has just received a innovative upgrade. In this guide, Universe of AI explains how the integration of Gemini 3 Pro has transformed Stitch into a […]

The post Google Stitch & Gemini 3 : Speed up Real App Prototypes with Smart Planning appeared first on Geeky Gadgets.

Posted in Uncategorized

Peak Pouch Turns 5,180 Tons of Park Waste Into Trash Bag Holders

South Korea’s national parks removed trash bins to protect ecosystems and pushed a carry-in, carry-out policy. The unintended side effect is that visitors hide trash in rock crevices or behind trees because they lack an easy way to deal with it. Over five years, 5,180 tons of waste were collected from parks, roughly 200 fully loaded 25-ton trucks, underlining the scale of the problem when good intentions meet poor infrastructure.

Peak Pouch is part of a National Park Upcycling Project, a portable waste-bag dispenser and bag holder made from waste wood decks and plastics collected directly from the parks. The designers argue that visitors are not short on environmental awareness; they are short on tools and motivation. Peak Pouch turns the abstract idea of conservation into something you can hold and use on every hike, making the right behavior easier than hiding trash.

Designer: Hyunbin Kim

Peak Pouch is a small, organic cylinder inspired by the curves of Baengnokdam crater in Hallasan National Park. The body is a blend of upcycled wood and plastic, with irregular speckles and a rough but warm texture that the designers leave visible. It feels closer to a small stone or piece of bark than a gadget, helping it sit naturally in a hiking context and build an emotional link to the landscape it came from.

The product is built from just three parts for intuitive use. It uses biodegradable roll bags to keep the system sustainable, and the bottom slot uses a simple twist-lock mechanism for refilling. You twist off the base, drop in a new roll, twist it back on, and you are done. The simplicity reduces friction, so carrying and refilling bags does not feel like a chore.

Peak Pouch is designed for immediate access during hikes. A side slit lets you pull and tear bags one-handed while walking, so you do not have to stop and unpack. A sturdy top strap clips to a backpack or belt loop, keeping the dispenser visible and within reach. The idea is to make grabbing a bag when you need one the path of least resistance.

After you have filled a bag, a dedicated holder on the side lets you tie it off and attach it securely, so you do not have to carry it in your hand on the way down. That matters on steep or uneven trails, where having both hands free makes the descent safer and more comfortable. It turns carrying out waste from an awkward burden into something that feels planned for.

Peak Pouch comes in signature colors derived from the landscapes of major Korean national parks like Halla, Seorak, and Bukhansan, with each park’s name embossed on the body. After the hike, the bag holder’s built-in magnet lets it live on a refrigerator or metal furniture as a memo or photo clip, quietly reminding you of the trail and your role in keeping it clean.

Peak Pouch reframes the park souvenir. Instead of a passive trinket, it is a piece of the park’s own waste turned into a tool that helps you leave less behind. By living on your pack during hikes and on your fridge between them, it nudges you from passive awareness to active practice, one pulled bag and carried-out wrapper at a time, making zero-waste hiking feel like something you choose rather than something you dread.

The post Peak Pouch Turns 5,180 Tons of Park Waste Into Trash Bag Holders first appeared on Yanko Design.

iOS 26.4 Leak: Siri’s Massive Overhaul is Finally Happening

iOS 26.4 Leak: Siri’s Massive Overhaul is Finally Happening

Apple’s iOS 26.4 update is set to deliver a host of enhancements aimed at improving functionality, security, and personalization across its ecosystem. Whether you’re a casual user or a tech enthusiast, this update introduces features designed to make your experience more seamless and intuitive. Below is a detailed look at the most notable features and […]

The post iOS 26.4 Leak: Siri’s Massive Overhaul is Finally Happening appeared first on Geeky Gadgets.

Posted in Uncategorized

How to use a VPN

Chances are that if a VPN is marketed to everyday users, it more or less runs itself. As long as you go with one of the best VPNs instead of setting up your own manual connection, the interface is likely built so you have to engage with it as little as possible. Generally, if you find yourself constantly thinking about your VPN while using it — as happened to me with Norton VPN — that's a bad thing and you should change providers.

That said, it's still useful to get a high-level view of how to use a VPN, especially if you've never used one before. In this article, I'll walk you through how to download, install and configure a VPN on any platform and how to choose servers for specific situations. I'll also discuss specific steps for desktop and laptop computers, phones, tablets, smart TVs, game consoles and routers.

How to download and install a VPN

There are over 100 VPNs available on the internet and the two big mobile app stores, but most of them follow a similar approach to download and installation. Except for certain free VPNs, you'll need to create an account on the VPN provider's website, install the VPN client, then use your account to log in. Here are the steps.

  1. In a web browser, navigate to a VPN provider's website. For suggestions on where to start, check out our list of the best VPN deals. Click any link that mentions getting the VPN or claiming the deal — as a rule, they aren't hard to find.

  2. Select a plan based on the length of time you need the VPN for, the features you want and the number of devices you'd like to use the VPN on simultaneously. Add a payment method. You'll be prompted to create the username and password for a new account.

  3. On desktop, you can start with the Mac or Windows app store, though some VPNs require a download directly from their respective website. That’s generally the way to get the most feature-rich version of the VPN, but just make sure you’re downloading from the provider’s website to ensure you don’t get a malicious copycat. On mobile, the app store is your only choice, but don't forget to check the reviews and make sure you're getting the service you paid for — unfortunately, rival (and sometimes less scrupulous) VPN brands can use paid placements to appear higher on search results, even for a rival product.

  4. Follow the pre-programmed installation flow. Again, don't let a VPN make any changes to your system if you haven't thoroughly vetted the provider (or gone with one of our recommendations). If it's safe, allow the VPN all the setup permissions it needs.

  5. Finally, open the VPN client and sign in with the credentials you created in step two. You're now ready to start using your new VPN.

Surfshark in Mac downloads folder
Sam Chapman for Engadget

With so many VPNs on the market, this process won't always be the same. Sometimes you'll have to make the account before paying, and some mobile VPNs let you handle the whole process in-app. What's always true, though, is that a good VPN will make the signup flow as easy as possible. If you have trouble before you even log in, that's a red flag.

How to configure a VPN app

Most VPNs are ready to go out of the box. However, even if you don't think you're a power user, it's a good idea to go through the settings and make sure they match what you need. Here are a few steps I recommend taking.

  1. Activate the kill switch. This feature monitors your connection to the VPN server. If it ever drops — either from problems in the server, your client or somewhere in between — the kill switch instantly cuts off your internet until your VPN connection is restored. This saves you from accidentally broadcasting anything sensitive while also ensuring you only connect to legitimate VPN servers (avoiding the Tunnelvision bug).

  2. Set up favorites and profiles. VPNs usually let you select servers you'll use regularly, websites you'll often connect to through the VPN and other preferences that will appear immediately when you open the app. Some go further, like Proton VPN, which lets you create user profiles that bundle several preferences together.

  3. Decide if you want the VPN to automatically launch and connect when you start up your computer.

  4. Check on split tunneling. There may be cases where you want a certain app or site to work outside the VPN, or where you want everything to go unencrypted except one site or app. You can set up a split tunnel when you need it, but if there's one you know you'll use regularly, it helps to build it early.

  5. Activate or deactivate any content blockers the VPN comes with, including ad blockers, malware detectors and parental controls, as you see fit.

  6. Decide whether you want the VPN to send you notifications, and how.

  7. Select a VPN protocol. It's almost always best to let the VPN choose for itself, but it's helpful to at least know where the protocol-switching option is. Occasionally, if one protocol isn't working, you can troubleshoot by selecting another.

You can do all this by digging into your VPN's preferences control panel. A gear seems to be the universal icon for that, but Mac users may also find it by picking "preferences" or "settings" from the menu bar. When you find the preferences menu, go through each tab in turn and make sure everything is the way you like it.

How to choose a VPN server

Picking a server location is the final box to check before connecting. You nearly always have the option of letting the VPN pick the best server. Most apps tend to determine the best server with a latency test, so it will almost always be a node very close to your physical location.

If you just want anonymity online, that's fine — it doesn't matter which IP address you use as long as it's not your real one. But several VPN use cases do require a specific server location. For those, follow one simple rule: Pick a server in the place you want your signal to come from.

Choosing locations on Surfshark
Sam Chapman for Engadget

For example, let's say you want to watch The Office, but you're only subscribed to Netflix and not Peacock. Luckily, Netflix is licensed to show The Office in the U.K. If you connect to a British server location before opening Netflix, you'll be able to access the show without paying for an extra subscription. (Of course, make sure VPNs aren’t expressly banned by the streaming service’s terms of service before accessing it while using one.)

Other than streaming, the most common reason you'll need a specific VPN server is to get around firewalls that block websites. Whether it's your school doing the censorship, your workplace or your entire state, the solution is the same: Pick a VPN server outside the restricted region. Censorship systems filter by location — they can't block where they don't have jurisdiction. Get a new virtual location and you should be free and clear. (Always be cognizant of the laws on VPN usage in your location before activating them.)

When to use a VPN (and when not to)

It's good to get into the habit of connecting to your VPN whenever you get online. You can never be sure what information your ISP is gathering on you. If you're using unprotected Wi-Fi, or a public network with a clearly visible password, anybody might be listening in. Even if you don't need a particular location, always be using your VPN.

The only reason you might want to be online without a VPN is that certain websites, especially online banks, get suspicious if they note repeated logins to the same account from too many different IP addresses. For those cases, you can either set up a split tunnel to exclude the website from encryption, or temporarily turn your VPN off altogether.

Instructions for specific devices

Although most VPNs try to keep their apps similar on every platform, the strictures of differing hardware and software lead them to install and operate differently. In case you still have questions after reading the general guide above, this section goes into detail on every platform where you might use a VPN.

How to use a VPN on desktop

After subscribing to a VPN on Windows, you should be directed to download an EXE file — if this doesn't happen, log into your account on the website and find the downloads center. Find the folder where the EXE is saved, double-click it and follow the onscreen instructions.

On Mac, the process is more or less the same, except you'll usually get a PKG file instead of an EXE. Go to your downloads folder (either in Finder or through your web browser) and double-click the PKG file. Grant the VPN whatever permissions it needs. (Again, this is why it’s important to only use a legitimate vendor, such as the ones we recommend.)

Once installed, you can open the VPN client at any time by double-clicking the icon again. Some VPNs open as separate windows, while others will add icons to your toolbar. This often varies by platform; if you're concerned that your VPN doesn't look like a screenshot you've seen, check which operating system the image comes from.

How to use a VPN on mobile

On Android and iOS, you'll download your VPN app through the Google Play Store or Apple App Store, respectively. Even if you get started through a mobile browser, it will probably redirect you to the app store for the actual download and installation.

Follow the usual step for downloading an app: search for its name in the app store, click "Get" or "Install," then let your phone cook. As always, so long as it's a vetted VPN, grant it the permissions it needs. You may be able to download and install the VPN first, then create your account and submit payment through the app afterward.

One final note: several leading VPNs offer free trials for mobile users. If you see a button that says something like "get free trial," you may be able to use the VPN for several days without paying. Just be warned that if the trial lapses, you might get automatically signed up for a plan that's longer than you'd like.

How to use a VPN browser extension

VPNs offer browser extensions as lightweight versions of their main clients. While a desktop or mobile VPN reroutes everything that device sends to the internet, a browser extension only protects traffic through your web browser. You can use one as a primitive form of split tunneling, but they're mainly for basic convenience — most of what you do online goes through a browser, so it's nice to be able to protect your connection without opening a separate app.

NordVPN browser extension on Chrome
Sam Chapman for Engadget

To use a VPN browser extension, just create your account as normal, then download the extension from your VPN's website. You can manage it from your browser's extensions center. That's a jigsaw piece at the top-right corner on most browsers, including Chrome, Edge and Firefox.

How to use a VPN on a smart TV

You can use a VPN to change your location and stream international content directly to a smart TV. The catch is that not all smart TV brands support VPN apps. For those that don't, you'll have to find a workaround.

The good news is that a ton of the best smart TVs can natively host VPNs, including Google TV, Android TV, Amazon Fire TV and Apple TV (though only tvOS 17 and above). To use a VPN on Android TV or Apple TV, go through the device's app store. On Fire TV, simply type the name of your chosen VPN provider into the search bar.

On smart TVs that don't have native VPN, like LG, Roku and Samsung, you have a few options. You can use a smart DNS feature like ExpressVPN's MediaStreamer to reroute smart TV traffic without full VPN encryption; the steps for this are different for every VPN, so check the provider's website. You can also install a VPN on your router (see below) so your smart TV automatically uses the router's location.

Finally, you can get a temporary fix by using your computer as a Wi-Fi hotspot while it has a VPN active. Follow the steps for your operating system.

On Windows:

  1. In your system settings, go to "Network & Internet" and turn on the mobile hotspot.

  2. Go to "Network & Sharing Center" and click "Change adapter settings."

  3. Right-click the name of your VPN provider and go to "Properties," then "Sharing."

  4. Check the boxes next to "Allow other network users to connect through this computer's internet connection" and "Allow other network users to control or disable the shared internet connection."

  5. Click the "Home networking connection" dropdown and select "Microsoft Wi-Fi Direct Virtual Adapter."

  6. Open your VPN client and connect to a server in your desired location.

  7. On your smart TV, open the internet connections menu and select the name of your PC. Your TV is now online through the VPN server.

On Mac:

  1. Open system settings and go to the "General" tab. Scroll down and click "Sharing."

  2. Toggle "Internet Sharing" on, then click on "Configure."

  3. Click the "Share your connection from" dropdown, then choose the VPN installed on the Mac. Under "To computers using," select "Wi-Fi."

  4. Click on "Wi-Fi options" and enter a name and password for your hotspot network.

  5. On your smart TV, connect to the network you just created.

How to use a VPN on a game console

Right now, there's no such thing as a game console with native VPN support. If you want to use a VPN while gaming — and I recommend that for safety if you're planning to play online — you can use two of the same methods that work for a smart TV: install a VPN on your router, or get your console online through a Mac or PC hotspot.

How to install a VPN on a router

When you install a router VPN, anything that gets online through your home network will be protected, including game consoles, TVs and smart devices that don't support VPNs natively. It's not a process for the faint of heart, though. You'll need to get a new router and potentially install VPN firmware on it yourself. If you want to go this route, the easiest option is to get an ExpressVPN Aircove router — not only does it come with all the settings done for you, but it can be managed through the same clean interface as ExpressVPN's other apps.

We don't have space here to go through the entire process, but here's a general overview. First, get a router with firmware that supports VPN configurations — most ISP default routers don't, so you'll have to go third-party.

Next, go to the downloads center of your VPN's website and look for the section with VPN configurations. A "configuration" is a complete set of the information needed to access a certain VPN server through a certain protocol — say, a Proton VPN server in Arizona through OpenVPN. Download a configuration file for the protocol and location you want all your home devices to connect through.

Finally, open your router control panel by entering your router's IP address into a web browser address bar, then log in with your router credentials (these should be marked on the router itself unless you've changed them). Go to the VPN tab — which should be there if it's a router with VPN firmware — and upload the profile you downloaded from the VPN website. Use the same router control panel to activate and deactivate the router VPN connection.

This article originally appeared on Engadget at https://www.engadget.com/cybersecurity/vpn/how-to-use-a-vpn-140000564.html?src=rss

The best winter tech for 2026 to help get you through the coldest months

The festive lights, time off and cute scarfs can only conceal the truth for so long: Winter can be pretty bleak. I don't mean to be a downer, but it's cold all of the time, dark most of the time and this lasts far beyond the most wonderful time of the year. Here at Engadget, we've tried so many tools and products to make winter more bearable from therapy lamps to heaters. We've invested in tea sets, wrapped ourselves in heated blankets and learned to grow herbs indoors — really, anything that will make these three-plus months more bearable, we've tried.

Here, you'll find some of the best winter tech getting us at Engadget through the coldest months, plus a number of recommendations from our other gift guides that will get anyone through the winter warm, comfortable and content.

This article originally appeared on Engadget at https://www.engadget.com/home/smart-home/the-best-winter-tech-for-2026-to-help-get-you-through-the-coldest-months-130009890.html?src=rss

Ralph AI Coding Plugin : Helps Claude Finish Any Task Effeciently

Ralph AI Coding Plugin : Helps Claude Finish Any Task Effeciently

What if the key to unlocking unparalleled efficiency in your development workflow was hiding in plain sight? Better Stack outlines how a seemingly quirky plugin, born from a bash loop and named after a lovable cartoon character, has quietly transformed into a innovative feature for developers. This isn’t just another coding gimmick, Anthropic’s Ralph plugin […]

The post Ralph AI Coding Plugin : Helps Claude Finish Any Task Effeciently appeared first on Geeky Gadgets.

Posted in Uncategorized

Follow the Lego CES 2026 press conference live right here

picture alliance via Getty Images

The Lego Group is set to host its very first press conference at CES 2026 later today — but exactly what it plans to unveil is still under wraps. The iconic toy brick maker has offered no clues about what's on the agenda, leaving speculation wide open, from new video games to Formula 1 race cars.

Unlike nearly every other press event at CES today, however, Lego's event is not being livestreamed. Thankfully, Engadget is here to bridge the gap: Our own Nate Ingraham will be in the room at the Mandalay Bay in Las Vegas, liveblogging the event in real-time. 

The Lego CES press conference is scheduled for Monday, January 5 at 1PM ET (10AM PT). We have confirmed with Lego reps that this event will not be officially livestreamed, so we're sharing our real-time impressions right here. Our stream starts at noon ET, an hour before the official event.

Thus far, Lego hasn't shared any public info about its CES plans, so we're largely in the dark as to what to expect. At CES 2025, for instance, the toy production giant partnered with Sony to announce the animated Lego Horizon Adventures online game. As such, Lego may spend some time talking up its new 2026 game, Lego Batman: Legacy of the Dark Knight. The company may also give some stage time to its Lego Group F1 Academy racing car, though that too would be more about brand building than consumer products.

And given Lego's focus on the environment, the company may discuss its efforts to reach its 2032 ecological goals, including making its Lego bricks more sustainable and reducing carbon emissions by 37%.

While there are plenty of new Lego sets for 2026, however, this is CES, not Toy Fair. So we're assuming that the company will be showcasing something that's more tech-centric. Stay tuned.

This article originally appeared on Engadget at https://www.engadget.com/gaming/follow-the-lego-ces-2026-press-conference-live-right-here-130005940.html?src=rss