Compact MagSafe Flashlight is perfect for everything from iPhone photography to outdoor adventures

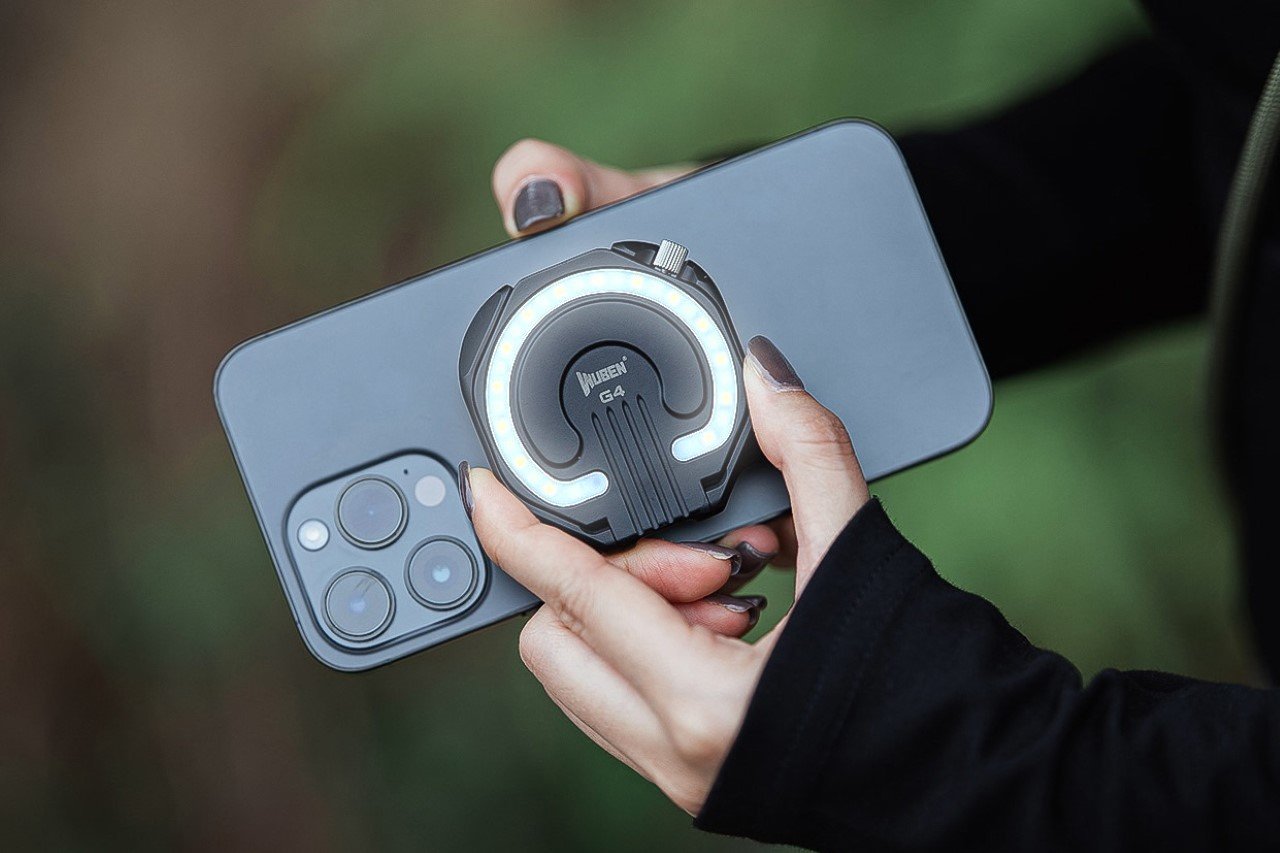
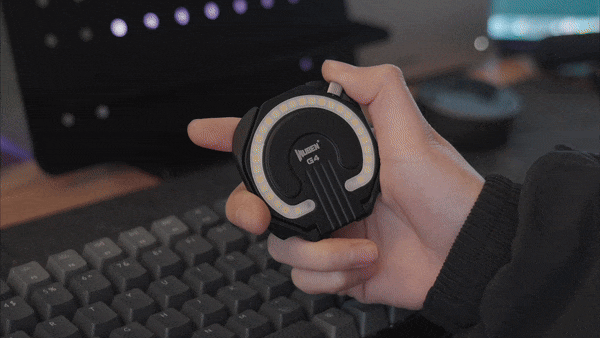
With a stunning 300 lumens of brightness, the WUBEN E1 is 6 times more powerful than your smartphone flashlight, making it perfect for selfies, vlogging, outdoor trips, emergencies, and even reading. The best part, it snaps right onto the back of your phone, giving you a compact ring-light on demand, so you don’t have to use your phone’s crummy excuse for a flashlight. And when you’re not using the light, you can use it as a stand to prop your phone up at any angle.

The WUBEN E1 is proof that MagSafe was an incredible idea. While Apple merely designed the feature to support chargers and attach wallets, MagSafe has spawned a whole host of third-party accessories, from finger grips to tripods, power banks, EDC, and now the E1 flashlight. A perfect example of an accessory that nobody knows they want but everyone definitely needs, the WUBEN E1 straps a powerful lighting device to the back of your phone. Much more effective than your smartphone’s native flashlight, the WUBEN E1 sports a ring of 28 LEDs that create a bright ring light that’s perfect for selfies or for exploring the outdoors. The light sits on a hinge that serves as a stand for your phone, while also letting you face the light forwards or backward, giving you the option of even using it for selfies. Plus, multiple brightness levels and three color temperature settings (warm, neutral, cool) give you way more freedom than your smartphone flashlight could even dream of.

Designer: WUBEN

Click Here to Buy Now: $39 $49 (20% off) Hurry, limited units at discounted price. Raised over $133,000.

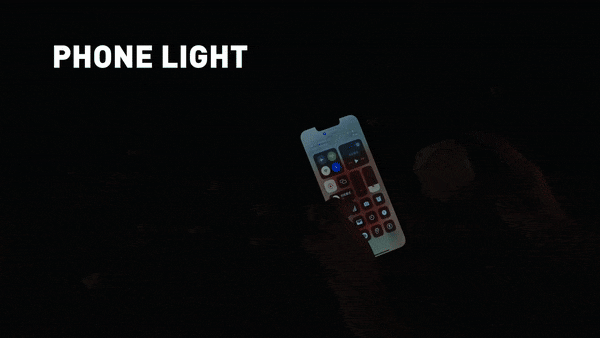
For context, the iPhone 15’s flashlight maxes out at 50 lumens – ask any photographer and they’ll tell you that is far too little for effective flash photography. The WUBEN E1, however, overshoots the smartphone flashlight’s brightness by about 6x, giving you a light that’s much more effective in a variety of scenarios, whether it’s finding your keys in the dark or taking beautiful low-light selfies.

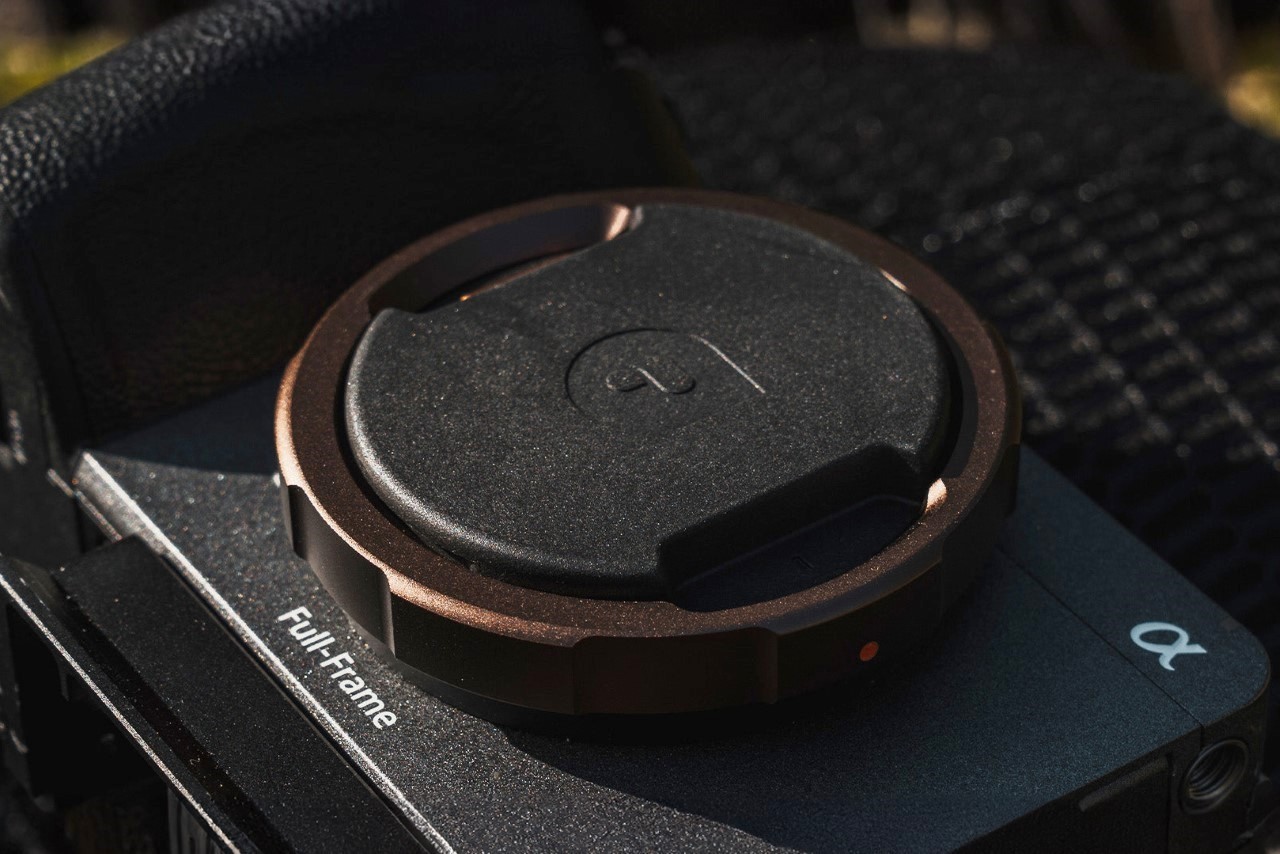
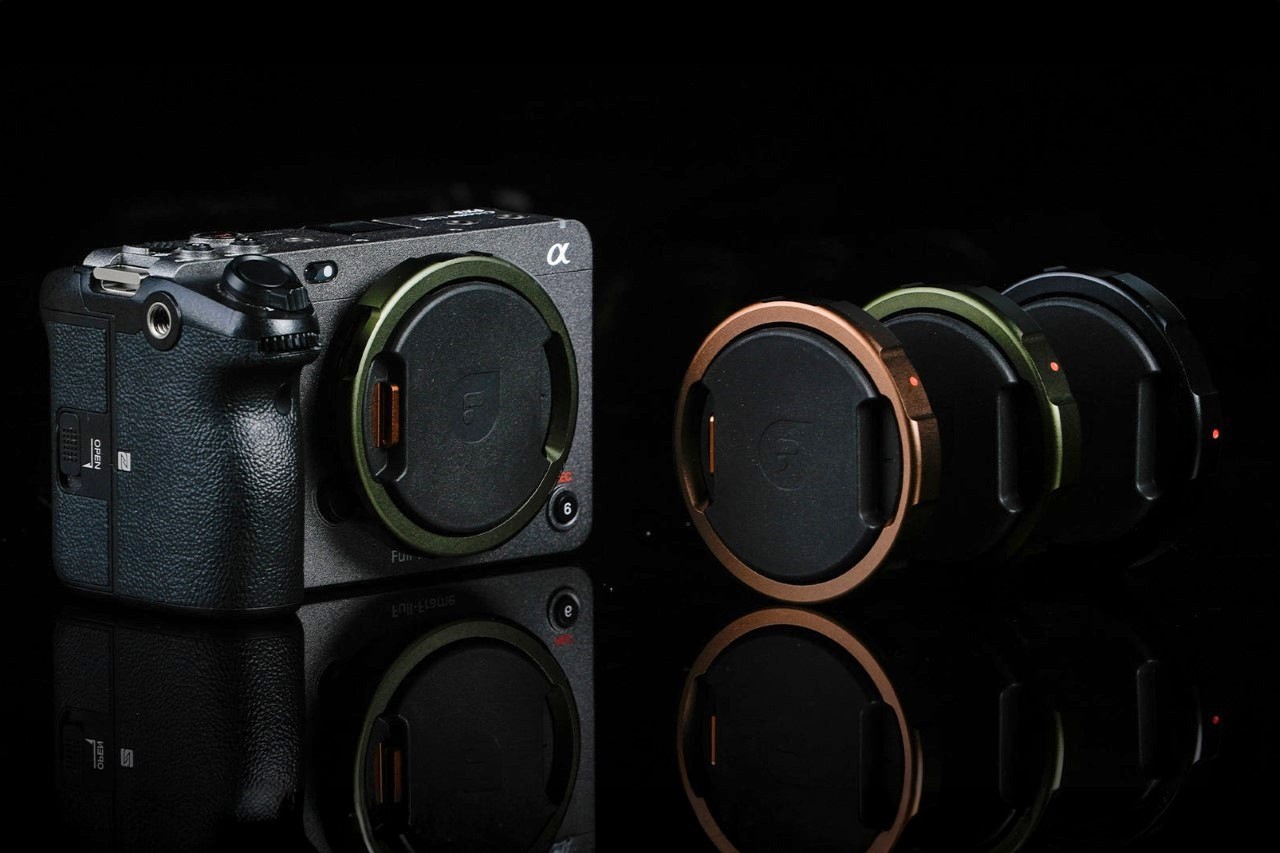
Slightly smaller than a hockey puck, the WUBEN E1 packs a series of 28 LEDs in its compact design, and can be used either independently or while securely snapped to the back of your MagSafe-compatible smartphone. On its own, the WUBEN E1 is a pretty handy little flashlight that can be held in your hand, attached to the hood of your car (or any metal surface), or even propped up on any flat-ish plane for instant lighting. Snap it onto the back of your smartphone, however, and you’ve got yourself a powerful tool for selfies, vlogging, or even outdoor adventures.

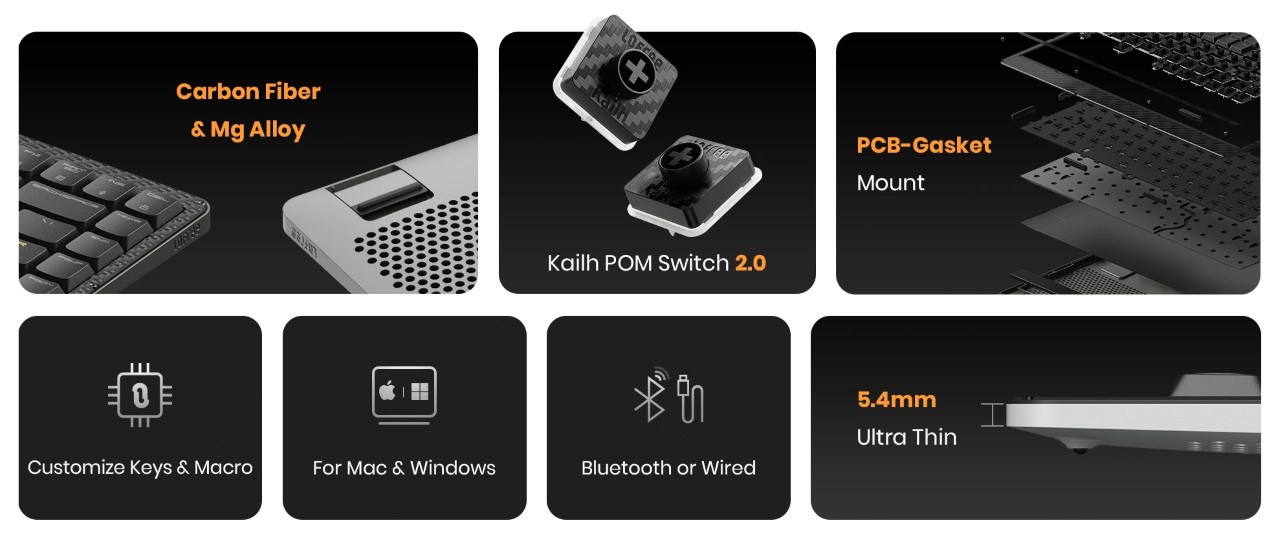
The WUBEN E1 operates entirely thanks to a crown located on the rim beside the LEDs. Similar to the ones found on a watch, the crown can be pushed to activate the light or cycle through temperature settings, and can be rotated to adjust the brightness. Keeping things gloriously simple, the E1 doesn’t come with an app or any settings that would complicate its use. It’s simply a great, intuitive, sleek EDC light that just so happens to attach to the back of your phone.

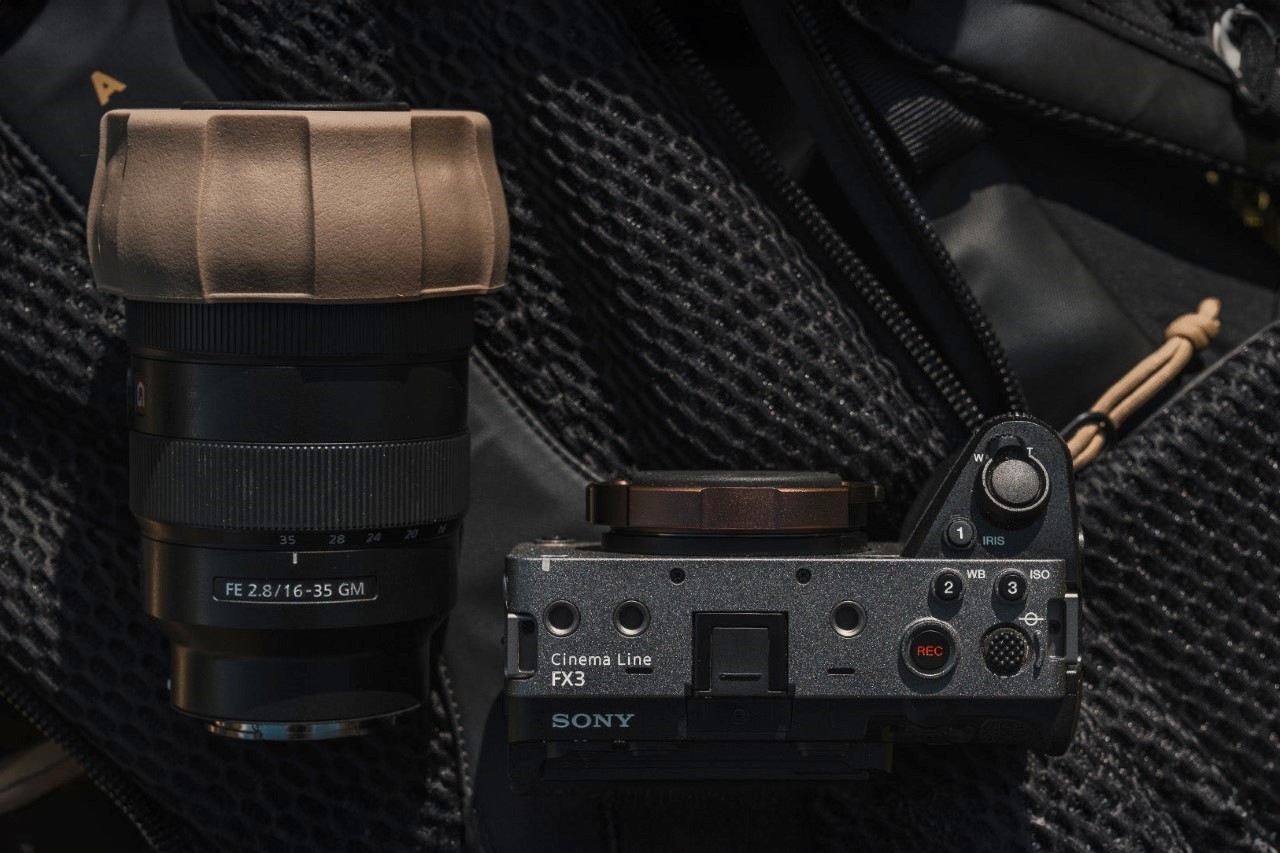
Attaching the WUBEN E1 to your phone gives you two distinct benefits. The light’s hinged arm lets you use the E1 as a stand for your phone, propping it up in pretty much any angle you choose. The second, more obvious benefit, is the fact that it replaces your phone’s flashlight with something far more versatile and powerful. The LED ring is 6x more powerful than your phone’s native flashlight, and the hinged arm lets you face the lights anywhere, creating a great makeshift camera light that’s just wonderful for low-light shots, vlogs, or even vanity selfies. Weirdly enough, the LED ring also makes your iPhone look somewhat like a Nothing Phone (1), which feels ironic and slightly hilarious. iPhone users get the last laugh, however, because the E1 is so much more capable than the Nothing Phone’s notification LEDs.

Each E1 comes made from lightweight Magnesium alloy, giving the EDC flashlight a weight of just 36 grams or 1.26 ounces. At just 6mm thin, the WUBEN E1 fits comfortably onto the back of your phone without really jutting out or obstructing regular phone usage. It’s also slim enough to slide directly into your pocket with or without your phone, reinforcing its portability. A 320mAh battery gives the flashlight anywhere between 30 minutes of usage (on its brightest setting) or 50 hours of on-time (on its lowest setting), while a USB-C port on the base of the light lets you charge your device.

The WUBEN E1 starts at $39, and for $69 you’ll get the E1 along with a metal tripod stand/selfie stick that sits between the flashlight and your phone, turning your cutting-edge phone into a comprehensive photo and videography device. The Wuben E1 ships globally starting July 2024.

Click Here to Buy Now: $39 $49 (20% off) Hurry, limited units at discounted price. Raised over $133,000.

The post Compact MagSafe Flashlight is perfect for everything from iPhone photography to outdoor adventures first appeared on Yanko Design.

This Camera Lens Cover comes with a secret compartment for SD cards or an AirTag

Your DSLR may not have Apple FindMy, but the folks at Polar Pro have a clever alternative. Meet the Defender, a camera body cap that fits directly over the lens rim, protecting the sensor inside from damage or exposure to outer elements. Designed to fit on a wide range of models, the Defender isn’t just a protective cover, it comes with a hollow design that lets you stow away essentials including SD cards or even an Apple AirTag. Pop the Defender onto your camera and now not only do you have memory cards available to you at the tip of your fingers, you’ve also got a camera that you can track on your iPhone or any other Apple device. Smart, eh?!

Designer: Polar Pro

The Defender Body Cap comes with a 6061 aluminum outer body, eschewing the plastic construction found on most default camera body caps. The aluminum offers stronger protection, defending your camera from bumps, scratches, and offering much higher protection than flimsy plastic.

The Defender’s secret sauce, however, lies in its inserts that fit into the body cap, allowing you to store items inside the cap’s spacious form factor. Polar Pro offers 3 inserts to choose from – one that holds an AirTag, another that holds 1 SD and 2 MicroSD cards, and a third that holds a CFexpress A card. The caveat, however, is that you can only use 1 insert at a time, which means you can’t simultaneously store an AirTag with an SD card (which feels like a bit of a lost opportunity to be honest), but I’d probably pick an AirTag any day, given that SD cards can easily fit in a wallet.

This nifty feature means your camera’s body cap now has a secondary purpose – hidden storage. The cap fits on Sony, Nikon, and Canon cameras, allowing you to pretty much attach the Defender onto DSLRs, SLRs, Mirrorless cameras, or even full-frame video cameras. Pop an AirTag in and your camera can easily be tracked on your FindMy app, so that if it ever gets misplaced or stolen, you’ll know exactly where it is. Chances are nobody will know the body cap has an AirTag concealed inside it, and anyone who values cameras will know better than to throw the body cap away.

The Polar Pro Defender comes in 3 colors – Black, Desert, and Forest, and ships with all 3 inserts, allowing you to choose what to tuck away in your body cap.

The post This Camera Lens Cover comes with a secret compartment for SD cards or an AirTag first appeared on Yanko Design.

Build your own NAS Cloud Drive using a Raspberry Pi 4 and a 3D Printer

Why pay for iCloud when you’ve got your own personal iCloud at home?!

Subscriptions will be the death of our civilization. Imagine not being able to ‘own’ something because a company only allows you to rent it. You don’t own the movies you pay for on Netflix, you don’t own the music you pay for on Spotify, and you can’t own storage on the cloud because even though you’re buying 500GB worth of space, you’re merely renting the space on a cloud server somewhere. This strange arrangement has led to the rise of personal NAS (Network-Attached Storage) devices, with people choosing to simply BUILD their own cloud storage devices instead of paying Apple, Google, or Microsoft for them. The advantages of a NAS are many – you don’t need to pay monthly fees, your cloud-drive is private to you so you don’t have to worry about Google or Apple getting hacked and your data getting leaked, but most importantly, you can store and access files on your NAS from anywhere. Use it to take phone or laptop backups, to store/watch videos, or even build your own music/movie streaming library as the ultimate cord-cutting move!

Designer: Frank Bernhardt

If you’re looking to buy a NAS, there are quite a few out there, but if you want to try building your own, DIY-maker Frank Bernhardt managed to put together one using a Raspberry Pi 4 module, a few extra components, and a 3D-printed enclosure. His entire process is up on Instructables for anyone to see and make, although you’ll definitely require some technical knowledge to get the software up and running.

Bernhardt’s NAS runs on a Pi4 module, connected to an SSD. The entire enclosure’s printed out of plastic, with metal inserts to screw the NAS together. Instead of simple status LEDs, Bernhardt even put a functional screen on the front that displays messages and the time of day when sitting idle.

One of the primary considerations in this project is the design of the enclosure. The enclosure needed to meet several specifications: it should allow access to the power and network connectors from the rear while keeping the USB connectors inside for a clean aesthetic. The use of melt-in brass threaded inserts ensured durability, and the compact size made it printable on a standard 200 x 200 mm 3D printer bed. The design avoids the common 90-degree offset for connectors typical in Raspberry Pi cases, streamlining cable management. Moreover, the enclosure does not require active cooling, reducing noise and making it suitable for SSDs.

Here are the materials and components used in the entire build:
Devices for computing and storage

  • Raspberry Pi 4 or 5 with power supply, 2GB RAM is sufficient
  • 32 GB micro SD card, SanDisk Extreme PRO recommended
  • One or two 2.5″ SATA hard disk drives, SSD recommended
  • One or two USB 3.0 to SATA adapter(s), Sabrent adapter(s) recommended

Software

  • Raspberry Pi Operating System Image (Pi OS Lite, 64-bit no desktop)
  • NAS Software for Raspberry Pi OS, openmediavault recommended

Component parts

  • 10 x M3 brass threaded inserts
  • 10 x M3x5 screws (4 more for the second hard disk drive)
  • 4 x M2.5 brass threaded inserts
  • 4 x M2,5×6 screws
  • 4 x M3x6 countersunk head screws
  • 1 x Keystone module RJ45 Cat 6
  • 1 x RJ45 Cat 6 patch cable (length or color doesn’t matter)
  • 1 x USB type C male connector plug to solder
  • 1 x USB type C female connector jack 2 pin with wire
  • 1 x SH1106 1.3″ OLED module I2C 128X64 4 pin
  • 1 x 4-pin cable with Dupont female connectors, either self-made or ready-made
  • Some PLA filament for your printer with the colors you prefer.

Printing the enclosure involved creating four main parts: the tray, device rack, side lid, and an optional stand. The tray required support structures for the connector openings and display window, which can be generated using slicing software. The rack holds the Raspberry Pi and hard drives, ensuring that the components are securely mounted. The assembly of the rack with the Raspberry Pi and hard drives necessitated precision, particularly when melting the brass threaded inserts using a soldering iron.

The next phase involved setting up the Raspberry Pi OS and configuring the network. Using the Raspberry Pi Imager, Bernhardt installed Raspberry Pi OS Lite (64-bit) onto a micro SD card. Essential settings such as hostname, username, password, and SSH enablement were configured during this process. Assigning a static IP address to the NAS ensured consistent network access, either through the Raspberry Pi OS, openmediavault, or a DHCP server, with a provision for regular patches and security updates

After the software setup, attention shifted back to hardware. The USB-C power connection and OLED display installation were critical steps. The USB-C socket was soldered inside the enclosure due to space constraints. The OLED display, used for status updates, was delicate and had to be installed without bending. Properly connecting the display to the GPIO pins of the Raspberry Pi was essential, ensuring to match the pin configurations correctly.

For the network connection, a keystone module simplified connectivity and future upgrades. By attaching a patch cable and keystone module inside the enclosure, the LAN port became easily accessible, accommodating both Raspberry Pi 4 and 5 models. This modular approach facilitates easy maintenance and upgrades, ensuring the longevity of the NAS setup.

Once the hardware assembly was complete, the OLED display software was installed. A Python script displays various system metrics on the OLED screen. The script runs at startup, continuously updating the display. Finally, the NAS software, openmediavault, was installed. This software provides a user-friendly web interface for managing the NAS, making it accessible and easy to configure. The installation was straightforward, and upon completion, the NAS was ready for use, with a commendable 500GB of storage.

Bernhardt’s Raspberry Pi NAS required a fair bit of technical expertise, but the process worked out MUCH cheaper than spending hundreds on a readymade NAS. If you’re looking for a nice summer project for yourself, you can build your own Raspberry Pi NAS too by following Bernhardt’s instructions here.

The post Build your own NAS Cloud Drive using a Raspberry Pi 4 and a 3D Printer first appeared on Yanko Design.

What if AirPods had ChatGPT, could translate languages, and came with a touchscreen case?

Meet the Wooask TransBuds A8 – a pair of TWS earbuds that are so unique you’ll want to ditch your AirPods for them. Built with ChatGPT integration in the earbuds themselves, these wearables put the power of AI in your ear, actively translating 147 languages and accents in real-time, without an app. What’s better, if you do need to navigate through the TransBuds A8’s functionalities, you don’t even need to look at your smartphone, the earbuds case comes with a nifty 2-inch screen for both online or offline translation, as well as the ability to simply chat with ChatGPT the way Iron Man chats with JARVIS. Oh, and you can listen to music too.

Designer: Wooask Technology

Click Here to Buy Now: $179 $299 (40% off). Hurry, only 63/200 left!

The A8 translation earbuds facilitate real-time bidirectional translation, allowing two people to wear one earbud each for instant simultaneous interpretation.

The TransBuds A8 has a familiar design, albeit with a few VERY clever upgrades. Sure, you’ve got the white case with a flip-top lid that reveals two white earbuds… but on both hardware and software fronts, the TransBuds A8 are much more advanced than any regular TWS earbuds you’ll find on the market. For starters, the entire wearable has ChatGPT integration, giving you a voice assistant that is far more advanced than Google, Siri, or Alexa. You can simply tap the earphones to talk to ChatGPT, or access the AI through the unique interface built into the case. The case with a touchscreen is a welcome feature too – it eliminates the need for an app, and gives you a perfect standalone device that works without draining your phone’s battery or piggy-backing off your phone’s cellular network.

By leveraging ChatGPT’s vast knowledge base and natural language processing capabilities, users can enjoy more than just translation assistance.

The presence of AI isn’t just a bandwagon feature, it helps aid the TransBuds A8’s core value proposition – the ability to actively translate 77 languages and 70 accents in real-time, giving you the ability to pretty much travel anywhere in the world without a language barrier. The interaction is swift and seamless, either share an earbud with someone and have bi-directional conversations in two separate languages, and the earbuds will actively translate both of them simultaneously, or use the earbuds and case together to have a conversation with a local. The earbud-sharing method is perfect for in-person meetings and other long conversations. Each person wears one earbud like a Bluetooth earpiece of sorts, and the TransBuds A8 listens to what the opposite person is saying, and translates it for you right in your ear. A transcript of your entire conversation gets captured as a text thread on the TransBuds A8’s screen, and can be saved for later, allowing you to quickly and easily transcribe an entire meeting using the power of AI.

Alternatively, the case itself comes with a microphone and powerful speakers, allowing you to use just the case as a translator device. Hold it up and speak into it, and the TransBuds A8 lets you have a conversation with a local or a stranger without needing to share an earpiece. A powerful mic and speaker system allow you to easily converse with people even around ambient noise, while the display on the case does a good job of allowing people to read the translated text if they can’t hear the translated audio.

The case, frankly, is more of a smartphone that houses earbuds than just your average charging case. It runs on a Qualcomm Quad-Core Processor and earbuds use a Qualcomm 3040 chipset that allows it to translate 147 languages and accents with a latency of 0.5 seconds and an impressive 98% accuracy. The 2-inch screen has an app drawer that lets you access the TransBuds A8’s different features, even letting you tap into the offline translation feature that works with 16 popular languages. Buttons on the side of the case let you increase or decrease the case’s volume, or even go back to the home screen while navigating the interface.

The earbuds are remarkable too, with an ergonomic design, and a dual-mic setup that powers the ENC (Environment Noise Cancelation) feature to help you speak and hear clearly even if you’re in a noisy environment. The earbuds have a translation time of 5 hours, and a regular battery life of 35 hours along with the case that doubles as a charging dock for the buds. 16 gigabytes of in-built memory means you can even load your favorite MP3 files right onto the case, turning it into a makeshift iPod Touch that plays music directly without a streaming app or pairing with your phone. You can, however, pair the earbuds with your phone to listen to music, watch movies, or take calls too.

Quite the all-round device, the TransBuds A8 are for any and everyone. They work independently without your phone, translating over a hundred languages, transcribing conversations, and giving you the power of ChatGPT right in your ears. They also work as your standard TWS buds when you’re looking for something traditional, pairing with your phone via Bluetooth for answering calls, watching TikTok, or listening to music and podcasts. The buds are ideal for avid travelers, students, digital nomads, expats, and people working in multicultural companies and teams. The TransBuds A8 starts at a discounted $179 (an absolute steal considering the features it packs), which also includes one year of free ChatGPT integration. Subsequently, you’ll either be required to pay $9.9 per month or $40 annually for the AI features – online and offline translation remains free forever.

Click Here to Buy Now: $179 $299 (40% off). Hurry, only 63/200 left!

The post What if AirPods had ChatGPT, could translate languages, and came with a touchscreen case? first appeared on Yanko Design.

Record-breaking Drone hit 510km/h speeds, dethroning Red Bull for the World’s Fastest Drone

Earlier this year, Dutch Drone Gods, in partnership with Red Bull, unveiled the World’s Fastest Drone that went head-to-head with Max Verstappen behind the wheel of an F1 car. With a top speed of 350km/h, that drone held the title for barely a few months before YouTuber Luke Maximo Bell decided to challenge it.

Taking on the entire design and R&D team of Red Bull Racing, Bell managed to 3D-print a drone that was nearly 50% faster, hitting high speeds of 500km/h (310mph) and setting a new record, verified by the team at Guinness Book of World Records. The video above captures Bell’s entire journey, from prototype to building to tuning, and finally FPV footage of the world’s fastest drone. To think that one YouTuber with a BambuLabs printer managed to outpace a drone built out of carbon fiber by the elites at Red Bull Racing known for manufacturing the world’s leading F1 cars…

Designer: Luke Maximo Bell

Bell’s design process was a reiteration of one of his older drones named Peregreen, which could hit speeds of up to 400km/h. If you look at the shape of the drone you’ll quickly realise how even Red Bull and DDG opted for a similar format. The drone isn’t your average quadcopter or even FPV racer. Instead, it has a missile-style design with propellers at the bottom that give it an eVTOL style ability to vertically take off, tilt forward to race ahead, and then land vertically too.

The backbone of Peregreen 2’s success lies in its meticulous design and the use of high-quality materials. The frame, constructed from carbon fiber, was chosen for its exceptional strength and wide availability. Custom frames were precision-cut using a CNC machine at Flying Robot in Cape Town. Despite initial setbacks with incorrect mounting hole dimensions, which required manual adjustments, the final product was a high-precision, robust frame capable of withstanding the rigors of high-speed flight. Building on data from the original Peregreen, Bell and his father (who helped build the original Peregreen) selected larger motors, propellers, and batteries. However, this brought a new set of challenges. The initial batteries overheated, reaching temperatures above 130°C, leading to failures. Additionally, the motor wires were not thick enough, causing them to overheat and even catch fire during bench tests. After extensive testing and adjustments, the team switched to thicker wires and sourced new batteries that maintained a stable temperature below 80°C. These changes were crucial in ensuring the drone could operate at high speeds without the risk of overheating or component failure.

A cheap reliable way to test aerodynamics, simply hold it outside a car’s window!

Aerodynamics played a pivotal role in the drone’s performance. Initial designs faced stability issues at high speeds, necessitating extensive experimentation with tail lengths and fin sizes. The goal was to achieve a stable flight profile with a low drag coefficient. By creating and testing various models (often by simply 3D printing them and holding them out of a car window at high speeds), the team eventually found a configuration that provided the necessary stability. This iterative process of refinement led to a design that not only looked sleek but also performed exceptionally well in high-speed conditions. The final aerodynamic model was a testament to the team’s dedication to optimizing every aspect of the drone’s performance.

Once a drone’s built, its performance needs to be tuned by programming all its components to work in sync so that there isn’t a malfunction in the sky. Despite several initial failures during test flights, the team sought the expertise of Chris Raser, a renowned FPV drone specialist. His insights and detailed tuning guides were instrumental in resolving stability issues and fine-tuning the drone’s flight characteristics. This collaborative approach underscored the importance of seeking specialized knowledge and continuously learning from each phase of the project. The resulting improvements were significant, allowing the drone to perform high-speed maneuvers with precision and reliability.

The testing phase was rigorous and demanding, marked by numerous iterations and rebuilds. The drone was 3D printed using the Bambu Lab X1 Carbon printer, which proved to be an excellent tool for creating precise and durable components. Through a series of high-speed runs, the Peregreen 2 eventually achieved speeds of 500 km/h, a milestone that underscored the success of the design and engineering efforts. This achievement was officially recognized by Guinness, solidifying the team’s place in the record books.

Beyond setting a world record, the Peregreen 2 project also focused on capturing stunning cinematic footage. By incorporating a new open canopy for the camera (shown below), the team was able to obtain clear, distortion-free shots. The Insta360 Go 3 camera, known for its small size and lightweight, was integral in capturing high-speed footage. The drone’s performance in endurance tests was equally impressive, managing a flight of 7.5 km at an average speed of 180 km/h. These accomplishments highlight the drone’s versatility and potential for various applications.

The post Record-breaking Drone hit 510km/h speeds, dethroning Red Bull for the World’s Fastest Drone first appeared on Yanko Design.

Want Perfect Sourdough Bread every single time? This Kitchen Tool gives you foolproof results

The beauty of baking your own bread lies in its simplicity, and the fact that the yeast and bacteria does most of the job for you. You don’t need fancy equipment or ingredients, just a big container to proof your bread, and an oven to bake a perfectly rustic loaf of sourdough that you can then top up with avocado or ricotta and honey. However, what most bakers don’t tell you is that your loaf of bread is actually a living being. The yeast, whether natural or the instant kind you buy at the market, is a living creature that transforms your ball of dough into a fluffy, airy, mildly tart slice of bread that tastes so good with anything you put on top. This yeast needs just 3 things to perform this transformation – flour, water (hydration), and the right temperature. Most home bakers ignore that last metric, and if you’ve made a loaf of bread that just lacked that oomph or the right texture, chances are you followed your recipe correctly, but missed out on ensuring the yeast could grow under the right temperature. The DoughBed, however, takes care of that part of the breadmaking journey for you. Designed to be a perfectly optimal proofing tray for your dough, the Doughbed is a wide glass tray with a cork lid and a heating bed that creates exactly the right temperature for your loaf. Keep your dough to proof in the DoughBed and you’ll be consistently rewarded with the perfect proofing every time, whether it’s for sourdough loaves, pizzas, baguettes, focaccias, brioche buns, or any other kind of leavened bread you desire to bake!

Designers: Sourhouse (Erik Fabian & Jennifer Yoko Olson)

Click Here to Buy Now: $175 $225 ($50 off). Hurry, deal ends in 72-hours! Raised over $220,000.

Designed by home-baker Erik Fabian and industrial designer Jennifer Yoko Olson, the DoughBed is basically an incubation chamber for bread microbes that creates the perfect thermal conditions for yeast (and sourdough bacteria) to feed and grow. “The problem is not your dough, it’s your kitchen. Kitchen temperatures are often too cold for bread dough, and more importantly, always changing,” say the duo behind the DoughBed. The yeast in your dough thrives at temperatures of 75-82°F (24-28°C), but that might just be a tad too warm for humans, who set their thermostats or air conditioners to slightly lower temperatures. This mild temperature difference (of a mere 4-5°F) can be the difference between a perfect loaf, and a loaf that just doesn’t have the right open crumb. The solution? A mini habitat for your doughball, allowing it to do its job flawlessly well, every single time.

Mat + Bowl + Lid = The Perfect Proofing Solution

DoughBed combines a warming mat, a glass dough bowl, and a cork lid to create an efficient warming solution. The dough bowl has a wide bottom so your dough is gently and evenly warmed to 75-82°F (24-28°C) by the mat below.

Each DoughBed is made of 3 parts – an oval-shaped glass bowl, a cork lid, and a warming base that gives your bread microbes the ideal temperature to do its job. The wide oval tray is big enough to hold 3 loaves worth of dough at one time, and is perfectly shaped and sized for mixing your dough in, resting and proofing, and pouring your dough out for shaping before baking. As a bonus, it’s even designed to be oven safe, although baking a loaf that big would be overkill!

The warming mat is made with cork to prevent heat loss into your cold counter.

Once your dough’s ready for proofing, simply cover the glass tray with the DoughBed’s cork lid and place the tray and lid on the DoughBed’s electric base, which heats up to just the right temperature for your bread microbes to thrive. The bowl’s wide base helps the bread dough heat evenly and quickly, and the DoughBed’s single temperature target works with remarkable consistency all throughout the year, giving you perfect loaves even in autumn or winter months.

Oval = the Best Shape for Dough Handling

The DoughBed is perfect for home bakers looking to upgrade their bread game. The oblong oval shape of the glass bowl is ideal for mixing, kneading, and folding with both your hands, and the cork lid and base don’t just give the DoughBed its rustic aesthetic, they’re key to helping your dough maintain its temperature efficiently, and the cork base prevents heat-loss into your kitchen counter.

The DoughBed’s base operates with just 10W of power (that’s 75% less than an oven light), relying on a USB cable that can be wound up and tucked into the underside of the base when not in use. The cork lid comes with a removable, food-safe polypropylene liner, and both the glass bowl and polypropylene liner are dishwasher safe. We’d recommend not washing the cork to ensure it lasts longer. The DoughBed starts at a discounted $175 for backers – that’s a lot cheaper than the Le Creuset you’d mix and proof your sourdough loaf in.

Click Here to Buy Now: $175 $225 ($50 off). Hurry, deal ends in 72-hours! Raised over $220,000.

The post Want Perfect Sourdough Bread every single time? This Kitchen Tool gives you foolproof results first appeared on Yanko Design.

Nothing just beat Apple by bringing ChatGPT to all its TWS earbuds… even the older models

London-based tech company Nothing is making waves in the tech world by expanding its integration of ChatGPT, a powerful AI language model, to a wider range of its audio devices. This move comes just a month after the feature debuted on the company’s latest earbuds, the Ear and Ear (a), and their smartphone lineup… and coincidentally, just hours before Google’s I/O event, where the company’s expected to announce an entire slew of AI features and upgrades.

The earlier-than-expected rollout signifies Nothing’s commitment to bringing advanced AI features to everyday tech. This integration isn’t limited to Nothing-branded devices; it extends to their sub-brand CMF as well. Users with older Nothing and CMF earbud models, including the Ear (1), Ear (stick), Ear (2), CMF Neckband Pro, and CMF Buds Pro, will be able to leverage the capabilities of ChatGPT starting May 21st with a simple update to the Nothing X app. It also cleverly pre-empts Apple, which is allegedly working with OpenAI to bring ChatGPT to future models of the iPhone.

Read the Nothing Ear (a) Review here

There’s a caveat, however. To enjoy the benefits of ChatGPT through your Nothing or CMF earbuds, you’ll need to be using them with a Nothing smartphone running Nothing OS 2.5.5 or later. The good news is that activating ChatGPT is a breeze. Once you’ve updated the Nothing X app, you can enable a new gesture feature that allows you to initiate conversations with the AI assistant by simply pinching the stem of your earbuds.

This development signifies a growing trend in the tech industry: embedding AI assistants directly into consumer devices. By offering voice control through earbuds, Nothing is making it easier for users to perform everyday tasks hands-free, like checking the weather or controlling music playback. Imagine asking your earbuds for directions while jogging or requesting a quick weather update during your commute – all without reaching for your phone.

The move comes at a perfect time, right between OpenAI’s GPT-4o announcement, and Google’s I/O event, which will include multiple AI improvements including integration of Gemini AI into a vast variety of Google products as well as with the Pixel hardware lineup.

The post Nothing just beat Apple by bringing ChatGPT to all its TWS earbuds… even the older models first appeared on Yanko Design.

Cutting-edge Pet Water Fountain has a 10-liter reservoir and a multi-stage filtration system

Would you drink water out of a glass that’s been sitting on the table for 5-6 hours? No, right? So why is it that your pet has to drink water from a bowl that’s been left standing for hours at an end? Quite like a drinking glass with stagnant water, traditional water bowls can become stagnant and harbor bacteria, requiring frequent cleaning and refills. The LALAHOME DailyFresh™ 
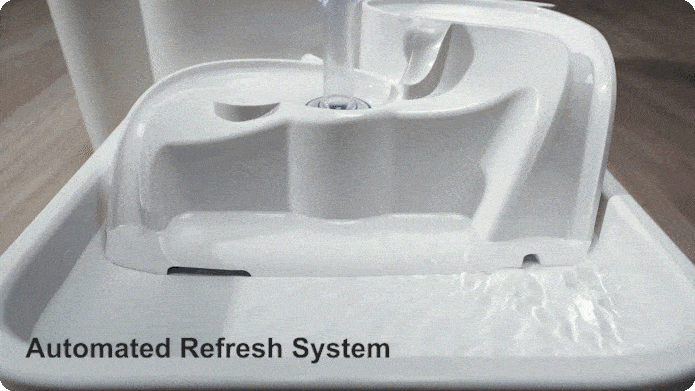
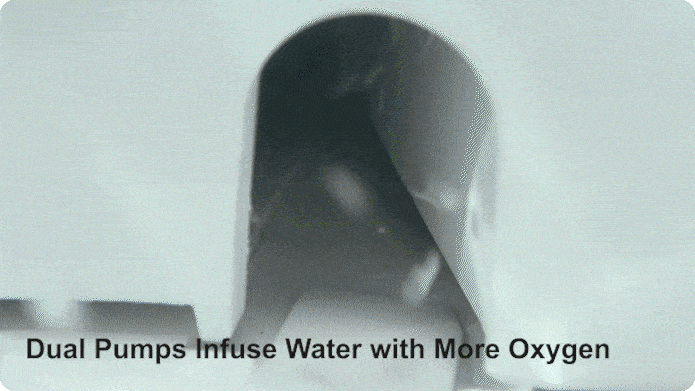
Eco-System pet fountain aims to revolutionize pet hydration by not only ensuring that your pets drink fresh water, but also ensuring they drink water that’s been appropriately filtered.

Designer: LALAHOME SMARTECH CO.,LTD

Click Here to Buy Now: $169 $299 (43% off). Hurry, only 18 left! Raised over $90,000.

DailyFresh™ and RealPura™ 5X Filtration Technology help deliver fresh and crystal-clear water, while the extra-large 10L tank and 6L waster water tank ensure fewer refills and disposals.

Sure, it’s easy to think of the LALAHOME DailyFresh as yet another pet water fountain, and there are many pet water fountains available out there… but on the inside, you’ve got a purification system so cutting-edge it could rival most regular purifiers found in homes for human consumption. Water is purified, oxygenated, sterilized, and waste/contaminated water is even discarded in a separate container that you can then use for watering/growing plants. The system is ruthlessly efficient, giving your pet the best water it can drink, and ensuring that every sip they have is as fresh as possible. Why? Because pet parents only want what’s best for their fur-babies, right?!

The overall design takes cues from Brutalist architecture of the 60s, combining those cues with the the minimal functionalism of contemporary design styles. Almost reminiscent of a self-sustaining society, the LALAHOME DailyFresh recycles, treats, and dispenses water efficiently. The twin cylinders look almost like skyscrapers, dual spouts look like meandering rivers, and waste water is diverted to grow cat grass (wheatgrass and other sprouted cereals) that help aid your pet’s gut biome and digestive system.

The pet fountain boasts a large 10-liter water reservoir, eliminating the need for daily refills. That’s up to two weeks of fresh water for your pet, providing peace of mind for busy pet owners with multiple jobs or those who travel frequently. The DailyFresh system goes a step further by incorporating automatic water renewal. This innovative technology automatically flushes, drains wastewater, and refills the fountain with fresh water, ensuring a consistent supply of clean water for your pet.

But fresh water is only half the story. The DailyFresh Eco-System Pet Fountain incorporates a rigorous 5-layer RealPura filtration system to remove impurities. This multi-stage filtration process tackles everything from pet hair to heavy metals, keeping the water fresh and healthy for your pet. An integrated UVC light provides an extra layer of protection by eliminating bacteria and other pathogens that can lurk in stagnant water. LALAHOME’s OxygenZ technology increases water flow, resulting in oxygen-rich water that tastes fresher and is more enticing to pets. This can be particularly beneficial for cats who may be more inclined to drink from a moving water source than a stagnant bowl.

All that tech delivers results that you can actually measure. The DailyFresh comes with a smartphone app to control the dispenser, check water levels, and even toggle different modes. Now, you’re probably wondering why your pet fountain needs its own dedicated app, but for the overly caring pet parent, the app gives control over the dispenser as well as allows you to track how much your pet drinks in the day. The app lets you know when the DailyFresh’s water levels are low, so you can replenish the removable water tanks, and the DailyFresh’s neat design and tight footprint let you easily place the pet fountain anywhere in you house, ensuring your furry friends get the best drinking water to stay hydrated and healthy, without depending on you to constantly replenish their water bowl!

Click Here to Buy Now: $169 $299 (43% off). Hurry, only 18 left! Raised over $90,000.

The post Cutting-edge Pet Water Fountain has a 10-liter reservoir and a multi-stage filtration system first appeared on Yanko Design.

This 10th Anniversary Apple Watch Concept comes with a camera, edge-to-edge screen, and TouchID

Apple is rumored to be planning something special for the 10-year anniversary of the Watch this September (quite like the iPhone got the iPhone X), although nobody really knows whether it’ll be a seismic leap like the iPhone X introducing the notch. Designer Luka Gehrer, however, designed what he believes to be the ideal evolutionary stage for the Watch’s 10-year anniversary. The Watch X comes with a few upgrades that make it even more unique than the Watch Ultra – Gehrer outfits it with an edge-to-edge screen, a hole-punch camera (which could easily function as a dynamic island), a blood pressure monitor built into the watch strap, and TouchID integrated into the crown. In doing so, Gehrer doesn’t just make the Watch better, he practically makes it a miniature iPhone… which is totally something Apple’s done before, turning the iPad into a miniature MacBook!

Designer: Lukas Gehrer (Wordsmatter.io)

For Gehrer, the watch is basically an extension of his phone, with added health benefits. You can answer audio calls on your watch, read messages on it, so why not accept FaceTime calls too? The Watch X sports an 8MP shooter on the front, thanks to a screen cutout (Apple would probably never do this), but as a compromise, Gehrer also pushes the screen to its limits, practically making a bezel-less display with edge-to-edge pixels. The result feels familiar but different, with a rather visible hole in the display that conveniently gets hidden by gradient watch interfaces that go dark as they approach the edges.

The camera serves as a crucial element for enabling FaceTime on the Watch X, but also allows you to occasionally click selfies or record videos or vlogs. I’d imagine the hole punch could easily serve as a dynamic island too, but dynamic islands on smartwatches may be a little too much too soon.

The Watch X (10th Gen) also gets a casing upgrade, with Gehrer opting for a squarish case design instead of the obvious curved case. Designed as a hat-tip to the iPhone 15, the case has flat edges, and a brushed metal finish reminiscent of the iPhone 15’s Titanium outer casing.

The presence of a camera also creates safety concerns, which is why the Watch X is the first to be outfitted with TouchID built right into its crown. Mimicking the TouchID found in the iPad Air’s power button, this adds a layer of security to the Watch X, ensuring that not everyone can access all of the watch’s core features.

In an unusual twist, the Watch X’s strap also gets is first sensor. The new Blood Pressure sensor on the strap sits on the front of your wrist under the palm, and comes based on a rumor from famed Apple leaker and analyst Mark Gurman of Bloomberg.

Apple’s iPad event ended with quite a flair last week, and Apple is gearing for WWDC soon. However, there’s a lot that’s planned for the September event. Quite a few Apple products need a refresh this year, although it’s pretty much set in stone that the September event will see newer versions of the iPhone, the Watch, and probably even the Watch Ultra. One can only speculate what the Watch 10th Gen will look like, but until then we’ve got this concept giving us dreams of being able to FaceTime on an Apple Watch without relying on the Wristcam strap from years ago!

The post This 10th Anniversary Apple Watch Concept comes with a camera, edge-to-edge screen, and TouchID first appeared on Yanko Design.

Lofree EDGE – The World’s Thinnest Mechanical Keyboard is just 16mm, less than two iPhones thick

You don’t associate mechanical keyboards with sleek portability… and you don’t associate portable compact keyboards with great tactile feedback or mechanical travel. Lofree’s somehow managed to blur both those worlds into a keyboard that offers the best typing experience while weighing just a pound and being 0.6 inches (16.5mm) thick at its thickest point. Crafted from a combination of magnesium and carbon fiber, the Lofree EDGE reinvents the wheel. It uses unique aerospace-grade materials for their strength-to-weight ratio, redesigned keycaps that are thin but still feel ergonomic, and redefined Kailh mechanical switches that provide a great tactile feel that gives you the mechanical feedback of a much thicker keyboard, but in a highly portable, sleek form.

Designer: Lofree

Click Here to Buy Now: $129 $249 (48% off) Hurry, only limited units at a discounted price. Raised over $270,000.

Over the years, Lofree’s developed its brand reputation for designing wonderfully retropunk tech peripherals. Whether it’s the Touch mouse with PBT buttons, the Wavy Chips mouse that looks like Italian automotive design from the golden ages, or even its Foundation and Block wireless keyboards that reinvent classic designs from decades ago to give them a proper modern revival, the company’s always pushed the boundaries of visual aesthetics, striking a fine balance between classic and contemporary. It’s no wonder that they have, as a result, developed a viciously loyal fan base of design enthusiasts and tech nerds who coalesce around the company’s vision for making great-looking tech that performs remarkably too.

The EDGE is unlike anything Lofree’s ever made before, given that its design brief is distinctly different from the company’s previous approaches to industrial design. Lofree’s thinnest mechanical keyboard yet, the EDGE boasts an ultra-low profile, with a design that’s equal parts utilitarian and aesthetic. Every material is chosen carefully, and every design detail has meticulous thought behind it, resulting in a keyboard that’s just 485 grams (1.06 pounds) light and just 15mm at its thickest point – making it both thinner and lighter than the Corsair K100 Air, which previously held the title of being the thinnest mechanical keyboard. At its thinnest point, it’s a staggering 5.4mm, making it just marginally thicker than Apple’s newest M4 iPad Pro.

The title of the thinnest mechanical keyboard doesn’t come without some intense design and engineering, backed by solid R&D. Lofree basically designed the entire keyboard from the ground up, removing non-essential components, choosing materials like magnesium and carbon fiber for their strength and low-weight, and even using custom switches. The EDGE’s construction removes components like the positioning plate, silicone pad, and IPXE foam that you’d find in most keyboards, instead opting for a unique PCB gasket structure that holds the keyboard’s internals in place. The base of the keyboard is made from machined magnesium alloy, which then gets capped off with a 3K twill weave carbon fiber upper plate that not only gives the keyboard a solid upper surface but also gives it the distinct carbon fiber aesthetic that people know and love.

The keys themselves have a unique redesigned profile that’s a combination of thin yet ergonomic, and come made from grease-resistant PBT polymer. They come with a concave top, allowing for error-free typing, and have a specially formulated Kailh POM Switch 2.0 that’s just 9.8mm thick (your average mechanical keyboard switches are 18.5mm) – and even though it’s just half the size of a mechanical switch, it still boasts a healthy amount of travel so you feel like you’re using a mechanical keyboard and not one of those uncomfortable keyboards you’d find on slim laptops. The EDGE’s wedge design does, however, reinforce a sense of slimness, which means you can even carry your wireless keyboard with you in a laptop bag.

The EDGE works in both wired and wireless formats, and is compatible with Windows as well as Mac devices. In wired mode, the keyboard operates at a staggering 100Hz polling rate, practically making latency a thing of the past for gamers. The wireless mode helps keep desks clean, and reduces cable clutter, suitable for all other professions. The EDGE also comes with Lofree’s Configurator software, which lets you change the RGB backlight, remap keys, and set macros/shortcuts (the Configurator is only available for Windows, with a Mac version rolling out at the end of this year). A built-in 2000mAh battery offers 10 hours of wireless use with the backlight on, and a staggering 130 hours if you switch the backlight off. A USB-C port charges the keyboard in just under 3 hours.

Lofree’s products don’t come without a design twist. While their previous keyboards and mice boasted quirky retropunk aesthetics that gave a distinct flair to your workplace, the EDGE comes with its own carbon fiber vertical stand that holds either the keyboard or your laptop when not in use. Each stand comes cleverly machined from the blank rectangle that gets cut out of the center of the EDGE’s carbon fiber upper plate, helping reduce waste and repurpose the material to create something functional. Each EDGE comes with the stand flat-packed, which can easily be assembled in under a minute, giving you a convenient place to dock your device when you’re done with it, so your table remains clean and clutter-free. The $129 EDGE also ships with a connecting cable, extra keycaps, and a keyboard sleeve that’s only available to people who back the keyboard on Kickstarter. The world’s slimmest mechanical keyboard ships globally starting July 2024.

Click Here to Buy Now: $129 $249 (48% off) Hurry, only limited units at a discounted price. Raised over $270,000.

The post Lofree EDGE – The World’s Thinnest Mechanical Keyboard is just 16mm, less than two iPhones thick first appeared on Yanko Design.