DaVinci Resolve’s latest Micro Control Panel turns your Apple iPad Pro into a full-fledged studio

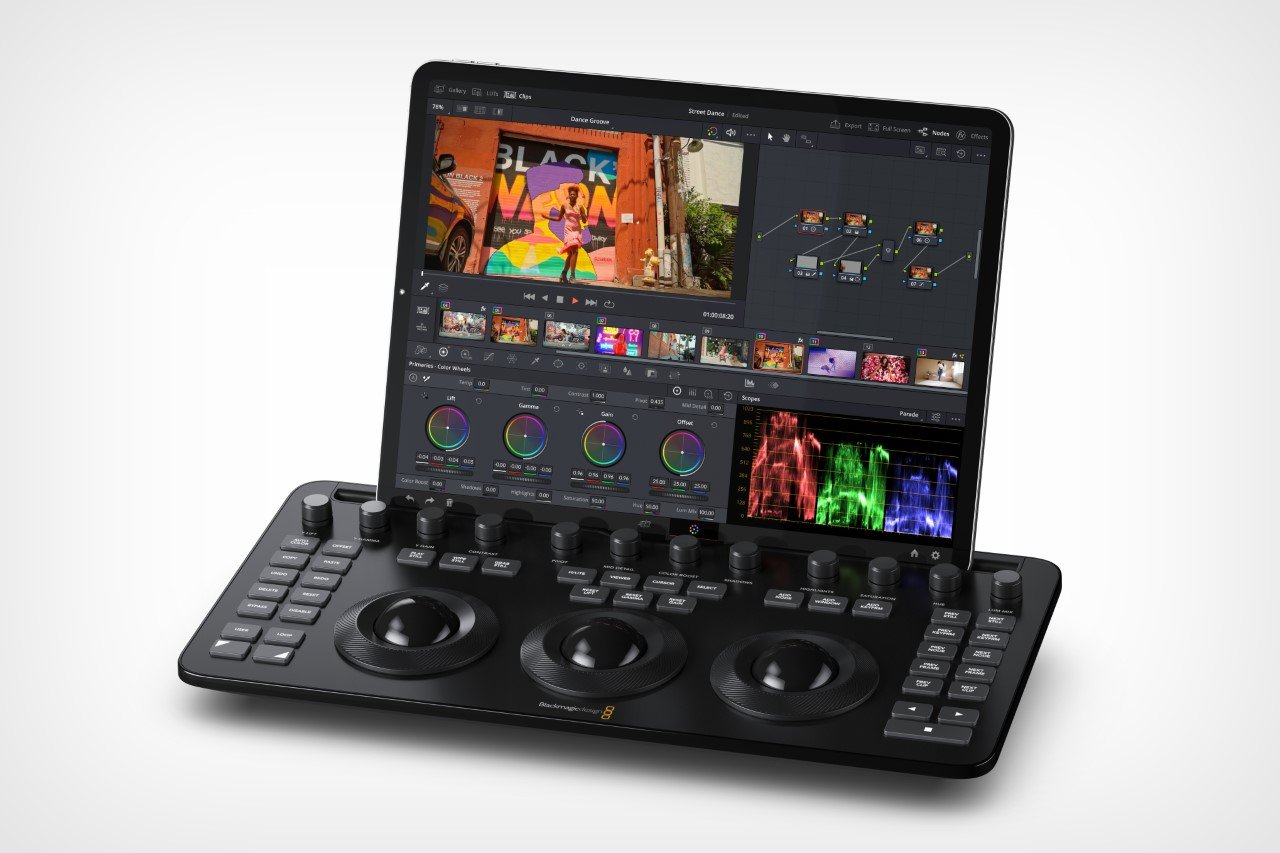
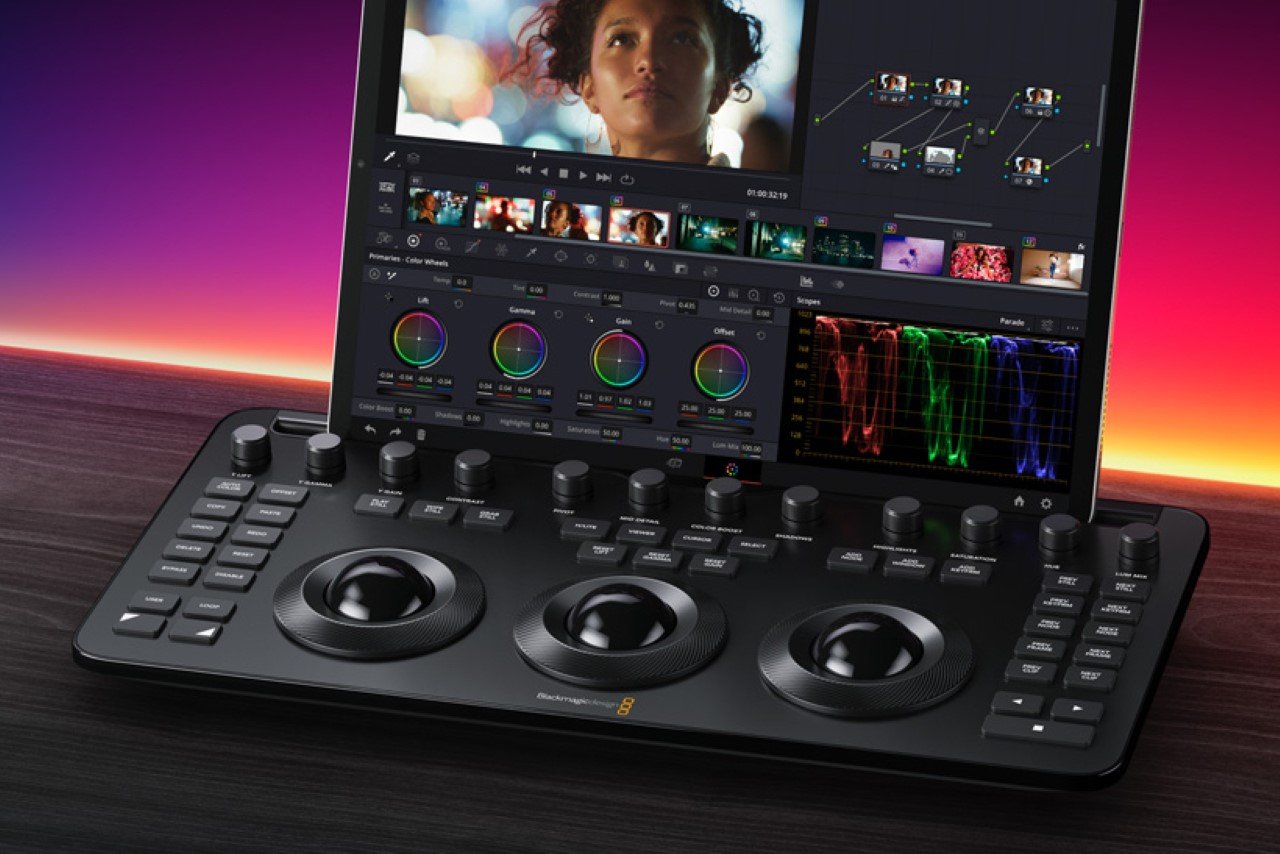
Just in time for Apple’s May 7th event, Blackmagic announced the Micro Control Panel, a tiny, keyboard-sized controller that takes your iPad color grading to a whole new level. Dock your latest iPad Pro in the Micro Control Panel, fire up the DaVinci Resolve app, and this tiny rig rivals most color-grading setups. Designed for professional as well as novice videographers and unveiled at NAB 2024 this year, the new portable control panel features a mounting slot for an Apple iPad Pro, an internal battery, supports both Bluetooth and USB-C connections, and boasts an affordable $495 price tag.

Designer: Blackmagic

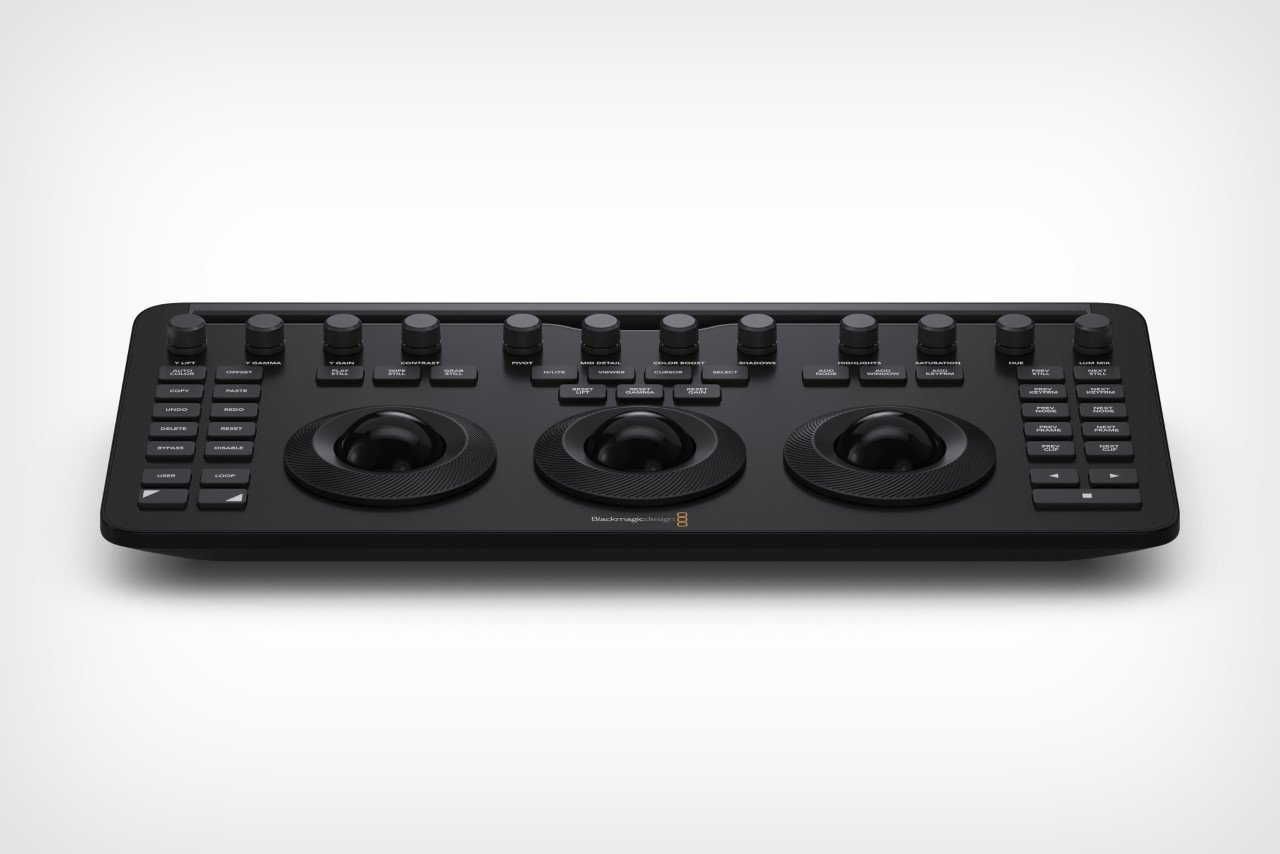
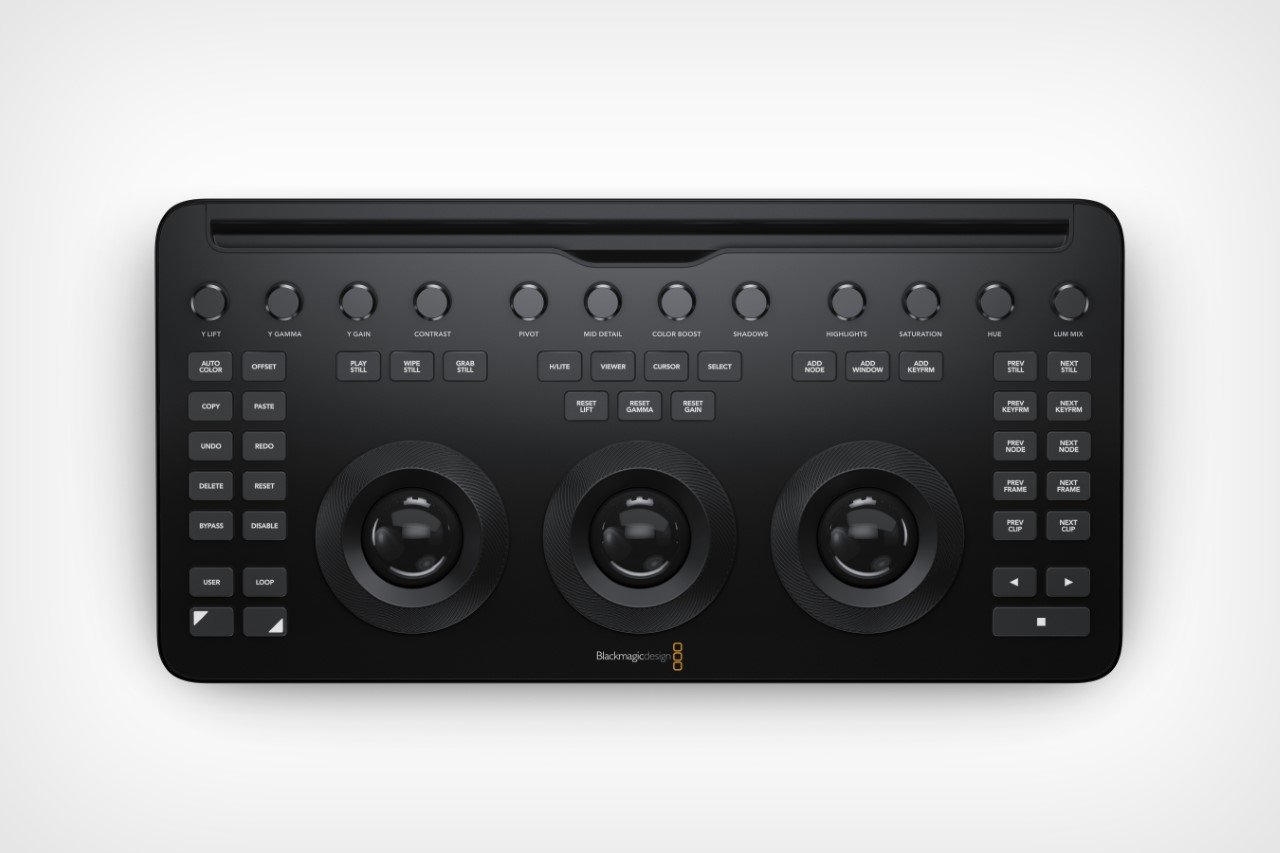
Standing out for its portability, the DaVinci Resolve Micro Color Panel is roughly the size of a keyboard. Don’t be fooled by its size, though. This panel packs a punch with high-quality trackballs and machined knobs for precise control over color correction. Whether you’re adjusting shadows, highlights, or saturation, the tactile feedback provided by these controls allows for nuanced fine-tuning.

Beyond color correction, the panel offers a range of transport and grading controls conveniently positioned around the edges. With these buttons at your fingertips, you can navigate your project timeline, set stills, and execute other commands with ease, significantly speeding up your workflow. Notably, some of these controls were previously exclusive to the larger DaVinci Resolve Mini and Advanced panels.

For existing DaVinci Resolve users, the Micro Color Panel offers a familiar feel. The trackballs boast a similar professional design, and the shift keys mimic the layout of higher-end panels. This ensures a smooth transition for experienced colorists while offering a user-friendly introduction for beginners.

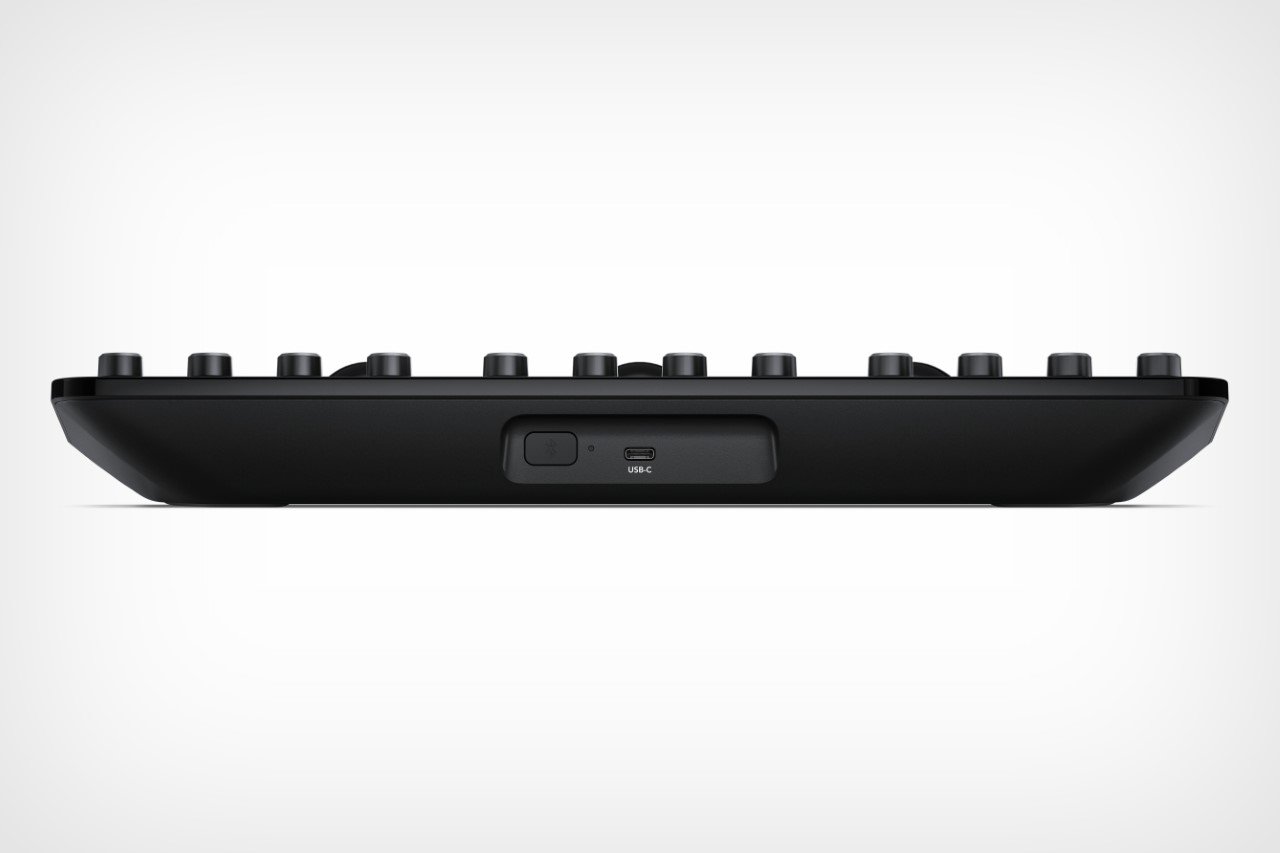
An exciting feature for creators on the go is the integrated battery and Bluetooth connectivity. Ditch the cables and achieve wireless control over your color grading suite. This makes the Micro Color Panel ideal for location shoots or editing suites with limited space. But don’t worry, traditionalists can still connect via USB-C if desired.

The biggest perk might be the price tag. At $495, the DaVinci Resolve Micro Color Panel is significantly more affordable than its larger counterparts. This opens the door for a wider range of editors and colorists to experience the power of dedicated control panels and take their creative output to the next level.

The post DaVinci Resolve’s latest Micro Control Panel turns your Apple iPad Pro into a full-fledged studio first appeared on Yanko Design.

The rebuilt Sonos app focuses on getting you to your tunes faster

If you use Sonos speakers, chances are you’ve used their app and encountered at least a little frustration at some point. I don’t think it’s a bad app when you consider the many functions it needs to juggle: finding and playing music from dozens of services, managing multiple connected speakers, running people through setup and troubleshooting and so on. But at the very least, it’s fair to suggest that it’s a little long in the tooth. Sonos knows this, too, and is announcing a totally new app for Android and iOS that was written from the ground up. It’ll be available on May 7.

I spoke to Sonos VP of user experience and user research Neil Griffiths about the redesign, and he said that it came as a result of talking to hundreds of customers about their listening habits and the way they want to use the app. From those conversations came two principles the company followed for the new app. One was to make it easier for people to play back whatever audio content they have, whether it’s streaming music, podcasts, radio, audiobooks, devices plugged into Sonos speakers like TVs or turntables and more. The second is making the app into a hub that’s better-suited to getting to exactly what you want to hear.

The end result is a much simpler app — the old one had the usual five tabs along the bottom, three of which could be used to find music. Now, there’s a single, customizable home screen with a persistent search bar and rows of content. By default, you’ll see a “recently played” section at the top that pulls things in from any service you use; below that you’ll see a carousel of the different services you have hooked up to Sonos. There’s also an area that controls different inputs, like line-in to speakers that support it or TVs plugged into soundbars. That way, you can tap those to switch between streaming music and playing back the connected device.

Sonos 2024 app redesign
Sonos

There’s still a “now playing” bar at the bottom of the app that you can tap to get the full playback controls and volume adjustments, but if you swipe up from the bottom of the screen you’ll instead get a view of your whole Sonos system. This shows all your speakers and what’s playing where; you can adjust volume for each from here or group speakers together.

Easily the best thing about this new app is the customizable home screen, though. Not only can you change the order of things that appear there, you can also pin content directly from within different apps so you can get to it immediately. For example, Spotify, Apple Music and basically every other music service typically have a “new releases for you” section that shows recent albums based on your listening habits. If you always want to see that, you can pin it straight to your home screen and it’ll dynamically update when Spotify has new picks. And you can re-order these carousels so your most-used one is right at the top of the screen.

The old Sonos home screen had a recently played section at the top and let you pin songs, albums, playlists and stations from across your services, so it had some degree of flexibility. But being able to add full, dynamically updating sections from the apps you use feels like a major step forward. I can easily see pinning a half-dozen lists from different apps to my home screen, which will make the process of starting music from the Sonos app itself a lot more fluid. I still mostly use AirPlay or Spotify Connect to broadcast to my speakers, but I think it’ll be worth setting up my home in this new app and see if I use it more. Pulling together content from the too many streaming apps I use in one place sounds like a nice improvement over jumping in and out of apps depending on what I want to hear.

Sonos also made it easier to jump right into the service of your choice. All of the streaming apps that you’re logged in to will appear in a carousel as well, with your default / favorite option always at the beginning of the list. The same goes for search — when you open the search bar and type something in, you’ll get the results from your favorite service first.

Sonos desktop web app
Sonos

The company is also replacing its existing desktop controller app for Mac and Windows with a web app that'll offer the same functionality and design as you get on your phone. That's probably a good call, as the Sonos controller feels pretty out of step with the company's current design and feature set, though I'm sure some will bristle at it being a web app. That should also start rolling out on May 7, and the existing Mac and Windows app will eventually be shut down.

For a lot of people, I wager the Sonos app will still be a “set it and forget it” kind of thing, used to get speakers set up and then tucked away in case something goes wrong. If you only have one or two speakers and do nearly all your listening through Spotify, for example, it’ll probably be preferable to just use the Spotify app itself still. But people who have a more involved speaker setup and use multiple sources for audio should find a lot to like here when the app arrives in a few weeks.

This article originally appeared on Engadget at https://www.engadget.com/the-rebuilt-sonos-app-focuses-on-getting-you-to-your-tunes-faster-130022601.html?src=rss

Adobe Photoshop’s latest beta makes AI-generated images from simple text prompts

Nearly a year after adding generative AI-powered editing capabilities to Photoshop, Adobe is souping up its flagship product with even more AI. On Tuesday, the company announced that Photoshop is getting the ability to generate images with simple text prompts directly within the app. There are also new features to let the AI draw inspiration from reference images to create new ones and generate backgrounds more easily. The tools will make using Photoshop easier for both professionals as well as casual enthusiasts who may have found the app’s learning curve to be steep, Adobe thinks.

“A big, blank canvas can sometimes be the biggest barrier,” Erin Boyce, Photoshop’s senior marketing director, told Engadget in an interview. “This really speeds up time to creation. The idea of getting something from your mind to the canvas has never been easier.” The new feature is simply called “Generate Image” and will be available as an option in Photoshop right alongside the traditional option that lets you import images into the app.

An existing AI-powered feature called Generative Fill that previously let you add, extend or remove specific parts of an image has been upgraded too. It now allows users to add AI-generated images to an existing image that blend in seamlessly with the original. In a demo shown to Engadget, an Adobe executive was able to circle a picture of an empty salad dish, for instance, and ask Photoshop to fill it with a picture of AI-generated tomatoes. She was also able to generate variations of the tomatoes and choose one of them to be part of the final image. In another example, the executive replaced an acoustic guitar held by an AI-generated bear with multiple versions of electric guitars just by using text prompts, and without resorting to Photoshop’s complex tools or brushes.

Adobe's new AI feature in Photoshop let users easy replace parts of an image with a simple text prompt.
Adobe

These updates are powered by Firefly Image 3, the latest version of Adobe’s family of generative AI models that the company also unveiled today. Adobe said Firefly 3 produces images of a higher quality than previous models, provides more variations, and understands your prompts better. The company claims that more than 7 billion images have been generated so far using Firefly.

Adobe is far from the only company stuffing generative AI features into its products. Over the last year, companies, big and small, have revamped up their products and services with AI. Both Google and Microsoft, for instance, have upgraded their cash cows, Search and Office respectively, with AI features. More recently, Meta has started putting its own AI chatbot into Facebook, Messenger, WhatsApp, and Instagram. But while it’s still unclear how these bets will pan out, Adobe’s updates to Photoshop seem more materially useful for creators. The company said Photoshop’s new AI features had driven a 30 percent increase in Photoshop subscriptions.

Meanwhile, generative AI has been in the crosshairs of artists, authors, and other creative professionals, who say that the foundational models that power the tech were trained on copyrighted media without consent or compensation. Generative AI companies are currently battling lawsuits from dozens of artists and authors. Adobe says that Firefly was trained on licensed media from Adobe Stock, since it was designed to create content for commercial use, unlike competitors like Midjourney whose models are trained in part by illegally scraping images off the internet. But a recent report from Bloomberg showed that Firefly, too, was trained, in part, on AI-generated images from the same rivals including Midjourney (an Adobe spokesperson told Bloomberg that less than 5 percent of images in its training data came from other AI rivals).

To address concerns about the use of generative AI to create disinformation, Adobe said that all images created in Photoshop using generative AI tools will automatically include tamper-proof “Content Credentials”, which act like digital “nutrition labels” indicating that an image was generated with AI, in the file’s metadata. However, it's still not a perfect defense against image misuse, with several ways to sidestep metadata and watermarks

The new features will be available in beta in Photoshop starting today and will roll out to everyone later this year. Meanwhile, you can play with Firefly 3 on Adobe’s website for free. 

This article originally appeared on Engadget at https://www.engadget.com/adobe-photoshops-latest-beta-makes-ai-generated-images-from-simple-text-prompts-090056096.html?src=rss

Meta opens Quest OS to third parties, including ASUS and Lenovo

In a huge move for the mixed reality industry, Meta announced today that it's opening the Quest's operating system to third-party companies, allowing them to build headsets of their own. Think of it like moving the Quest's ecosystem from an Apple model, where one company builds both the hardware and software, to more of a hardware free-for-all like Android. The Quest OS is being rebranded to "Meta Horizon OS," and at this point it seems to have found two early adopters. ASUS's Republic of Gamers (ROG) brand is working on a new "performance gaming" headsets, while Lenovo is working on devices for "productivity, learning and entertainment." (Don't forget, Lenovo also built the poorly-received Oculus Rift S.)

As part of the news, Meta says it's also working on a limited-edition Xbox "inspired" Quest headset. (Microsoft and Meta also worked together recently to bring Xbox cloud gaming to the Quest.) Meta is also calling on Google to bring over the Google Play 2D app store to Meta Horizon OS. And, in an effort to bring more content to the Horizon ecosystem, software developed through the Quest App Lab will be featured in the Horizon Store. The company is also developing a new spatial framework to let mobile developers created mixed reality apps.

“Mixed reality is transforming how people interface with computers by integrating digital experiences and physical spaces to reach new levels of productivity, learning and play," Lenovo Chair & CEO, Yuanqing Yang, said in a statement. "Building from our past successful partnership, Lenovo is bringing together Meta Horizon OS with our leadership and innovation in personal computing to accelerate adoption of new user scenarios in mixed reality like virtual screens, remote presence, content consumption, and immersive training.”

This article originally appeared on Engadget at https://www.engadget.com/meta-opens-quest-os-to-third-parties-including-asus-and-lenovo-163127396.html?src=rss

Microsoft’s AI tool can turn photos into realistic videos of people talking and singing

Microsoft Research Asia has unveiled a new experimental AI tool called VASA-1 that can take a still image of a person — or the drawing of one — and an existing audio file to create a lifelike talking face out of them in real time. It has the ability to generate facial expressions and head motions for an existing still image and the appropriate lip movements to match a speech or a song. The researchers uploaded a ton of examples on the project page, and the results look good enough that they could fool people into thinking that they're real. 

While the lip and head motions in the examples could still look a bit robotic and out of sync upon closer inspection, it's still clear that the technology could be misused to easily and quickly create deepfake videos of real people. The researchers themselves are aware of that potential and have decided not to release "an online demo, API, product, additional implementation details, or any related offerings" until they're sure that their technology "will be used responsibly and in accordance with proper regulations." They didn't, however, say whether they're planning to implement certain safeguards to prevent bad actors from using them for nefarious purposes, such as to create deepfake porn or misinformation campaigns. 

The researchers believe their technology has a ton of benefits despite its potential for misuse. They said it can be used to enhance educational equity, as well as to improve accessibility for those with communication challenges, perhaps by giving them access to an avatar that can communicate for them. It can also provide companionship and therapeutic support for those who need it, they said, insinuating the VASA-1 could be used in programs that offer access to AI characters people can talk to. 

According to the paper published with the announcement, VASA-1 was trained on the VoxCeleb2 Dataset, which contains "over 1 million utterances for 6,112 celebrities" that were extracted from YouTube videos. Even though the tool was trained on real faces, it also works on artistic photos like the Mona Lisa, which the researchers amusingly combined with an audio file of Anne Hathaway's viral rendition of Lil Wayne's Paparazzi. It's so delightful, it's worth a watch, even if you're doubting what good a technology like this can do. 

This article originally appeared on Engadget at https://www.engadget.com/microsofts-ai-tool-can-turn-photos-into-realistic-videos-of-people-talking-and-singing-070052240.html?src=rss

7 Rendering Tricks to make your KeyShot Renders look Completely Photorealistic

Render by Ali Rouzbeh

These small tips will take your renders from average to awesome.

If you’re on this website reading this article, there’s a fair chance that you’re an Industrial Designer who 3D models and renders for a living, and if that’s true there’s an even fairer chance that you’ve heard of KeyShot. Touted by 88% of designers as the best software for realistic renders, KeyShot is known for two things, being intuitive and easy to use, and being great at creating good renders with low effort. However, just like how a great camera doesn’t make you a great photographer, a great software doesn’t automatically make your renders incredible. If you’ve used KeyShot for work, personal projects, or the occasional design competition, here are a few lesser-known tips that should completely revolutionize your rendering game. Use these tricks to upgrade your skill set, bookmark the article for later, and give KeyShot 2024 a download so you can put your new rendering skills to the test!

Click Here to Get Free KeyShot Pro + Keyshot Web

1. Perfection lies in imperfection

Render by Jay Bhosale

That might sound like a paradox, but look around you – nothing is perfect. Your phone has fingerprint marks on it, your table’s got a few scratches, the glass you’re drinking water from isn’t 100% geometrically perfect – its surface has marginal imperfections that cause light to reflect/refract in unique ways. If you want to look real, you have to embrace reality… and in reality, nothing’s perfect. Sure, your product render against a white background can be as perfect as possible, but if you’re looking for a photorealistic scenario render, obsess over the imperfections. Add dust and fingerprints to flat glossy surfaces, use bump maps pretty much anywhere you can, create scratches as a layer/label in your material, remove 100% sharp edges (everything is marginally rounded off), and most importantly, push objects out of alignment in your scene. No real-world scenario has stuff aligned perfectly. These settings alone should take you halfway to photorealism, because humans perceive imperfections as a part of reality.

2. Bokehs are everywhere

Render by Mads Hindhede Svanegaard

Your eyes are telescopic. They can’t focus on everything at the same time – you look at one thing and everything else blurs out. The blur is the key here, and it’s why portrait-mode photos on smartphones look great too. Seldom do you see photos of ANYTHING where every single item is in focus, and similarly, your renders need to ‘focus’ on that too. Go to the Camera tab on the top right and scroll down to the part that says Depth of Field. Activate it, adjust your focus distance, use the target button to click on the object you want to focus on, and set your F-stop to an appropriate number to ensure everything else is properly blurred. It’s easy to overdo the blurring, so once you find the right F-stop, raise it a little higher to err on the side of caution (don’t over-blur stuff, it’ll look fake). Remember, blurring takes a significant chunk of your rendering time, so if you DO use this tip, double or triple your rendering time per image. The results will come out fantastic.

3. Adjust your Image Settings
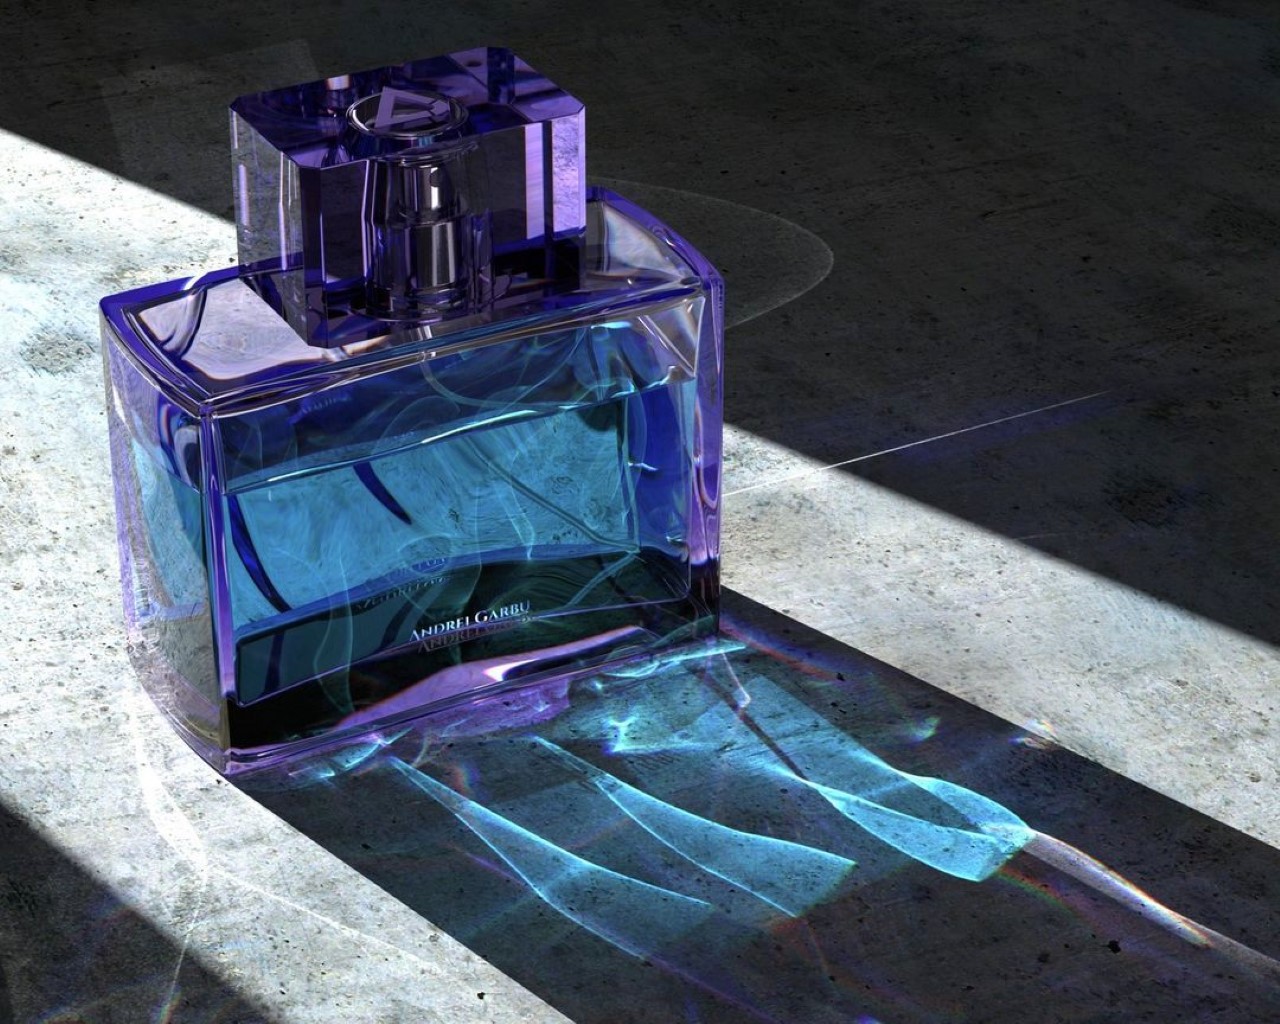
Render by Andrei Garbu

If you’ve ever used a camera, chances are you didn’t just point at a photo and hit the shutter button. You probably adjusted the exposure, aperture, ISO, and maybe played around with the white balance too. Think of the camera in KeyShot as a camera in real life – all it really does is capture the angle and focus… but there are still settings you need to tweak. Here, the Image Settings are your friend. Click on the Image tab on the top right corner and switch from Basic to Photographic. Now you can play with the exposure, contrast, white balance, highlights, shadows, midtones, and other parameters. You can even increase or decrease your image’s saturation to get you that perfect balance of colors, darkness, and light. Select ‘Linear’ in the Response Curve setting, enable the Curve editing feature below, and tinker away! It’s the secret sauce your renders need!

4. Beginners render, legends ‘Denoise’

Render by Sam Gwilt

Sometimes your renders just look grainy because you didn’t give them enough time to render out perfectly. Makes sense, you’re probably on a strict deadline and you don’t have 10-20 minutes to spare per render. Luckily, KeyShot’s Denoise feature in the Image Settings works like magic. They just blur out the grains in your renders, letting you ‘cheat’ your way through a quick render. Enable Denoise and watch as all the grains disappear miraculously. Set your Denoise level to around 0.6 for a balanced effect – setting it too high will give you weirdly blurry/smudgy renders, and setting it too low will give you grainy images. The Denoise feature works VERY well when you’re using the Depth of Field setting too, allowing you to easily cut down your rendering time without cutting down on quality.

5. Caustics are a headache, but they’re worth it

Render by Tommy Cheong

If there’s any transparent object in your render, chances are that it won’t just absorb or block light, it’ll bend light too. If you’ve ever looked at a reflection of a glass of water on a table, or those bright lines at the bottom of a swimming pool, those are caustics. They’re caused by light being manipulated by transparent/translucent objects. Caustics in KeyShot remain disabled by default, but that’s only because they’re kind of an absolute headache. They require a truckload of CPU/GPU power, take a LOT of time to perfect, and even more time to render. But if you nail your caustics, you’re guaranteed to get a few ‘wow’s from people who see your renders. The Caustics setting can be found in the Lighting tab in the top right corner. Enable it and also enable Global Illumination. Increase your ray bounces as well as your global illumination bounces, and if you’re using glass or plastic as a material, go to the material settings and increase the sample size. The problem here is that there will be a difference between what KeyShot shows you in the preview window, and what it actually renders, so the only way to really tell if you’ve done a good job is by rendering images, reviewing them, and then tweaking the settings. Rendering caustics also takes a LOT of time, and here Denoise won’t help you. You just need to trust the process and let KeyShot do its job simulating the bouncing of light to create those caustic refractions. Like I told you, it’s a bit of a headache, but the rewards pay off well.

6. If you’re thinking fabrics, think RealCloth™

Render by Hossein Alfideh Fard

Perhaps one of KeyShot’s most underrated materials, RealCloth adds unbelievably photorealistic cloth effects to any fabric in your scene. Whether it’s a tablecloth, the upholstery of a sofa, or even the strap of a camera, RealCloth’s one job is to mimic the woven effect of any kind of cloth. It adds depth, weave-patterns, and even lets you bake in imperfections like flyaway fibers and threads. If you’re simulating photorealism, chances are one of the objects in your scene has a fabric texture (it could be something as small as a cloth tag on a product). If it does, tap into the power of RealCloth to get that absolutely perfect cloth effect. Don’t rely on fabric bump maps online, trust me they won’t give you the precise control or sheer jaw-dropping dynamism that RealCloth will.

7. Shadows are just as important as lights

Render by Will Gibbons

When you’re setting your scene, don’t focus all your energy on getting the right highlights. Focus also on getting great shadows. This means ditching the HDRI lighting settings and actually adding physical lights to your scene. Photorealism requires work, and those drag-and-drop environments won’t help you achieve it. Sure, you can use the environments to create realistic reflections, like a sky reflecting off a windshield of a car… but there’s NO way that environment will create the dramatic shadows you need. For those, you’ll require area lights, point lights, and/or spotlights. You’ll have to add these lights to your project by assigning them as materials to random spheres and planes within your scene. Unlike the HDRI environments, these lights will create actual shadows that are crisp at some edges, blurry at others, and more importantly, shadows that overlap, warp, and interact with each other. Take your smartphone flash and hold it against your hand. Move the flash closer and see the shadow grow bigger, move it farther and see the shadow get smaller – the shadow’s shape and behavior are determined by physical lights in your scene, not by the environment lights. So add physical lights to your scene and keep those shadows in mind because while the eyes don’t ever focus on shadows, they do register them. A render without accurate shadows will just look… off.

Click Here to Get Free KeyShot Pro + Keyshot Web

The post 7 Rendering Tricks to make your KeyShot Renders look Completely Photorealistic first appeared on Yanko Design.
Apple says it was ordered to remove WhatsApp and Threads from China App Store

Apple users in China won't be able to find and download WhatsApp and Threads from the App Store anymore, according to The Wall Street Journal and The New York Times. The company said it pulled the apps from the store to comply with orders it received from Cyberspace Administration, China's internet regulator, "based on [its] national security concerns." It explained to the publications that it's "obligated to follow the laws in the countries where [it operates], even when [it disagrees]."

The Great Firewall of China blocks a lot of non-domestic apps and technologies in the country, prompting locals to use VPN if they want to access any of them. Meta's Facebook and Instagram are two of those applications, but WhatsApp and Threads have been available for download until now. The Chinese regulator's order comes shortly before the Senate is set to vote on a bill that could lead to a TikTok ban in the US. Cyberspace Administration's reasoning — that the apps are a national security concern — even echoes American lawmakers' argument for blocking TikTok in the country. 

In the current version of the bill, ByteDance will have a year to divest TikTok, or else the short form video-sharing platform will be banned from app stores. The House is expected to pass the bill, which is part of a package that also includes aid to Ukraine and Israel. President Joe Biden previously said that he supports the package and will immediately sign the bills into law. 

This article originally appeared on Engadget at https://www.engadget.com/apple-says-it-was-ordered-it-to-remove-whatsapp-and-threads-from-china-app-store-061441223.html?src=rss

Quicken Simplifi subscriptions are half off through April 21

Subscriptions to the budgeting app Quicken Simplifi are half off through April 21. The price has been brought down to just $2 per month, which is billed annually at $24. The deal also extends to Quicken Classic, which adds more features for investments and tracking taxes. This tier now costs $4 per month, instead of $8 per month. It’s also billed annually.

Quicken Simplifi is pretty much the budgeting app to beat all budgeting apps. There’s a reason, after all, that it topped our list of the best budgeting apps and our collection of the best apps to replace Mint. We’ve consistently praised the user-friendly interface that makes it easy to get started and keep an eye on things. Users have instantaneous access to various metrics, like top-line balances, net worth, recent spending, upcoming recurring payments and more.

We also loved how simple (pun intended) it is to set up customized savings goals and the like. The UI is clean, yet offers playful visualizations to keep things interesting. It integrates with most financial institutions, including Fidelity. Users can also invite a spouse or a financial manager to co-manage the account.

There’s no integration with Zillow, so people can’t track fluctuations in home value, which is something that competing apps like Monarch Money and Copilot Money offer. It requires manual entry of real estate information, just like any other asset. We also experienced some small errors during use, in which the app miscategorized some expenses, though this was in line with other products we tested. There’s no option for a free trial, so $2 per month is about as close as it gets. Just remember to cancel before the year is up if things don’t work out.

Follow @EngadgetDeals on Twitter and subscribe to the Engadget Deals newsletter for the latest tech deals and buying advice.

This article originally appeared on Engadget at https://www.engadget.com/quicken-simplifi-subscriptions-are-half-off-through-april-21-190006927.html?src=rss