Last year Adafruit showed us how to make the PiGRRL, a Game Boy-inspired handheld NES and MAME emulator. Now the electronics shop presents the Pocket PiGRRL, a multi-console emulator with a case that’s inspired by the Game Boy Pocket.
Measuring about 5″ tall and 3″ wide, the Pocket PiGRRL is about half the size of the PiGRRL and is actually a bit smaller than the Game Boy Pocket. It has a 2.4″ 320×240 screen, a 2000mAh battery and is powered by the Raspberry Pi A+. Adafruit loaded the Pocket PiGRRL with RetroPie, allowing it to emulate a wide range of gaming systems, including of course the Game Boy.
Head to Adafruit for the full guide and links to the materials and 3D files so you can build your own Pocket PiGRRL.
We’ve seen a laptop and a tablet that are both powered by the Raspberry Pi. Tyler Spadgenske completes the gadget trinity with the Tyfone, a 2G cellphone based on the versatile computer.
The Tyfone has a 3.5″ TFT touchscreen, an AdaFruit FONA GSM module, a 5MP Raspberry Pi camera and a 3D printed case. It can make and receive calls and SMS messages, and take pictures. It’s operating system appears to be based on Linux, with a custom user interface that Tyler made in Python. Prepare to be underwhelmed!
So what if it’s clunky, slow and can’t access Facebook? It’s a cellphone that you can put together on your own! This is some MacGyver steeze. Head to Tyler’s Instructables page to find out how to make a Tyfone.
One of the PlayStation 4’s worst flaws is the short battery life of its controller. The DualShock 4’s always on LED exacerbates the issue, but the fact is it has a low-capacity battery. You can buy Nyko’s external battery to alleviate the issue, or you can go the DIY route and follow Redditor AtariXL’s guide.
AtariXL replaced the DualShock 4’s stock 1000mAh battery with a compatible 2000mAh battery from Adafruit. You can check out his build log in the Imgur gallery below. It’s a straightforward process, but AtariXL does have an important reminder: “When switching the battery leads (pic 6-8) DO NOT ALLOW THE WIRES TO TOUCH!”
The guide starts with the controller already opened; check out iFixit’s battery replacement guide if you don’t know how to do that.
AtariXL says the controller’s battery meter won’t accurately reflect the new battery’s capacity, but in his tests it lasts up to 13.5 hours per charge, which as expected is twice as long as what he was getting on the stock battery.
Flexible RGB LED strips usually only have a single row of LEDs. But Adafruit’s new Flexible NeoPixel RGB LED Matrix has 256 LEDs arranged in an 8×32 matrix. It has a thick and flexible PCB backing, so you can wrap it over bent or curved surfaces.
Despite the demo video below, the component isn’t meant to be bent repeatedly or at extreme angles. You can make a curved iBling with it though.
Bend your browser to Adafruit’s shop and order the Flexible 8×32 NeoPixel RGB LED Matrix for $140 (USD).
Not all wearables have to be the next big thing. Here’s a high-tech piece of jewelry that you can make with the help of Adafruit’s Pro Trinket microcontroller and a 3D printer. It’s a pendant with a 1.44″ LCD display that’s playing a looping animation. In this case it’s the clouds from Super Mario Bros. endlessly scrolling by, but you can replace that with your own graphics.
As you can see the pendant’s 3D printed case was inspired by the Game Boy, but again you’re free to come up with your own design.
Here’s a brief summary of the project:
Head to Adafruit for the full walkthrough and parts list.
Want to make a Shadowrun, Deus Ex or any cyberpunk or sci-fi costume? Adaruit contributor Tully Jagoe has a great accessory that you might want to replicate. Tully made a head-mounted array of small LEDs that make his eyes – or whatever part of your face you put them over – appear to be made of light.
The project is fairly simple, though you need to be good at soldering to pull it off. It involves attaching SMD LEDs and a battery module on a length of enameled copper wire.
You can use any LED color(s), and place them anywhere you over your face. Just make sure that the wire fits over your head properly.
Because the LEDs project light away from your eyes, they shouldn’t obscure your vision too much.
Get the browser augment and head to Adafruit’s website for the full guide and parts list.
Adafruit’s been on a tear with its 3D printingprojects lately. Their newest creation is a 3D printed replica of the helmet worn by Daft Punk’s Guy-Manuel de Homem-Christo. It has strips of programmable LEDs inside that are visible through the visor. Don’t expect to see well while wearing it though.
Here’s a summary of what you’ll need to do to make the helmet:
Use your harder better faster browser and head to Adafruit for the full instructions.
Electronics shop Adafruit showed us how to turn the Raspberry Pi into a Game Boy emulator, complete with a Game Boy-like case. Now they’re using the affordable computer to make a device that looks and works like a classic Macintosh.
Aside from its instantly recognizable chassis, Adafruit’s Mini Mac Pi also runs System 7 aka Mac OS 7, thanks to a software emulator called Mini vMac. This enables it to run classic Mac apps, though it’s probably going to be a pain to work on its cute display. Another notable feature of the Mini Mac Pi is that its front and rear panels are secured by magnets, making it easy to assemble and repair.
Head to Adafruit to find out how you can build a Mini Mac Pi. If you just want the cute Mac body, you can get the 3D file from Adafruit’s Thingiverse page.
A few weeks ago we saw how you can use a Game Boy Pocket’s case and buttons to make a Raspberry Pi handheld console. If you don’t have a Game Boy Pocket but have access to a 3D printer, Adafruit has a viable alternative called PiGRRL. The electronics shop made a 3D model for a Game Boy-like case, and then used the hardware from an SNES controller to give the PiGRRL buttons.
Adafruit decided to use its CupCade software to run games on PiGRRL, allowing it to run MAME and NES games.
Head to Adafruit’s website for the link to the 3D files as well as the guide to making PiGRRL.
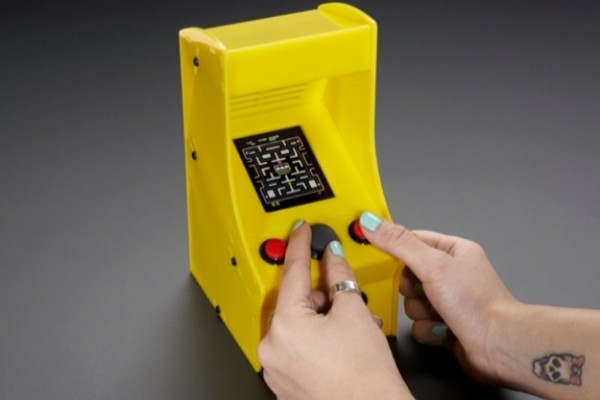
No matter how cool today’s games are, there’s always going to be someone crying over some games from the ’80s. Fortunately, today’s technology can be used for bringing back such games as Donkey Kong and Ms. Pacman in a unique form.
We’re quickly moving to 4K monitors and extremely fast video cards, and yet some people still sigh over some games that were created three decades ago. There’s no denying that the games from that era, despite appearing very pixelated by today’s standards, had something magic about that could keep kids and grown-ups in equal measure in front of their TV or computer. Cupcade is a Raspberry Pi-powered mini arcade that is capable of running a couple of games from back then, including Ms. Pacman and Donkey Kong.
Adafruit created a mini arcade that’s a bit larger than a keychain. In shape, it really resembles an arcade cabinet, but it actually is a miniature of that. Probably the best part about the Cupcade is that it’s a DIY kit, so whoever is buying it will have the joy of assembling it themselves.
Some games are meant to be played on a horizontal screen, while others look better on a vertical screen. Moreover, the joystick can either be placed in the middle or to the side. Fortunately, either one of these configurations can be made solely with the parts included in the kit.
Besides a Raspberry Pi, the Cupcade also packs a PiTFT 2.8? display, mini thumbstick, and mini arcade push buttons. All these miniature details make it the most adorable arcade cabinet in the world. The Cupcade also features a text-based MAME ROM selector screen capable of working in either H or V mode.
Shutting down the Raspberry Pi does not require a keyboard, in this case. Instead, users have to push the two front buttons for three seconds. Arcade gaming without the bleeps makes absolutely no sense, so the manufacturer included a mono speaker and audio amp. People need to keep in mind that the DIY kit for the Cupcade doesn’t include a Raspberry Pi Model B, so the users will have to spend some additional money on that. Even so, the concept is very appealing, especially to the ones who are still dreaming about games from three decades ago.